Перейти к основному содержанию

Lenovo ThinkPad T580 Cooling Fan Replacement

Выберете то, что вам нужно

  1. Lenovo ThinkPad T580 Cooling Fan Replacement, External Battery: шаг 1, изображение 1 из 3 Lenovo ThinkPad T580 Cooling Fan Replacement, External Battery: шаг 1, изображение 2 из 3 Lenovo ThinkPad T580 Cooling Fan Replacement, External Battery: шаг 1, изображение 3 из 3
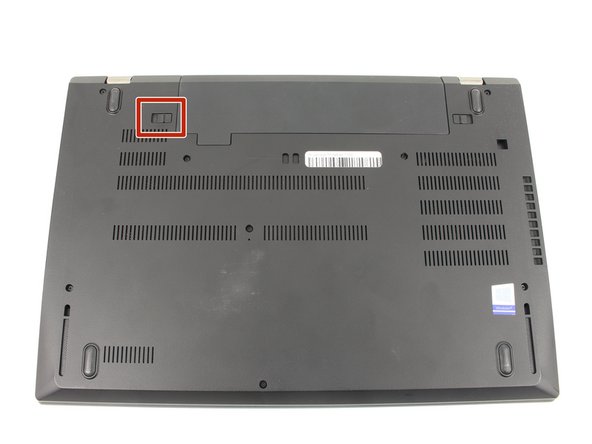
    • Slide the switch on the left side of the battery to the left.

  2. Lenovo ThinkPad T580 Cooling Fan Replacement: шаг 2, изображение 1 из 3 Lenovo ThinkPad T580 Cooling Fan Replacement: шаг 2, изображение 2 из 3 Lenovo ThinkPad T580 Cooling Fan Replacement: шаг 2, изображение 3 из 3
    • Slide the switch on the right side of the battery to the right while applying upward pressure on the battery.

  3. Lenovo ThinkPad T580 Cooling Fan Replacement: шаг 3, изображение 1 из 3 Lenovo ThinkPad T580 Cooling Fan Replacement: шаг 3, изображение 2 из 3 Lenovo ThinkPad T580 Cooling Fan Replacement: шаг 3, изображение 3 из 3
    • Pull the battery directly out of the socket

  4. Lenovo ThinkPad T580 Cooling Fan Replacement, Bottom Case: шаг 4, изображение 1 из 2 Lenovo ThinkPad T580 Cooling Fan Replacement, Bottom Case: шаг 4, изображение 2 из 2
    • Using a Phillips #00 screwdriver, unscrew the eight 3.3 mm captive screws on the bottom of the laptop.

    • The "captive" screws will not come out of the case.

  5. Lenovo ThinkPad T580 Cooling Fan Replacement: шаг 5, изображение 1 из 3 Lenovo ThinkPad T580 Cooling Fan Replacement: шаг 5, изображение 2 из 3 Lenovo ThinkPad T580 Cooling Fan Replacement: шаг 5, изображение 3 из 3
    • Run a Jimmy along the crease of the computer all the way around, twisting it periodically to disengage the clips.

  6. Lenovo ThinkPad T580 Cooling Fan Replacement: шаг 6, изображение 1 из 3 Lenovo ThinkPad T580 Cooling Fan Replacement: шаг 6, изображение 2 из 3 Lenovo ThinkPad T580 Cooling Fan Replacement: шаг 6, изображение 3 из 3
    • Once all the clips are released, remove the bottom cover.

    • You may need to jiggle the case slightly to release the clips around the external battery bay.

  7. Lenovo ThinkPad T580 Cooling Fan Replacement, Cooling Fan: шаг 7, изображение 1 из 2 Lenovo ThinkPad T580 Cooling Fan Replacement, Cooling Fan: шаг 7, изображение 2 из 2
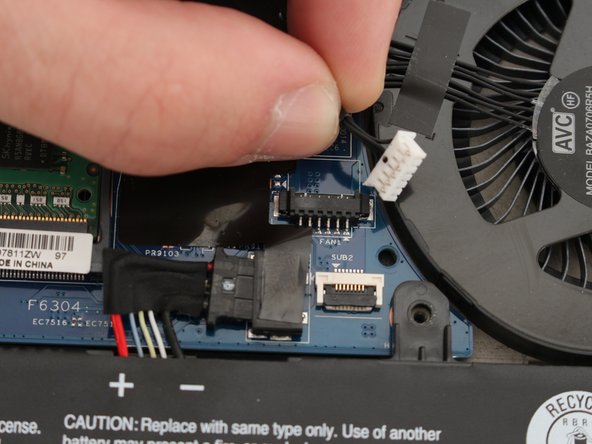
    • Unplug the cooling fan's cable from the the motherboard.

  8. Lenovo ThinkPad T580 Cooling Fan Replacement: шаг 8, изображение 1 из 3 Lenovo ThinkPad T580 Cooling Fan Replacement: шаг 8, изображение 2 из 3 Lenovo ThinkPad T580 Cooling Fan Replacement: шаг 8, изображение 3 из 3
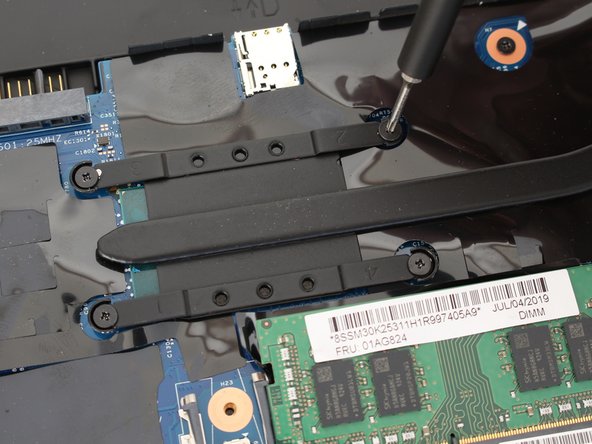
    • Using a Phillips #00 screwdriver, unscrew five 4.6 mm screws fastening the fan and cooling pipe.

    • The screws are set in the plastic and are not able to be removed from the fan parts.

  9. Lenovo ThinkPad T580 Cooling Fan Replacement: шаг 9, изображение 1 из 1
    • Remove the cooling fan directly upwards from the core.

    • Be sure to clean and replace any thermal paste on the heatsink and CPU before reassembling. You can use our How to Apply Thermal Paste guide if you need any help!

Заключение

To reassemble your device, follow these instructions in reverse order.
Ben Elkayam

Участник с: 01/23/20

954 Репутация

Автор 8 руководств

Команда

Cal Poly, Team S18-G6, White Winter 2020 Участник Cal Poly, Team S18-G6, White Winter 2020

CPSU-WHITE-W20S18G6

4 членов

Автор 24 руководств

0 Комментариев

Добавить комментарий

Просмотр статистики:

За последние 24часов: 1

За последние 7 дней: 10

За последние 30 дней: 47

За всё время: 2,323