Введение
Use this guide to replace the SSD stick in an SSD only, or Fusion Drive model of the Mac mini Late 2014.
Выберете то, что вам нужно
-
-
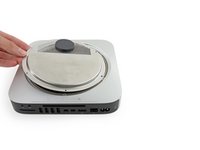
The bottom cover is clipped onto three screw posts.
-
Pry near, but not right on the screw posts.
-
-
-
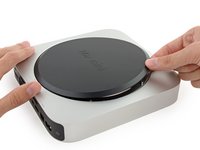
Use the plastic opening tool to pry the bottom cover up off of the Mac mini.
I used some wooden toothpicks instead of the opening tool. This worked flawless for me.
-
-
-
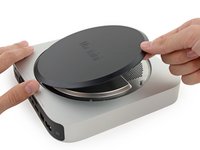
Lift and remove the bottom cover.
I taped the "Mac Mini Logic Board Removal Tool" to the flat part of the antenna plate before sealing everything up again. I mean, where else am I supposed to store it without forgetting where it is? I'm pretty sure it won't cause any problems there.
That’s a brilliant idea, @mrredwood!
Lol. And here I am keeping this old system going a little longer with a 2TB upgrade.
Richard -
I would suggest you wash the underside of the plastic as mine after 3 years was covered in dust.
I couldn’t get mine to snap back on
Make sure the 3 longer, thicker screws are in the right holes per the diagram in Step 4. (Hint: not next to the large black wireless button.) When those screws are in the right places, the back just snaps into place very easily.
-
-
-
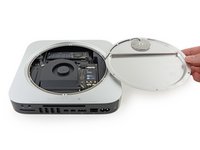
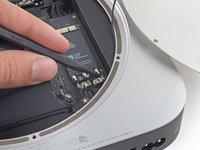
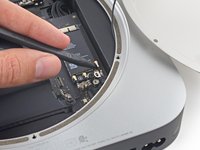
Remove the following TR6 screws from the antenna plate:
-
Three 4.1 mm screws
-
Three 1.9 mm screws
Had a T7 security screw driver [and didn't want to wait to have the T6 version shipped to me], so I gave it a whirl. I lined up the driver with the screw socket, pressed down a bit to make sure the driver would get enough grip, and slowly [but forcefully] rotated the driver and got these screws out. BE CAUTIOUS not to strip the screws. May not work for everyone.
As TR6 screwdrivers were sold out all over Germany and I wanted to exchange the HDD THIS friday, I took a VERY fine dental milling tip (0,8 mm head diameter) for my proxxon and milled away the little dots in the center of the the TR6 screws. After that I could open the case with a regular T6 screwdriver. All went fine, MM is closed again + working like a charm with it's new SSD. NOTE: For this task I used my loupe glasses (3x) ;)
On the whole screw thing. I just used a tiny dremel drill bit and drilled out the security pin. I hate those screws. I don't see the point in locking the them with those. they should have left the screws alone.
That worked for me, thanks for the trick!
Arroba -
great trick!
I used the T7 very carefully. No problems.
Kudo's for the T7 suggestion! I used pliers to loosen the large screws, then carefully used a T7 (while pushing down) to remove all the screws.)
I just had success using standard pliers to remove the longer screw posts, and then I used standard needle nose pliers to press down and grip the tiny screws. Please note that this method may/will cause scrapping of the aluminium cover.
Northern Tools sells a set of 13 Torx Security Keys for $28.99 that has the TR6 size.
On my 2nd drive replacement (swapping out to an SSD this time). Could not find my logic board removal tool. So I made another one from a metal coat hanger. So, here’s my tip, when you put it all back together: the logic board removal tool fits around that small black circle antenna perfectly and you can replace the large black cover over the top snuggly. No rattles or anything.. So, next time: I’m guaranteed to find my logic board removal tool.
The three longer screws could be removed with pliers.
The three shorter once I drilled out with a sharp 3 mm drill.
First put tape across the ventilation opening and carefully vacuum cleaned before taking of the antenna plate, though.
Don’t you hate it when the manufacturer does things like this, though??
I can recommend the Tekprem tools for this. That %#*@ security dimple foiled me until I got these. check Amazon ratings before you buy any tools, a lot of them that come from China are made with cheap pot metal rather than properly hardened alloys and will strip out very quickly. (Don’t ask me how I know this.)
I have T6 but not the required TR6, and my order for the bit from Amazon is going to take two weeks. I don’t have the patience to wait so…
I was able to remove all of the screws but 1 with a pair of needle nose pliers and sheer force of will. The last one wouldn’t come off so I just finally gave up and bent the plate back until the screw broke off. It wasn’t pretty but considering there is a plastic cover over the whole assembly it was something I was willing to live with.
Note that I can’t get the screws back in with the needlenose, they just don’t turn, so I will await the bit to arrive. In the meantime this computer is purring like a kitten, a whole new lease on life!
If you have non-security T6 and T7s, carefully drill away the middle of the screw with a very small bit, stopping frequently to vacuum out the filings to see if you’ve done enough. You don’t need to do much, and too much will strip the screw entirely. Then very carefully unscrew using a T6 (you may need a T7). I’ve done it twice and it works.
Crap, i'm stuck on these, too, and it's just the very beginning.. What can I say, that's simply unfair not to say plain stupid, Apple, but it's nothing new.
I can confirm that the small pin in the middle of the TR6 screws can be removed (actually broken out) pretty easily with a small, flat head screwdriver that can just fit inside the middle hole of the screw (as recommended in some YouTube video).
First, cover the antenna plate holes for safety. Then push the dots with the flat head screwdriver from one side cautiously, but forcefully by leaning the driver against the outer side of the inner hole, until you see the security pin leaning a little bit. Then push it from the opposite side, until it breaks out.
Yup it's possible, but beware that "cautiously but forcefully" requires dark magic. The only flathead I could find small enough to fit the gap got a little mangled in the process. I am not a delicate person. But the good news is the pins are removed and the regular T6 now works!
dpatts -
I've been fixing and upgrading Apple products using iFixit since the days of Gen2 iPod Touch and white plastic iBooks. This is the first time I had to use a drill press!!! To grind out those darn internal pins. But it worked. Now awaiting delivery of an SSD with my Mac mini in pieces on my desk. Thanks, iFixit and all the comment posters.
-
-
-
-
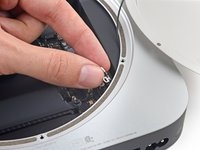
With the I/O ports facing you, flip the antenna plate to the right to allow access to the antenna cable connector.
-
-
-
Remove the single 3.4 mm T6 screw and washer from the antenna cable.
Not necessary to remove just be careful and don’t stretch the cable.
Steps 6 - 9 are not needed…
-
-
-
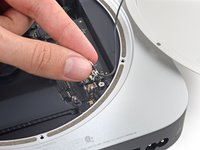
Use the point of a spudger to lift the antenna connector straight up off its socket on the airport card.
Is this really necessary? The antenna is no where near the SSD drive....
mike - 06/25/2017
UP! is it?
Not strictly necessary for SSD access, no—just allows you to detach the antenna plate and get it safely out of the way. You can leave it in place if you prefer, but be careful to support the antenna plate and make sure the cable doesn’t get strained or yanked accidentally.
Wenn nur die M.2 gewechselt werden soll, empfehle ich, den Antennenstecker nicht abzuschrauben und den Deckel einfach vorsichtig beiseite zu legen. Es ist dann allemal genug Platz zum Wechsel der M.2.
Das Ausstecken dieses Steckers ist hier wirklich nicht einfach, da die Anschlüsse winzig und mit bloßem Auge kaum zu erkennen sind. Hat bei mir gut 20 Minuten gedauert, bis ich das Teil wieder drauf hatte. Eine Lupe kann hier wirklich helfen. Auch das vorherige Fixieren mit der Schraube macht es ggfs. etwas einfacher. Der restliche Ausbau/Umbau/Zusamenbau war nach einer knappen halben Stunde erledigt und ist für jeden mit etwas Geduld machbar.
Des weiteren aufpassen mit der winzigen Schraube, die beim Zusammenbau leicht verkanten kann und dann sehr schnell abreißt.
In trying to remove the antenna connector pin from its socket on the airport card the socket came away from its location on the airport card completely, together with the cable and connector pin. Rather than replace the airport card (that would have a new socket) and a new connector/pin for the cable, I decided it would be worth trying to solder the connecting pin to the (now exposed) contact points for the socket on the airport card.
Best time to do this is during the re-build _after_ replacing the hard drive, when the antenna is still unattached to the airport card. After the re-build (with no further problems encountered) it was quite easy to solder the connector pin with attached remains of the socket to the airport card's contact points - there's enough space for easy solder access without other sensitive components nearby.
I had thought that my Mac Mini's wireless connectivity might be affected, but it wasn't.
Now very happy with a fast SSD machine with wireless connectivity.
this was the most fiddly part of the reassembly operation for me too. Old eyes, despite good lighting, led me to try this multiple times before I finally got that satisfying click. I am surprised that people find securing the screw first to be helpful, as I didn’t have nearly enough room to move the cable around if I tried that. Also, while it is theoretically possible to do this entire operation without removing the cable, I would never chance it… It’s way too easy to damage something by yanking on the plate. I had a lot of peace of mind when I was able to set the entire antenna plate aside.
After I reassembling, my bluetooth no longer works. The antenna connector is definitely seated properly as I heard the click, and it was fully secured when I tried to wiggle the wire. Did anyone else have this problem?
Update: when I disconnected the antenna cable, OSX retained my keyboard and mouse in the bluetooth device list, but it had apparently forgotten they were paired. I bought a usb keyboard and usb mouse to figure this out. Deleted the devices from the bluetooth list, rediscovered them, and now it’s working fine.
To everyone making comments regarding their experience - fabulous!
When reconnecting the antenna to the socket, hold your finger or use a flat edge to hold the socket in place as you thread the bracket back on. Otherwise, it may pop off.
-
-
-
Carefully pull the antenna cable out from the gap between the power supply and case.
-
-
-
Remove the antenna plate from the Mac mini.
-
-
-
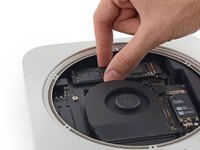
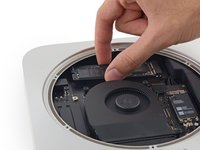
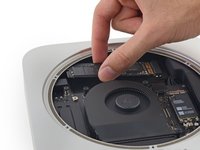
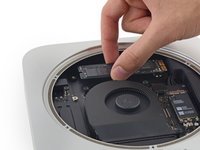
Remove the 5 mm T5 screw securing the SSD.
While you’re here, if you are upgrading a Fusion drive and abandoning the internal HDD, pop the SATA cable to disable the drive without needing to disassemble the whole mini. See the HDD replacement guide steps 14-16. Reinstall the shield while leaving the cable disconnected.
In my case I had to use a T4, instead of T5.
-
-
-
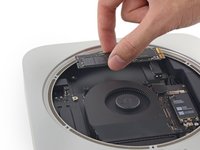
Carefully lift the SSD out of the case without scratching or touching the gold contacts.
What PCIe SSDs are compatible? I was hoping OWC's site would say, but it looks like OWC is pushing the 2.5" style hard drive for the 2014 Mac mini. The guide for replacing a 2.5" drive looks like you dismantle the entire computer to get there and I'm not really up for that right now. This slot looks like a reasonable alternative.
Here you have an example: PCIe SSD on Mini Late 2014
Guille -
I realize it’s far too late an answer for you, but for others reading this later, OWC now sells compatible SSDs. But they say they are “designed for APFS” and as such require macOS High Sierra or later. I have no idea why this should matter, but they say it does.
shamino -
The point OWC is trying to make is that HFS is likely to wear out SSDs more quickly than APFS will, so you should use an OS that support the latter. Whether this is an actual issue depends on the individual's usage.
OWC have 2 SSD to choose from 2019 straight replacements.
I wasn't aware that the 2014 Mac Mini supported PCIe drives. I had my 1 TB HDD upgraded to a 512 SSD (sata). The speed increase is like night and day.
-


To reassemble your device, follow these instructions in reverse order.
To reassemble your device, follow these instructions in reverse order.
Отменить: Я не выполнил это руководство.
107 человек успешно провели ремонт по этому руководству.


32 Комментариев
If I have a Mac Mini without SSD, only with normal Hard Drive (NO Fusion). Can I install a new one SSD like on this tutorial?. Thanks!
Please see my comment later in the thread.
Si, yo lo hice y la diferencia es abismal. Necesitaras un adaptador y por supuesto el SSD. Yes, I did it and the difference is abysmal. You will need an adapter and of course the SSD.
Yes, but you need to add a cable to connect it. If you buy the SSD from OWC, they sell a kit which includes the cable and tools (for an extra $20-40, depending on what size/model SSD you get).
shamino -
I have the same question as Juan
yes But You Need To Buy Parts Used Ifixet Or Ebay
I can source the custom PCIe cables. Please reply if interested.
I am interested in this cable if you can source it. Also is there a particular SSD that is compatible with it? Will the ones from the 2013 Macbook Air work?
Hello. Do you know if a NVMe PCIe drive might be used instead of the AHCI version? Thanks in advance!
Guille -
I am interested in this cable also. Would this be an M.2 or NVMe interface ssd that would be able to be installed?
thanks
Michael Oliver
Anyone looking for the M.2 SSD cable, you can find it here https://beetstech.com/product/ssd-cable-...
We have a corporate Mac Mini that we’d like to repurpose. Unfortunately, the user who left the company turned on FileVault so we can’t refresh the system. I looked online but couldn’t find a definitive answer other than just having private data protected. I was wondering if replacing the SSD would allow me to configure a fresh Mac instance, or does FileVault lock the system down entirely. The specs are decent and would had to have it bricked because of FileVault.
Hi Justin,
According to this comment, you should be able to wipe the drive and re-inststall MacOS without having to buy a new drive.
Is it possible to remove the blade SSD and install a regular 2.5 inch SSD?
Upgrading my Fusion drive to an OWC 1TB SSD was a piece of cake with this guide. I didn’t bother removing the old spinning drive; I just popped the SATA connector and left it unhooked.
OWC Aura SSDs are Mac Compatible - other brands are not guaranteed to be compatible.
Would this work instead? https://www.amazon.com/dp/B01CWWAENG/ref...
Did you try it. Other than length, yes. Use chip adhesive, just as good.
Please, I looking to find the answer to my question but I had no luck.
I bought a new Mac mini Core i5 2.8Ghz (2018) with 1TB Fusion drive. Can I upgrade the SSD and the HD? Can I use comum market parts or it must be from Apple? What is the specification for the SSD? My intention is to install a 512GB SSD and a 2TB FireCuda HD.
You can't use a bigger SSD if you stay with the fusion setup. Fusion SSD drive is limited to 128GB for some reason. If you use them as separate drives you should be able to.
I replaced my 256gb SSD without having to unhook the WiFi antenna. You just need to be careful that you don’t unhook the WiFi antenna cables while you replace the SSD. Swing the bottom cover to the side, and be careful
I used a Samsung 970 Evo 1 tb, but needed an adapter to make it work. This is the adapter I used:
https://www.amazon.com/gp/product/B07VVN...
I’m sure you can buy it from other sources than Amazon, but Amazon is where I got mine. Works great. I used my iFixIt toolkit to do the job.
Thanks iFixIt, you guys are the best!
what tools (HW/SW) do you recommend for imaging the mechanical HD and getting that image into the new SSD?
Yo uso Carbon Copy Cloner. I use Carbon Copy Cloner.
Hallo,
ich möchte einem Mac mini 2014, der nur eine HD hat, eine PCIe SSD einbauen. Benötige ich dazu das angesprochene Kabel? Oder ist das schon vorhanden?
You need the adapter to install a PCIe SSD, but i suggest you to use a SATA SSD: i heard of some tecnician saying that using PCIe SSD + adapters may result in some issues with Apple products.
So I have a 2014 16 gb and a 1tb. I have the adapter for the fusion drive. I have lots of ssd cards as luck would have it. Can I put a 1tb 2.5 where the hdd was and a 512 ssd card with the adapter to bring this i7 3.0 to a 16 gb ram and 1,512 gb ssd shared? That’s sounds like a pretty good machine.
Tell me why I can’t do this? Also, why isn’t it anywhere online? OWC is so expensive compared to ssd (brand names now). A year ago they were a modest amount more, now they are the apples of ssds but without cutting edge. Crucial mx is just as good as any OWC. I’ve got crucial and Wd red card.
The SSD required for a Mac is not a standard 2.5in format drive, it's a M.2 stick. At the very minimum you need that form factor with the correct number and layout of pins.
I tested a Hynix SSD (m2, short versión) and the firmware seems to be incompatible. The Mac falls into a boot loop, panicking and restarting over and over. Will swap it for a Kingston, or another brand.
i had the mac mini with the 1tb disk , followed this this tutorial and added this part fom aliexpress and added a nvme ssd disk , it was really easy and cheap , and now super fast mac mini with 1tb extra disk
Please kindly clarify the following: there are 2 tutorials for upgrading 2014 storage t--one hat is a difficult with over 30 steps and another one that takes only 15 minutes with about 12 steps. Both tutorials say they can be done on 2014 with fusion drive which is confusing to me. I am going to buy a used mac mini 2014 and the specs of it to be one for 15 minute tutorial. .There are 4 used mac mini 2014 models < https://everymac.com/systems/by_year/mac...>. Could you specify what model can be used with the 15 min tutorial and or with what storage it should have? Please include as much specs as possible. I am buying a used 2014 mac mini based on the fact I want to replace storage with new storage. . Would either of these work for the 15 minute tutorial? Late 2014 | 3.0 i7 16GB 1TB HDD MPN MGEQ2LL/A or 2014 3.0 i7 16GB 512 SSD PCIE. MPn MGEQ2LL/
Read Me First: I purchased an SSD drive directly from Crucial and, of course, it came uninitialized. After going thru the entire tear down, installing the new drive, and rebuilding the mini, it refused to recognize the new drive. So, of course, I had to re-tear it down, remove the new drive, insert it into an external housing and format it using my Macbook. After that the mini recognized the new drive. A word to the wise: format the new drive before installing it.
tom - Ответить
How were you installing the OS? I am planning on booting into a USB drive with a copy of OS High Sierra on it, and I assume I will be able to format my new Samsung SSD using that?
Simon - Ответить
On my Samsung EVO 850, mac mini download system automaticly
Stefan Repac - Ответить
Pre-formatting is not necessary if you make a USB boot installation drive with macOS installer. During boot up, hold down the option key until the mac boot into the USB, formatting can then be done using disk utility running off the USB drive.
SBR249 - Ответить
I had the exact same experience as tom. I installed a brand new 2TB Samsung 850 EVO and it was not recognized by the Mac Mini. I booted from a portable USB drive with a bootable copy of macOS High Sierra but the 850 EVO SSD I had just installed was not shown as an option. I tore down the Mac Mini again, formatted the 850 EVO, rebuilt the Mac Mini, and booted off the same bootable High Sierra USB drive, and sure enough the 850 EVO was recognized.
maxim - Ответить
diskutil list
diskutil erasedisk [filesystem] [drivename] /dev/disk[disk number]
Paul Rodgers - Ответить
My drive (Evo 860) was also not initialized. I started in recovery mode and went to disc utility and from there selected the drive. I then was able to use the “erase” function on the drive. I just left the settings as default and as soon as it erased then the drive was ready to go.
Nathan Cooper - Ответить
Just completed this upgrade a few days ago, having purchased the 1 TB SSD kit from IFixIt. The kit arrived quickly and the tools and drive worked perfectly. The step by step guide posted here is pretty much flawless, but do pay attention to the specific comments from users on certain steps - they really help. As far as ensuring that the new drive will reboot and install MacOS, I watched 1-2 videos on YouTube about re-installing using the Internet Recovery tool and that worked perfectly. My MacMini is performing WAY better than it used to, for only a $200 upgrade kit and about 3 hours of work, all in. Thanks!
Joshua Rednik - Ответить
I’ve had Apple computers since the G3 machines and they have always been snappy.
Unfortunately this 2014 macmini has always been slow but this upgrade (6 years later) has changed that!
if you have a late 2014 macmini, do this.
I used a 860 Samsung.
Mike Hayes - Ответить
A quick comment to tell you that at every step, make sure to read the comments and be careful. I managed to do the process fast without any problems, but thanks to the comments that warned me enough on the risky steps.
Euronymous - Ответить
This guide surely helped me breath upgrade and bring some new life into my macmini. Thanks to all who contributed.
Cameron Hasell - Ответить
can one of you give me the link for the screw drivers please?
Gerardo Ramirez - Ответить