Введение
Use this guide to install a new left fan (left when the device is resting with the logic board side closest to you.)
Выберете то, что вам нужно
-
-
Remove the following P5 pentalobe screws securing the lower case to the MacBook Pro:
-
Eight 3.0 mm
-
Two 2.3 mm
-
-
-
Lifting from the edge nearest the clutch cover, lift the lower case off the MacBook Pro.
-
Set the lower case aside.
-
-
-
-
Using the flat end of a spudger, gently pry the battery connector straight up out of its socket on the logic board.
-
Bend the battery cables back and out of the way, ensuring that the battery connector doesn't accidentally make contact with the logic board.
-
-
-
Use the flat end of a spudger to lift the rubber heat sink cover up off the left fan.
-
-
-
Remove the following three screws securing the left fan to the logic board:
-
One 4.4 mm T5 Torx screw with 2 mm collar
-
One 5.0 mm T5 Torx screw with 2 mm collar
-
One 3.9 mm T5 Wide Head Torx screw
-
-
-
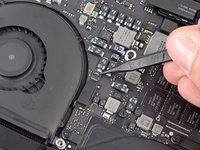
Use the tip of a spudger to flip up the retaining flap on the left fan ribbon cable ZIF socket.
-
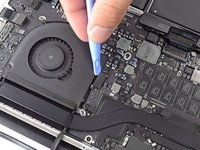
Starting at the top of the cable, slide a plastic opening tool under the left fan cable to free it from the logic board.
-
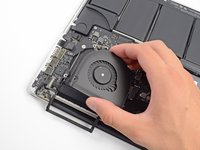
Lift the left fan out of the device.
-


To reassemble your device, follow these instructions in reverse order.
Отменить: Я не выполнил это руководство.
51 человек успешно провели ремонт по этому руководству.

8 Комментарии к руководству
Great directions! My 6-year old dropped my laptop from the couch armrest. No visible damage made but the left fan started to make a lot of noise. I was able to complete the entire left fan swap in about 20-30 minutes. I was lucky and found the fan cable was not strongly adhered to the board. However, for me, it was easier to lift the fan and free the cable from underneath. Be aware on the step before this: the retaining flap is very, very tiny. Look at the "view huge" image to get a fix on how to flip it up. Thanks iFixit for the part and tools. My new Retina MacBook Pro is running silent again.
This ended up being very easy - took me 20 minutes (my first repair). With my experience, the expoxy / glues you have to pry off turn out to not be that stuck on in the first place, and actually easily re-adhere after installing the new fan.
Btw iFixit saved me from the "minimum three days in the shop" nonsense that seems to be applecare (I'm chained to my laptop). Understand they have to follow procedure, but common sense is if you can hear a fan buzzing it's probably the fan.
Next time I'll be putting that $350 into the iFixit used parts fund :)
The instructions and tools are fantastic! It was really easy to follow through with them. The left fan I received was not so great. When I got it installed it made a "spinning disc" sound, so I took it out and reinstalled it. Unfortunately, it didn't solve the issue and sounded the same. In the end, I opted to put my original fan back in. I noticed that iFixit's left fan's strip (the part that connects to the computer) was a little bit longer than my original, so when I went to install it, the strip bent and tore a bit. But not through the connections. I don't think that could be the cause, but it's possible. Or perhaps the fan I received is faulty.
This is my everyday working computer, I have it already 3 years. Was never open since it never needed repair.
My fans were both emitting a high pitch noise when fully revved up. First I opened the computer and fully blowed out the cumulated lint with a Dust Off can (compressed air)
With this guide I disassembled both fans, and proceeded to unscrew the top on both of them and pulled out the rotor with a suction cup to reveal the bushing. After fully cleaning all the rotor itself, I applied a drop of PTFE oil (teflon) to the axle. Reassembled and presto. Like new!!!
also done. both fans in 50'.
thanks ifixit!