Перейти к основному содержанию

Microsoft Surface Laptop 3 15" Screen Assembly Replacement

Выберете то, что вам нужно

  1. Microsoft Surface Laptop 3 15" Screen Assembly Replacement, Prepare your device: шаг 1, изображение 1 из 2 Microsoft Surface Laptop 3 15" Screen Assembly Replacement, Prepare your device: шаг 1, изображение 2 из 2
    • Turn on your laptop and allow the battery to discharge below 25% before starting your repairs, as a charged lithium-ion battery can be dangerous if accidentally punctured.

    • Power down your laptop and unplug any cables.

    • Close the laptop.

  2. Microsoft Surface Laptop 3 15" Screen Assembly Replacement, Flip the laptop over: шаг 2, изображение 1 из 2 Microsoft Surface Laptop 3 15" Screen Assembly Replacement, Flip the laptop over: шаг 2, изображение 2 из 2
    • Flip the laptop over and place it on your work surface, feet facing up.

  3. Microsoft Surface Laptop 3 15" Screen Assembly Replacement, Removal tip: шаг 3, изображение 1 из 2 Microsoft Surface Laptop 3 15" Screen Assembly Replacement, Removal tip: шаг 3, изображение 2 из 2
    • The feet on the bottom of the laptop are meant to be removed with the pointed end of a spudger.

    • Each foot has a hidden indent that will simplify removal.

    • To make sure the spudger is in the indent, insert it at the nearest long edge, pushing parallel to the short edges of the laptop, as shown.

    • Note that the two feet near the rear (screen) edge are different than the two front feet.

  4. Microsoft Surface Laptop 3 15" Screen Assembly Replacement, Remove the rear feet: шаг 4, изображение 1 из 3 Microsoft Surface Laptop 3 15" Screen Assembly Replacement, Remove the rear feet: шаг 4, изображение 2 из 3 Microsoft Surface Laptop 3 15" Screen Assembly Replacement, Remove the rear feet: шаг 4, изображение 3 из 3
    • Insert the pointed end of a spudger underneath one of the two rear feet, at its rear edge.

    • Push the spudger underneath the foot and pry up to release it.

    • The two rear feet are secured with some light adhesive.

    • Repeat to remove the second rear foot.

  5. Microsoft Surface Laptop 3 15" Screen Assembly Replacement, Remove the front feet: шаг 5, изображение 1 из 3 Microsoft Surface Laptop 3 15" Screen Assembly Replacement, Remove the front feet: шаг 5, изображение 2 из 3 Microsoft Surface Laptop 3 15" Screen Assembly Replacement, Remove the front feet: шаг 5, изображение 3 из 3
    • Insert the pointed end of a spudger underneath one of the two front feet, at its front edge.

    • Push the spudger underneath the foot and pry up to release it.

    • The two front feet are secured with plastic clips as well as light adhesive.

    • Repeat to remove the second front foot.

  6. Microsoft Surface Laptop 3 15" Screen Assembly Replacement, Reassembly tip: шаг 6, изображение 1 из 2 Microsoft Surface Laptop 3 15" Screen Assembly Replacement, Reassembly tip: шаг 6, изображение 2 из 2
    • During reassembly:

    • Note that the front and rear feet are different.

    • Note that the front feet are directional and only clip in one way.

  7. Microsoft Surface Laptop 3 15" Screen Assembly Replacement, Reassembly tip: шаг 7, изображение 1 из 3 Microsoft Surface Laptop 3 15" Screen Assembly Replacement, Reassembly tip: шаг 7, изображение 2 из 3 Microsoft Surface Laptop 3 15" Screen Assembly Replacement, Reassembly tip: шаг 7, изображение 3 из 3
    • In place of reusing old, worn out feet on your device, 8 mm rubber furniture pads can be a good substitute.

    • Peel a pad away from its backing, align it over a foot cavity, and press to secure.

  8. Microsoft Surface Laptop 3 15" Screen Assembly Replacement, Remove the upper case screws: шаг 8, изображение 1 из 1
    Инструмент, используемый на этом этапе:
    Magnetic Project Mat
    $19.95
    Купить
    • Use a T5 Torx driver to remove the four 3 mm screws in the foot cavities securing the upper case to the device.

    • Throughout this repair, keep track of each screw and make sure it goes back exactly where it came from to avoid damaging your laptop.

    • During reassembly, don't over-tighten these screws—they strip easily.

  9. Microsoft Surface Laptop 3 15" Screen Assembly Replacement, Open the display: шаг 9, изображение 1 из 3 Microsoft Surface Laptop 3 15" Screen Assembly Replacement, Open the display: шаг 9, изображение 2 из 3 Microsoft Surface Laptop 3 15" Screen Assembly Replacement, Open the display: шаг 9, изображение 3 из 3
    • Flip the device over.

    • Open the display as far as it will go.

  10. Microsoft Surface Laptop 3 15" Screen Assembly Replacement, Lift up the upper case: шаг 10, изображение 1 из 3 Microsoft Surface Laptop 3 15" Screen Assembly Replacement, Lift up the upper case: шаг 10, изображение 2 из 3 Microsoft Surface Laptop 3 15" Screen Assembly Replacement, Lift up the upper case: шаг 10, изображение 3 из 3
    • The upper case is secured in place by magnets.

    • Grip the top edge of upper case above the keyboard and lift straight up to release it.

    • Don't try to completely remove the upper case just yet, as it's still connected to the rest of the laptop.

    • Lift the front edge of the upper case up and away from the laptop, taking care to not strain the keyboard and touchpad ribbon cable underneath.

    • During reassembly, lower the upper case onto the lower case until the magnets snap into place and it lays flat.

    • Check that the upper case sits flush around the entire perimeter. Any gaps between the upper and lower case near the display could cause damage to the display as it closes.

  11. Microsoft Surface Laptop 3 15" Screen Assembly Replacement, Disconnect the ribbon cable: шаг 11, изображение 1 из 3 Microsoft Surface Laptop 3 15" Screen Assembly Replacement, Disconnect the ribbon cable: шаг 11, изображение 2 из 3 Microsoft Surface Laptop 3 15" Screen Assembly Replacement, Disconnect the ribbon cable: шаг 11, изображение 3 из 3
    • The keyboard and touchpad ribbon cable is secured in place by a magnet connector.

    • On some models, this connector is surrounded by black tape.

    • Insert the flat end of a spudger underneath one edge of the ribbon cable connector, and pry up to release it.

    • Remove the ribbon cable from the motherboard.

  12. Microsoft Surface Laptop 3 15" Screen Assembly Replacement, Remove the upper case: шаг 12, изображение 1 из 2 Microsoft Surface Laptop 3 15" Screen Assembly Replacement, Remove the upper case: шаг 12, изображение 2 из 2
    • Remove the upper case.

    • Set the upper case onto a clean surface, keyboard-side down.

    • Ensure the ribbon cable lays flat, and isn't twisted or stressed.

  13. Microsoft Surface Laptop 3 15" Screen Assembly Replacement, Remove the SSD screw: шаг 13, изображение 1 из 1
    • Use a T5 Torx driver to remove the 2.7 mm screw securing the SSD.

    • Removing the SSD also functions as a battery disconnect and should be performed before all major repairs.

  14. Microsoft Surface Laptop 3 15" Screen Assembly Replacement, Remove the SSD: шаг 14, изображение 1 из 2 Microsoft Surface Laptop 3 15" Screen Assembly Replacement, Remove the SSD: шаг 14, изображение 2 из 2
    • With the SSD screw removed, the SSD will pop up at a shallow angle.

    • Grip the end of the SSD and pull it away from its board connector to remove it.

    • During reassembly, insert the SSD at a shallow angle into its board connector, and secure it back into its horizontal position with the SSD screw.

  15. Microsoft Surface Laptop 3 15" Screen Assembly Replacement, Remove the display connector shields: шаг 15, изображение 1 из 3 Microsoft Surface Laptop 3 15" Screen Assembly Replacement, Remove the display connector shields: шаг 15, изображение 2 из 3 Microsoft Surface Laptop 3 15" Screen Assembly Replacement, Remove the display connector shields: шаг 15, изображение 3 из 3
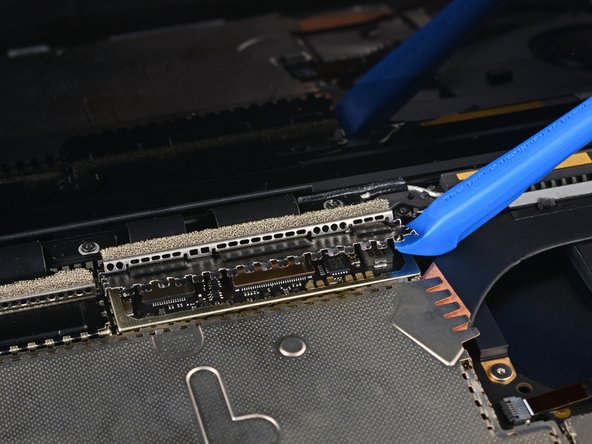
    • Use an opening tool to pry up the black shield covering the right bank of display connectors.

    • Try not to deform the shield too much—you will need to reinstall it during reassembly.

    • Repeat at different points around the shield until it becomes loose.

    • Remove the shield.

  16. Microsoft Surface Laptop 3 15" Screen Assembly Replacement: шаг 16, изображение 1 из 3 Microsoft Surface Laptop 3 15" Screen Assembly Replacement: шаг 16, изображение 2 из 3 Microsoft Surface Laptop 3 15" Screen Assembly Replacement: шаг 16, изображение 3 из 3
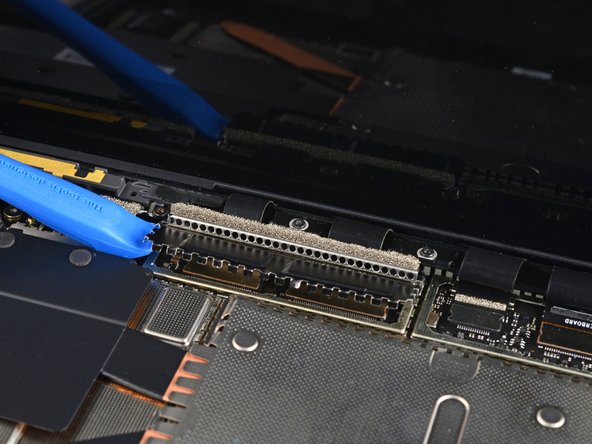
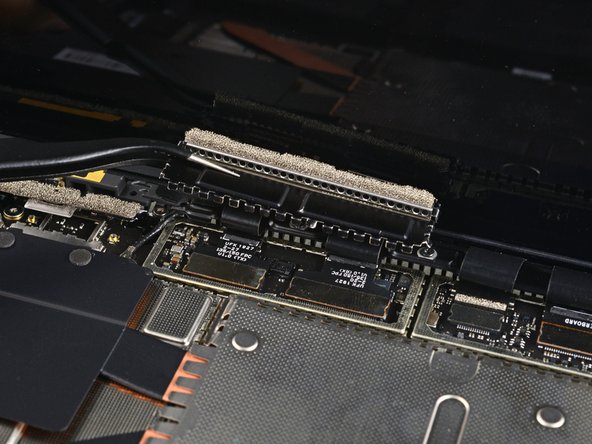
    • Repeat the previous step to remove the remaining shield from the left bank of display connectors.

  17. Microsoft Surface Laptop 3 15" Screen Assembly Replacement, Disconnect the display cables: шаг 17, изображение 1 из 2 Microsoft Surface Laptop 3 15" Screen Assembly Replacement, Disconnect the display cables: шаг 17, изображение 2 из 2
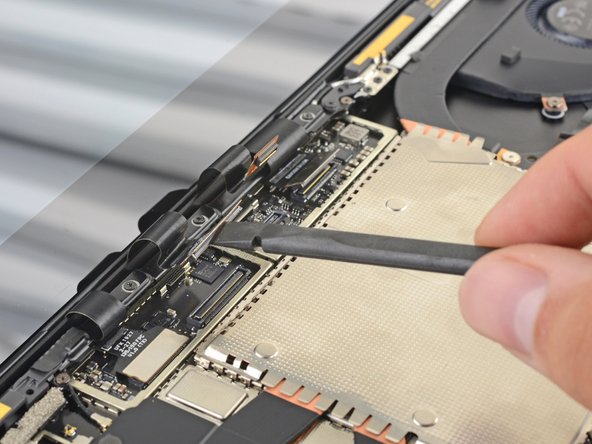
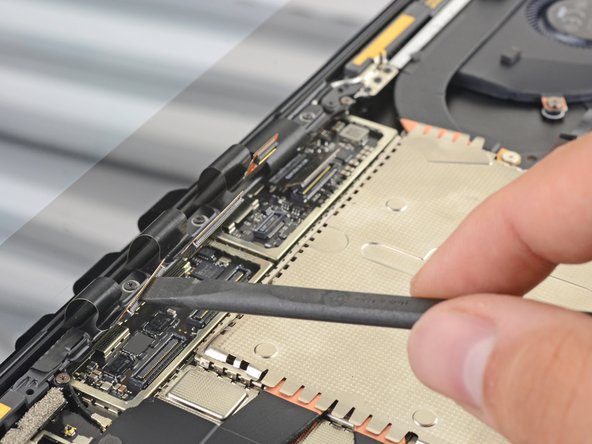
    • Use the flat end of a spudger to pry the first display cable up and out of its socket on the motherboard to disconnect it.

  18. Microsoft Surface Laptop 3 15" Screen Assembly Replacement: шаг 18, изображение 1 из 3 Microsoft Surface Laptop 3 15" Screen Assembly Replacement: шаг 18, изображение 2 из 3 Microsoft Surface Laptop 3 15" Screen Assembly Replacement: шаг 18, изображение 3 из 3
    • Disconnect the three remaining display connectors.

  19. Microsoft Surface Laptop 3 15" Screen Assembly Replacement, Reassembly tip: шаг 19, изображение 1 из 2 Microsoft Surface Laptop 3 15" Screen Assembly Replacement, Reassembly tip: шаг 19, изображение 2 из 2
    • During reassembly, use the flat end of a spudger to gently push the display cables back into their cavity in the lower case.

  20. Microsoft Surface Laptop 3 15" Screen Assembly Replacement, Tilt open the screen: шаг 20, изображение 1 из 1
    • Open the screen as far as it will go.

  21. Microsoft Surface Laptop 3 15" Screen Assembly Replacement, Remove four hinge screws: шаг 21, изображение 1 из 3 Microsoft Surface Laptop 3 15" Screen Assembly Replacement, Remove four hinge screws: шаг 21, изображение 2 из 3 Microsoft Surface Laptop 3 15" Screen Assembly Replacement, Remove four hinge screws: шаг 21, изображение 3 из 3
    • When removing the hinge screws, make sure to hold the screen steady as it will become more and more loose as the hinge screws are gradually removed.

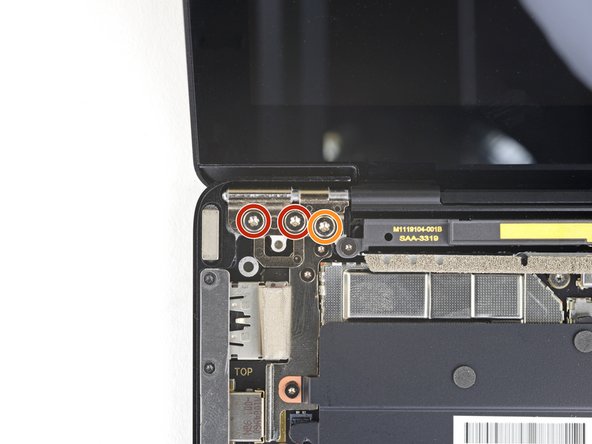
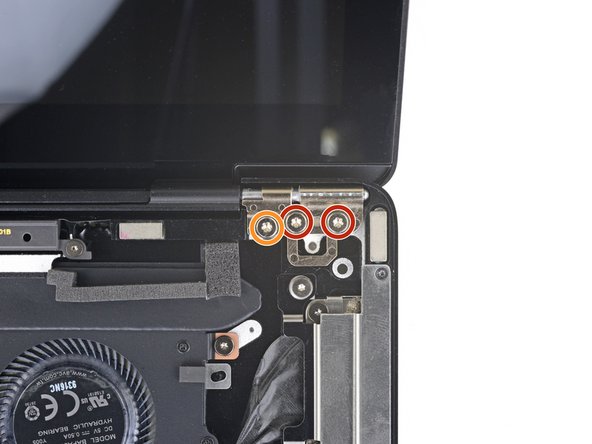
    • While holding the screen steady, use a T6 Torx driver to remove the four outermost 5.9 mm screws securing the screen, two on each side.

    • Leave the two innermost hinge screws in place for now, one on each side.

  22. Microsoft Surface Laptop 3 15" Screen Assembly Replacement, Tilt the screen vertical: шаг 22, изображение 1 из 1
    • Slowly tilt the screen until it's approximately vertical.

    • During reassembly, with the first two hinge screws tightened in place, the screen is free to tilt open for installation of the remaining four hinge screws.

  23. Microsoft Surface Laptop 3 15" Screen Assembly Replacement, Remove the final hinge screws: шаг 23, изображение 1 из 2 Microsoft Surface Laptop 3 15" Screen Assembly Replacement, Remove the final hinge screws: шаг 23, изображение 2 из 2
    • While holding the screen steady, use a T6 Torx driver to remove the two remaining 5.9 mm screws securing the screen, one on each side.

    • With these two final screws removed the screen will be freed from the rest of the device, so hold it steady.

    • If the screen is exactly perpendicular to the lower case, a screwdriver handle may contact the display during removal. If you're having trouble, lightly tilt the screen back enough to clear the driver.

  24. Microsoft Surface Laptop 3 15" Screen Assembly Replacement, Remove the screen: шаг 24, изображение 1 из 2 Microsoft Surface Laptop 3 15" Screen Assembly Replacement, Remove the screen: шаг 24, изображение 2 из 2
    • Lift the screen straight up and off of the lower case to remove it.

    • During reassembly, ensure the replacement screen's hinges are at a 90 degree angle with the display.

Заключение

Compare your new replacement part to the original part—you may need to transfer remaining components or remove adhesive backings from the new part before installing.

To reassemble your device, follow the above steps in reverse order.

Take your e-waste to an R2 or e-Stewards certified recycler.

Repair didn’t go as planned? Try some basic troubleshooting or search our Answers community for help.

Carsten Frauenheim

Участник с: 03/10/20

114 083 Репутация

Автор 338 руководств

Команда

iFixit Участник iFixit

Staff

135 членов

Автор 17 199 руководств

9 Комментариев

This is not a display replacement but just disconnecting.

So far so good! nice job!

HiGenius. NL - Ответить

This is not a screen replacement but rather the lid/screen/hinge assembly replacement.

Andrew Ho - Ответить

Neither Microsoft nor iFixit sell the entire lid assembly (which actually includes the front camera/microphones/Windows Hello sensors). All the replacement screens I've been able to find elsewhere are just the bare screen/LCD panel.

Andrew Ho -

Andrew,

Correct! This guide is for replacing the Surface Laptop 3's entire 15" screen assembly. Keep an eye out for a standalone display panel guide in the future—in the meantime, happy fixing!

Carsten Frauenheim -

Hi,

I've got a 15" model with a cracked screen too.

I'm also struggling for a guide.

I have seen a guide for the 13.5" model: Microsoft Surface Laptop 3 13.5" LCD Assembly Replacement

It looks similar and it might help.

Guy Parkin -

Добавить комментарий

Просмотр статистики:

За последние 24часов: 8

За последние 7 дней: 74

За последние 30 дней: 321

За всё время: 11,745