Перейти к основному содержанию

Motorola Moto E4 (XT1762) LCD and Digitizer Replacement

Выберете то, что вам нужно

  1. Motorola Moto E4 (XT1762) LCD and Digitizer Replacement, Back Cover: шаг 1, изображение 1 из 3 Motorola Moto E4 (XT1762) LCD and Digitizer Replacement, Back Cover: шаг 1, изображение 2 из 3 Motorola Moto E4 (XT1762) LCD and Digitizer Replacement, Back Cover: шаг 1, изображение 3 из 3
    • Power off your phone before beginning disassembly.

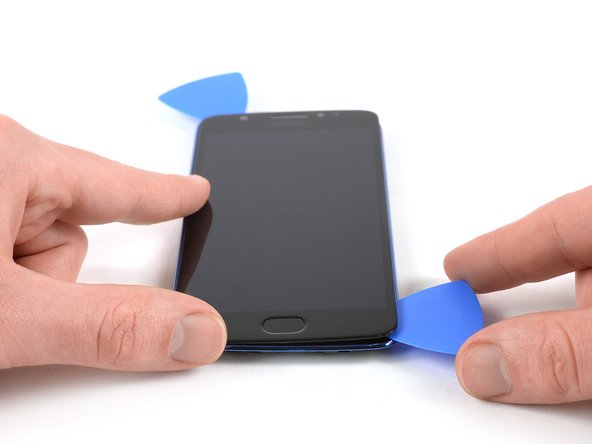
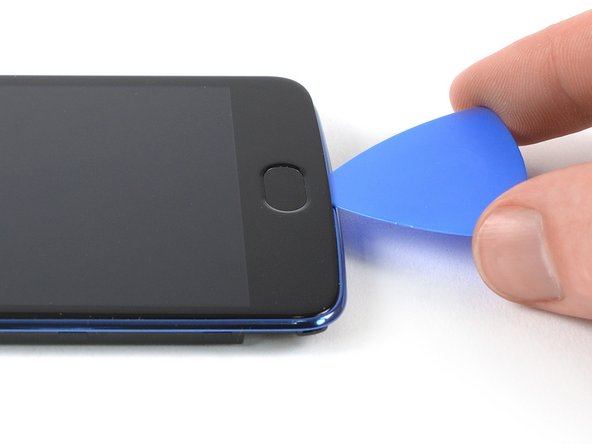
    • Insert a fingernail, or spudger, into the notch on the bottom right corner to start separating the phone unit from the back cover.

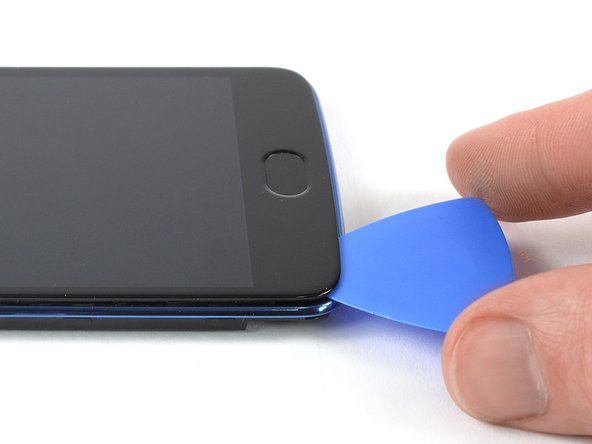
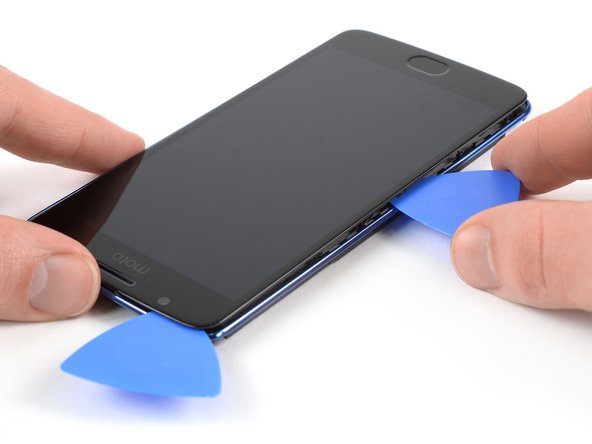
    • Move to the bottom left corner to pry the phone out of the back cover.

  2. Motorola Moto E4 (XT1762) LCD and Digitizer Replacement: шаг 2, изображение 1 из 2 Motorola Moto E4 (XT1762) LCD and Digitizer Replacement: шаг 2, изображение 2 из 2
    • Lift the phone out of the back cover.

  3. Motorola Moto E4 (XT1762) LCD and Digitizer Replacement, Battery: шаг 3, изображение 1 из 3 Motorola Moto E4 (XT1762) LCD and Digitizer Replacement, Battery: шаг 3, изображение 2 из 3 Motorola Moto E4 (XT1762) LCD and Digitizer Replacement, Battery: шаг 3, изображение 3 из 3
    • Use a fingernail or spudger to pry at the notch at the bottom end of the battery.

    • Lever the battery out of its recess and remove it.

  4. Motorola Moto E4 (XT1762) LCD and Digitizer Replacement, Loudspeaker: шаг 4, изображение 1 из 1
    • Remove the six 3.3 mm long Phillips #00 screws.

  5. Motorola Moto E4 (XT1762) LCD and Digitizer Replacement: шаг 5, изображение 1 из 2 Motorola Moto E4 (XT1762) LCD and Digitizer Replacement: шаг 5, изображение 2 из 2
    • Insert an opening pick between the loudspeaker and the frame to pry it up by twisting the opening pick.

    • Remove the loudspeaker unit.

  6. Motorola Moto E4 (XT1762) LCD and Digitizer Replacement, Motherboard Cover: шаг 6, изображение 1 из 1
    • Remove the seven 3.3 mm Phillips #00 screws.

  7. Motorola Moto E4 (XT1762) LCD and Digitizer Replacement: шаг 7, изображение 1 из 2 Motorola Moto E4 (XT1762) LCD and Digitizer Replacement: шаг 7, изображение 2 из 2
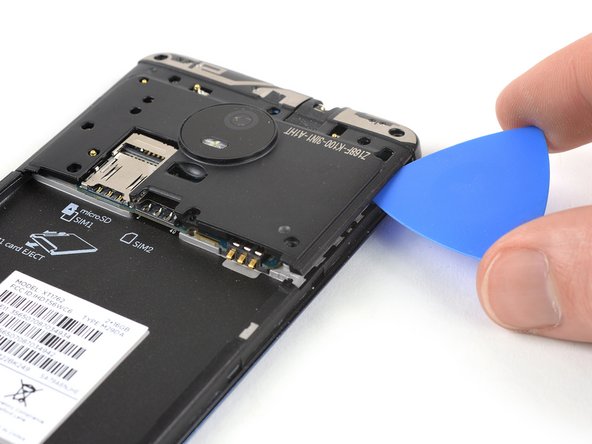
    • Insert an opening pick between the cover and the motherboard at the bottom right corner.

    • Slide the opening pick upwards to open the plastic clips.

  8. Motorola Moto E4 (XT1762) LCD and Digitizer Replacement: шаг 8, изображение 1 из 2 Motorola Moto E4 (XT1762) LCD and Digitizer Replacement: шаг 8, изображение 2 из 2
    • Insert an opening pick between the cover and the motherboard at the bottom left corner.

    • Slide the opening pick upwards to open the plastic clips.

    • Pry up the motherboard cover by twisting the opening pick.

  9. Motorola Moto E4 (XT1762) LCD and Digitizer Replacement: шаг 9, изображение 1 из 1
    • Remove the motherboard cover.

  10. Motorola Moto E4 (XT1762) LCD and Digitizer Replacement, Motherboard Assembly: шаг 10, изображение 1 из 2 Motorola Moto E4 (XT1762) LCD and Digitizer Replacement, Motherboard Assembly: шаг 10, изображение 2 из 2
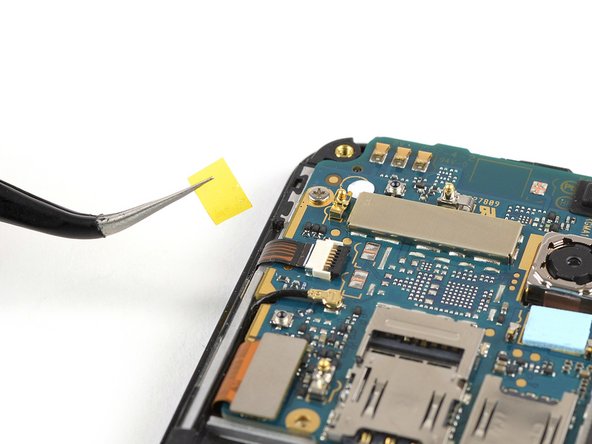
    • Use a pair of tweezers to peel off the yellow tape of the ZIF connector located on the left of the motherboard.

  11. Motorola Moto E4 (XT1762) LCD and Digitizer Replacement: шаг 11, изображение 1 из 2 Motorola Moto E4 (XT1762) LCD and Digitizer Replacement: шаг 11, изображение 2 из 2
    • Use the edge of a spudger to open the black flap of the ZIF connector.

  12. Motorola Moto E4 (XT1762) LCD and Digitizer Replacement: шаг 12, изображение 1 из 2 Motorola Moto E4 (XT1762) LCD and Digitizer Replacement: шаг 12, изображение 2 из 2
    • Slide the volume button flex cable out of the ZIF connector to disconnect it.

  13. Motorola Moto E4 (XT1762) LCD and Digitizer Replacement: шаг 13, изображение 1 из 2 Motorola Moto E4 (XT1762) LCD and Digitizer Replacement: шаг 13, изображение 2 из 2
    • Use a pair of tweezers to pry up and disconnect the antenna cable located on the left of the motherboard.

    • Fold the antenna cable out of the way.

  14. Motorola Moto E4 (XT1762) LCD and Digitizer Replacement: шаг 14, изображение 1 из 2 Motorola Moto E4 (XT1762) LCD and Digitizer Replacement: шаг 14, изображение 2 из 2
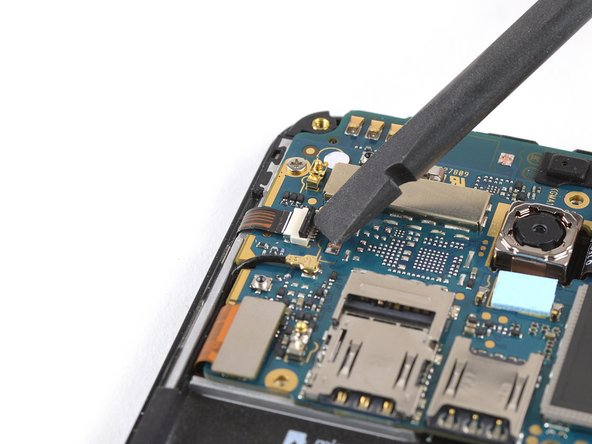
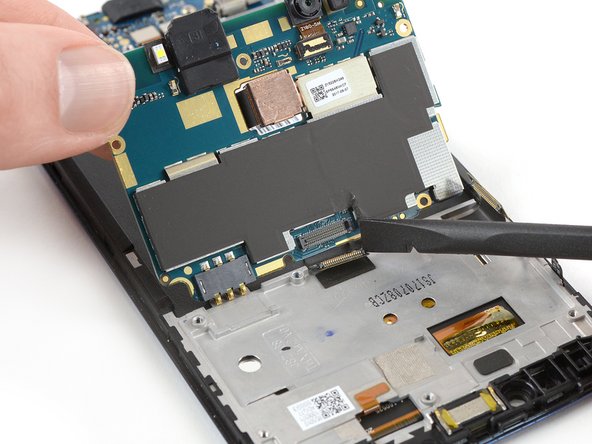
    • Use the edge of a spudger to pry up and disconnect the display flex cable located on the bottom left of the motherboard.

  15. Motorola Moto E4 (XT1762) LCD and Digitizer Replacement: шаг 15, изображение 1 из 1
    • Remove the two 2.9 mm long Phillips #00 screws securing the motherboard.

  16. Motorola Moto E4 (XT1762) LCD and Digitizer Replacement: шаг 16, изображение 1 из 2 Motorola Moto E4 (XT1762) LCD and Digitizer Replacement: шаг 16, изображение 2 из 2
    • Don't try to remove the motherboard all the way yet. The interconnect flex cable is still connected to its rear side.

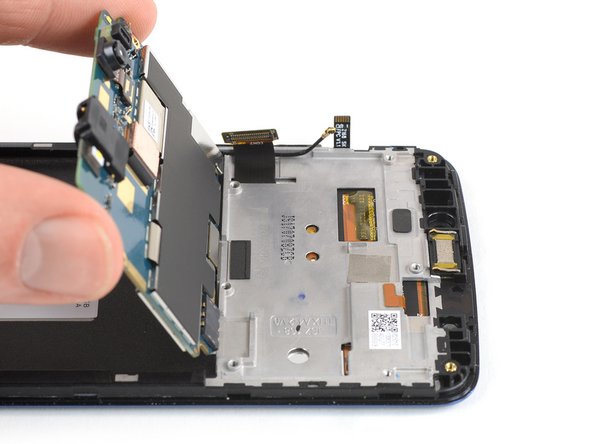
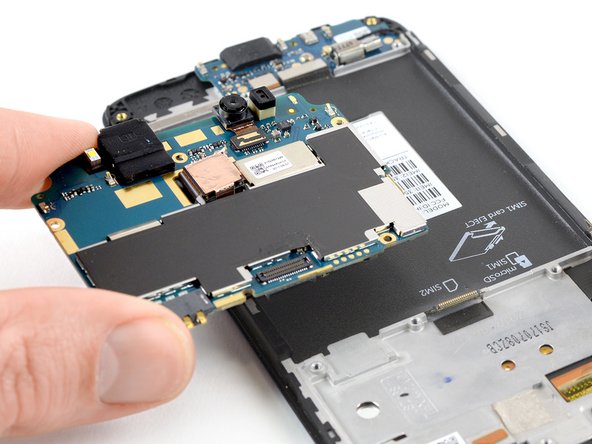
    • Use a spudger to carefully lift the motherboard from the top and fold it towards the battery compartment.

    • Be careful not to damage any components underneath the motherboard.

  17. Motorola Moto E4 (XT1762) LCD and Digitizer Replacement: шаг 17, изображение 1 из 3 Motorola Moto E4 (XT1762) LCD and Digitizer Replacement: шаг 17, изображение 2 из 3 Motorola Moto E4 (XT1762) LCD and Digitizer Replacement: шаг 17, изображение 3 из 3
    • Use the edge of a spudger to disconnect the interconnect cable from the motherboard.

    • Remove the motherboard.

  18. Motorola Moto E4 (XT1762) LCD and Digitizer Replacement, Charging Board: шаг 18, изображение 1 из 2 Motorola Moto E4 (XT1762) LCD and Digitizer Replacement, Charging Board: шаг 18, изображение 2 из 2
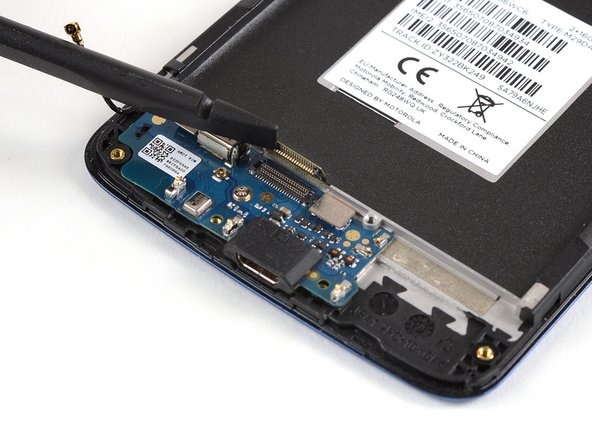
    • Use a pair of tweezers to pry up and disconnect the antenna cable.

  19. Motorola Moto E4 (XT1762) LCD and Digitizer Replacement: шаг 19, изображение 1 из 2 Motorola Moto E4 (XT1762) LCD and Digitizer Replacement: шаг 19, изображение 2 из 2
    • Use the edge of a spudger to pry up and disconnect the interconnect flex cable.

  20. Motorola Moto E4 (XT1762) LCD and Digitizer Replacement: шаг 20, изображение 1 из 2 Motorola Moto E4 (XT1762) LCD and Digitizer Replacement: шаг 20, изображение 2 из 2
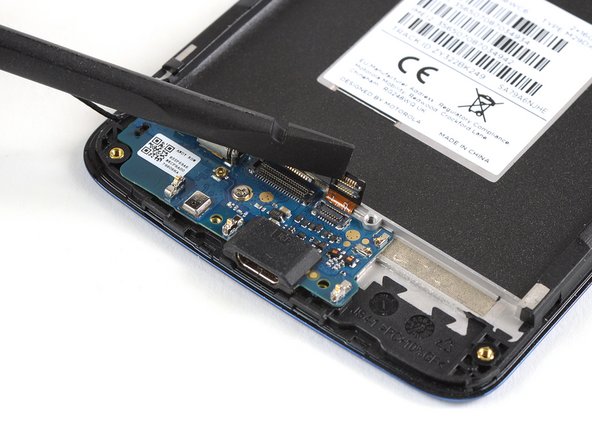
    • Use the edge of a spudger to pry up and disconnect the fingerprint sensor flex cable.

  21. Motorola Moto E4 (XT1762) LCD and Digitizer Replacement: шаг 21, изображение 1 из 1
    • Remove the 2.9 mm long Phillips #00 screw securing the daughterboard.

  22. Motorola Moto E4 (XT1762) LCD and Digitizer Replacement: шаг 22, изображение 1 из 2 Motorola Moto E4 (XT1762) LCD and Digitizer Replacement: шаг 22, изображение 2 из 2
    • Pry under the bottom end of the charging board and lift it upwards.

    • Remove the charging board.

  23. Motorola Moto E4 (XT1762) LCD and Digitizer Replacement, LCD and Digitizer: шаг 23, изображение 1 из 1
    • Prepare an iOpener and apply it to the edges of the display for at least two minutes to loosen the adhesive beneath.

  24. Motorola Moto E4 (XT1762) LCD and Digitizer Replacement: шаг 24, изображение 1 из 3 Motorola Moto E4 (XT1762) LCD and Digitizer Replacement: шаг 24, изображение 2 из 3 Motorola Moto E4 (XT1762) LCD and Digitizer Replacement: шаг 24, изображение 3 из 3
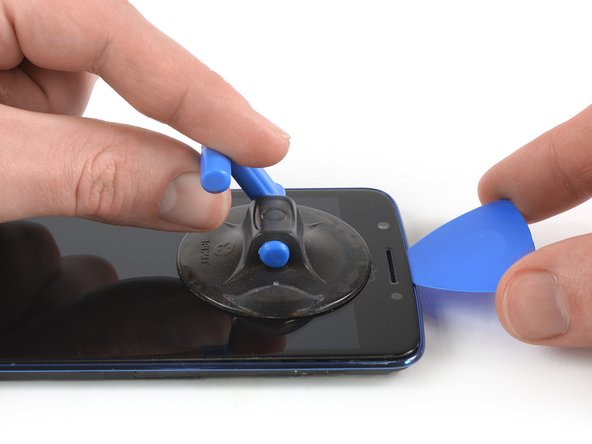
    • Once the screen is warm to the touch, apply a suction cup to the upper area of the phone right under the earpiece speaker.

    • If the phone's screen is cracked, the suction cup may not stick. Try lifting it with strong tape, or superglue the suction cup in place and allow it to cure so you can proceed.

    • Pull up the suction cup, and insert an opening pick under the display.

    • Slide the opening pick to the top left corner of the phone to cut the adhesive.

  25. Motorola Moto E4 (XT1762) LCD and Digitizer Replacement: шаг 25, изображение 1 из 2 Motorola Moto E4 (XT1762) LCD and Digitizer Replacement: шаг 25, изображение 2 из 2
    • Insert a second opening pick.

    • Slide it to the top right corner.

  26. Motorola Moto E4 (XT1762) LCD and Digitizer Replacement: шаг 26, изображение 1 из 3 Motorola Moto E4 (XT1762) LCD and Digitizer Replacement: шаг 26, изображение 2 из 3 Motorola Moto E4 (XT1762) LCD and Digitizer Replacement: шаг 26, изображение 3 из 3
    • If cutting becomes too difficult, reheat and reapply the iOpener.

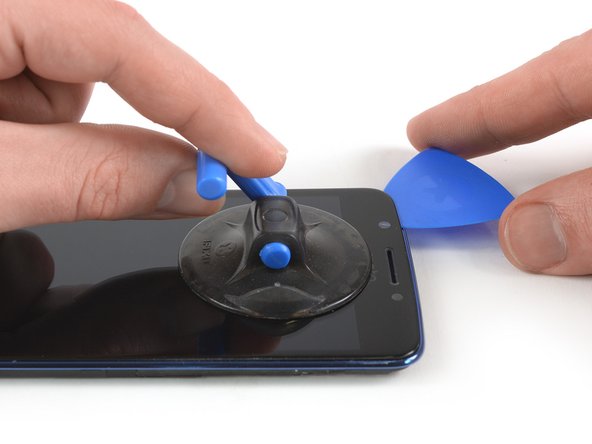
    • Slide the opening pick from the top right corner along the edge of the phone to cut the adhesive.

    • Make sure you get under the display unit and not just between the LCD and the digitizer on the front glass when cutting the adhesive.

    • Slide the opening pick around the bottom right corner.

  27. Motorola Moto E4 (XT1762) LCD and Digitizer Replacement: шаг 27, изображение 1 из 3 Motorola Moto E4 (XT1762) LCD and Digitizer Replacement: шаг 27, изображение 2 из 3 Motorola Moto E4 (XT1762) LCD and Digitizer Replacement: шаг 27, изображение 3 из 3
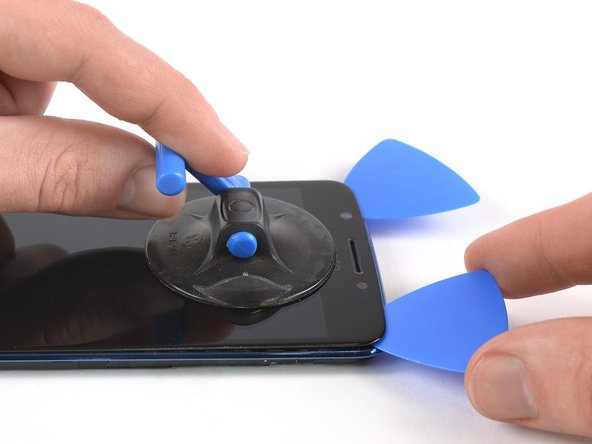
    • Slide the opening pick along the bottom edge of the phone and cut the adhesive.

    • In the middle where the home button is only use the very tip of the opening pick to not damage it.

  28. Motorola Moto E4 (XT1762) LCD and Digitizer Replacement: шаг 28, изображение 1 из 3 Motorola Moto E4 (XT1762) LCD and Digitizer Replacement: шаг 28, изображение 2 из 3 Motorola Moto E4 (XT1762) LCD and Digitizer Replacement: шаг 28, изображение 3 из 3
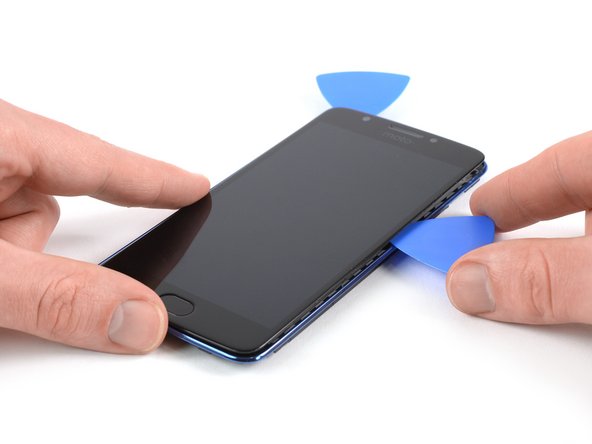
    • Repeat the previous heating and cutting procedure on the left edge of the phone to cut the remaining adhesive.

    • Try not to remove the display all the way yet. The fingerprint and display flex cables are still threaded through and may stick to the frame.

  29. Motorola Moto E4 (XT1762) LCD and Digitizer Replacement: шаг 29, изображение 1 из 2 Motorola Moto E4 (XT1762) LCD and Digitizer Replacement: шаг 29, изображение 2 из 2
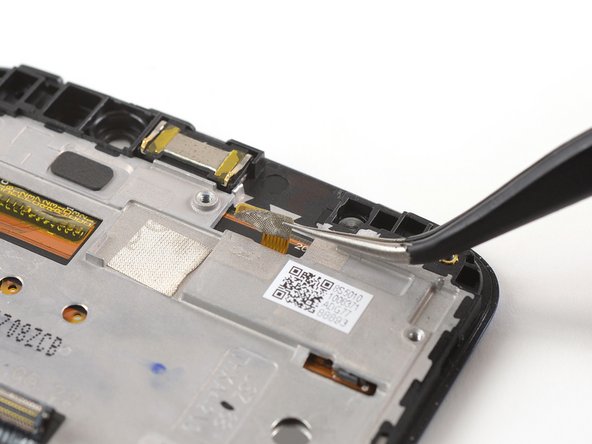
    • Use a pair of tweezers to peel both display flex cables off the frame. They are located on the bottom left and at the top of the motherboard.

  30. Motorola Moto E4 (XT1762) LCD and Digitizer Replacement: шаг 30, изображение 1 из 2 Motorola Moto E4 (XT1762) LCD and Digitizer Replacement: шаг 30, изображение 2 из 2
    • Carefully thread both display cables through their gaps in the frame.

  31. Motorola Moto E4 (XT1762) LCD and Digitizer Replacement: шаг 31, изображение 1 из 1
    • Make sure the fingerprint sensor flex cable does not stick to the frame. If so, peel it loose with a pair of tweezers.

  32. Motorola Moto E4 (XT1762) LCD and Digitizer Replacement: шаг 32, изображение 1 из 2 Motorola Moto E4 (XT1762) LCD and Digitizer Replacement: шаг 32, изображение 2 из 2
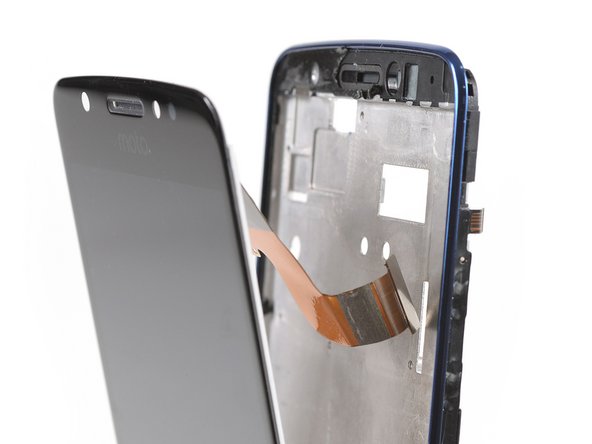
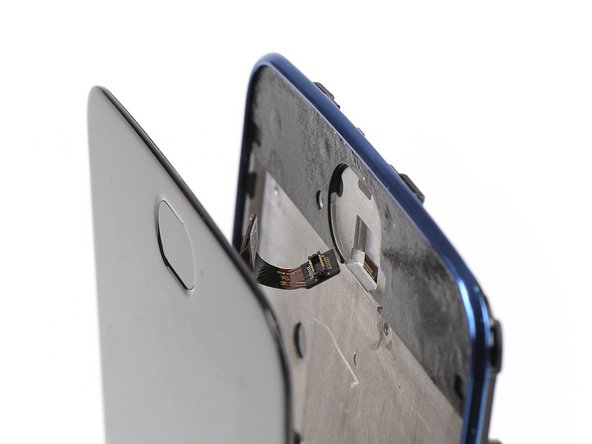
    • Carefully thread the fingerprint sensor cable at the bottom through its gap in the frame.

  33. Motorola Moto E4 (XT1762) LCD and Digitizer Replacement: шаг 33, изображение 1 из 1
    • Remove the LCD and digitizer unit.

    • Remove any remaining adhesive from the frame, and clean the glued areas with isopropyl alcohol and a lint-free cloth.

  34. Motorola Moto E4 (XT1762) LCD and Digitizer Replacement, Home Button: шаг 34, изображение 1 из 1
    • In case you're replacing a broken screen and the replacement screen already includes the home button, skip the following steps.

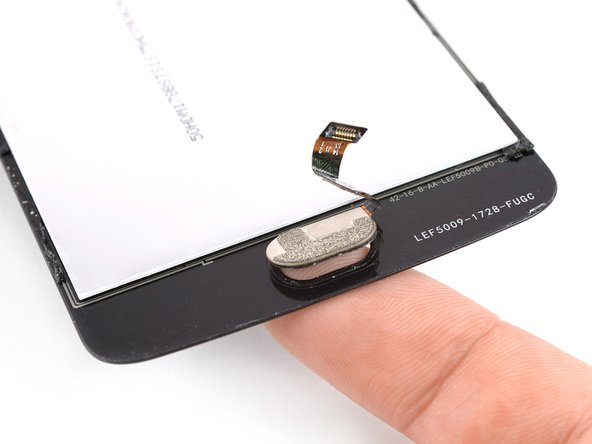
    • Apply an iOpener for about one minute to the bottom end of the display where the home button is located.

  35. Motorola Moto E4 (XT1762) LCD and Digitizer Replacement: шаг 35, изображение 1 из 3 Motorola Moto E4 (XT1762) LCD and Digitizer Replacement: шаг 35, изображение 2 из 3 Motorola Moto E4 (XT1762) LCD and Digitizer Replacement: шаг 35, изображение 3 из 3
    • Use your fingertip to push the home button from the front through the display.

    • Remove the home button.

Заключение

If possible, turn on your phone and test your repair before installing new adhesive and resealing the phone.

The best way to secure the new screen is with a sheet of custom-cut double-sided tape. If the replacement part does not come with adhesive preinstalled apply tape to the back of the screen, then carefully feed the display cable through the frame. Align the screen and press it into place.

To reassemble your device, follow these instructions in reverse order.

Take your e-waste to an R2 or e-Stewards certified recycler.

Repair didn’t go as planned? Check out our Answers community for troubleshooting help.

5 участников успешно повторили данное руководство.

Dominik Schnabelrauch

Участник с: 11/23/16

203 449 Репутация

Автор 682 руководств

Команда

iFixit Участник iFixit

Staff

135 членов

Автор 16 820 руководств

2 Комментариев

ottima guida… un’osservazione: a volte può capitare che acquistando un LCD+ DIGITIZER nuovo questi due non siano collegati. accertarsi prima di inserirlo nel frame.

dualcore - Ответить

Nicely done guide! Thank you!

Daniel Walton - Ответить

Добавить комментарий

Просмотр статистики:

За последние 24часов: 0

За последние 7 дней: 1

За последние 30 дней: 6

За всё время: 3,529