Введение
If your Skullcandy Hesh 3 headphones (model S6THW) aren't charging properly, use this guide to help replace the charging port. Before proceeding with this guide be sure to check for debris within the charging port. You can easily remove debris with a small dust blower or use a toothpick to clean it out.
Prior to starting this repair, you may refer to the Troubleshooting page for other possible reasons for the charging port issues you're experiencing. In addition, make sure to power down the headphones completely and disconnect them from any external power source.
This guide requires soldering. Soldering irons are very hot and have the potential to burn or cause a fire. Please use with caution. If you're unfamiliar with soldering or desoldering or need a refresher, refer to the How to Solder and Desolder a Connection guide.
Выберете то, что вам нужно
-
-
Use a Phillips #00 screwdriver to remove all four 4.0 mm screws securing the faceplate.
-
Remove the faceplate gently without pulling off the wires attached to the speaker and faceplate.
-
-
-
-
Use a soldering iron to heat up the solder at the points where the red, yellow, and black battery cables connect until they detach from the board.
-
Detach the connector on the side of the headphone cup to disconnect the red and black cables (next to the battery cables) from the headphones.
-
Slide the motherboard out of the headphone cup and flip it over.
-
-
-
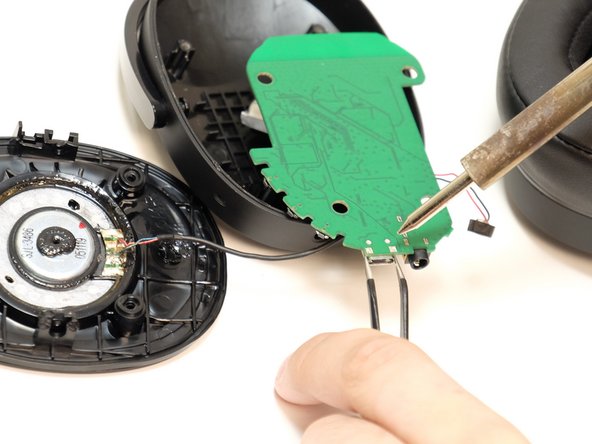
Use tweezers to hold the charging port in place, and use a soldering iron to desolder the four soldering points.
-
With tweezers, gently remove the charging port.
-


To reassemble your device, follow these instructions in reverse order.
To reassemble your device, follow these instructions in reverse order.
Команда

Linn Benton Community College, Team 1-3, Karnes Winter 2023 Участник Linn Benton Community College, Team 1-3, Karnes Winter 2023
LBCC-KARNES-W23S1G3
4 членов
Автор 4 руководств