Введение
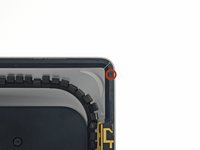
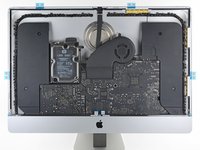
Removing the display on a 2012-2015 iMac requires cutting through the adhesive around the perimeter of the screen. After the adhesive is cut, it cannot be used to re-seal the display.
Follow this guide to apply a new set of adhesive strips.
The adhesive strips come in two variants: 2012-2015 adhesives and 2012-2019 adhesives. The 2012-2015 adhesives don’t have a microphone cutout along the lower strip and should only be used for 2012-2015 iMacs.
Выберете то, что вам нужно
-
Инструмент, используемый на этом этапе:iMac Intel 27" Cardboard Service Wedge$4.99
-
Инструмент, используемый на этом этапе:Tweezers$4.99
-
If you are re-using your existing display, you must also remove the old adhesive from the back of the display.
-
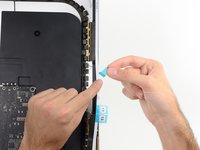
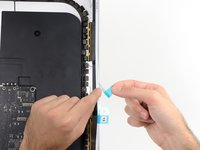
Peel off the adhesive strips using tweezers or your fingers. Start at the bottom and peel upward towards the top of the device.
-
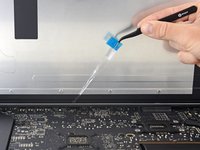
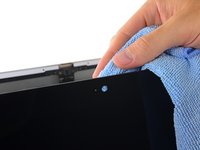
After all the old adhesive is removed, carefully clean the surface with 90% (or greater) isopropyl alcohol and a lint-free cloth. Wipe in one direction, not back and forth.
-
-
-
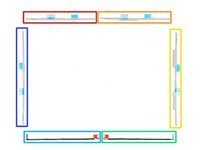
Lay out the adhesives strips beforehand so you won't accidentally install a strip in the wrong place:
-
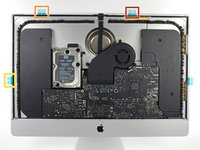
Strip 11 on the top left
-
Strip 12 on the top right
-
Strip 13 on the right vertical
-
Strip 14 on the bottom right, dark side up
-
Strip 15 on the bottom left, dark side up
-
Strip 16 on the left vertical
-
-
-
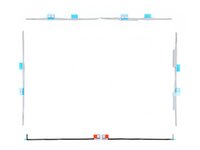
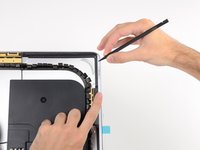
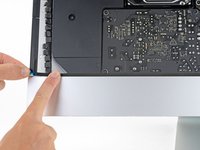
Start with strip 13, which goes on the right vertical side of the rear enclosure.
-
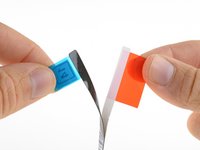
Peel the short piece of backing off the back of the strip.
-
-
-
Insert the tip of a spudger into the hole at the top of the strip from the side that still has a backing on it.
-
-
-
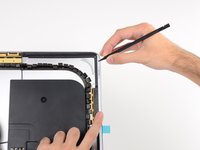
With the spudger still poking through the hole in the adhesive strip, push the spudger tip into the corresponding hole in the frame of the iMac.
-
Using the hole and spudger to anchor the position of the adhesive strip, line the strip up against the right edge, gently pull down against the spudger to ensure the strip is taut, and stick it onto the frame.
-
-
-
Once you're satisfied that the top half of the adhesive strip is neatly aligned, peel the longer piece of backing out from behind the strip.
-
-
-
-
Align the lower portion of the strip with the right edge of the frame, and stick it down.
-
-
-
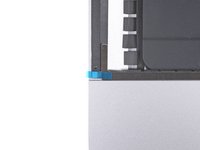
Use your finger to smooth out the strip. Make sure it is neatly aligned with the right side of the frame and that it sits flat.
-
-
-
Work your way counter-clockwise around the perimeter of the iMac, adding three more adhesive strips in the same manner:
-
Strip 12 on the top right
-
Strip 11 on the top left
-
Strip 16 on the left vertical
-
On the iMac Intel 27" Retina 5K Display, the top-right strip's blue tabs will not line up with the top antenna in the same way as the non-5K model. This is perfectly acceptable and won't impact the performance of the strips or antenna.
-
-
-
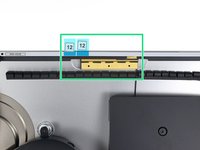
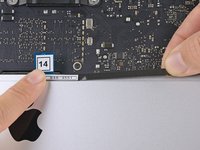
Grasp the red pull tab on strip 14 and pull to remove the backing from the strip.
-
Align the strip on the bottom edge of the rear enclosure, directly to the right of the middle screw on that edge.
-
Run your finger along the length of the adhesive strip to ensure it is straight and unwrinkled, pressing down as you go to adhere the strip to the iMac.
-
-
-
Repeat the previous step for strip 15, placing it along the bottom left edge of the iMac.
-
-
-
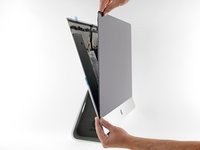
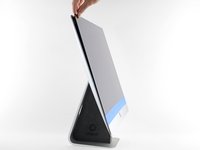
Gently set the display in place over the iMac, and align it carefully.
-
-
-
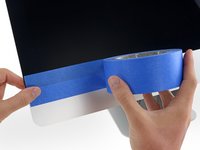
Use painter's tape or masking tape to temporarily secure the bottom edge of the display to the iMac's enclosure.
-
-
-
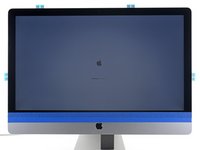
If you've already verified that your iMac is working correctly and are ready to seal it up, skip to step 18.
-
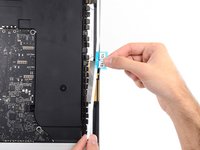
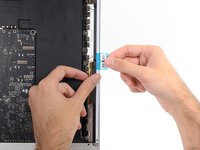
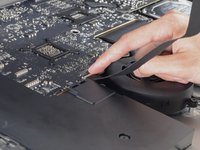
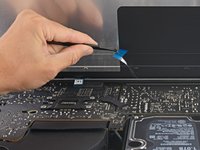
Gently insert the display data connector into its socket on the logic board. Be sure to press it straight into the socket, and insert it completely.
-
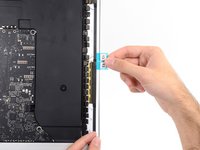
Flip the display data connector lock down onto the socket.
-
Insert the display power connector into its socket on the logic board.
-
-
-
After confirming that your iMac functions properly, disconnect the display cables and carefully lean the display forward.
-
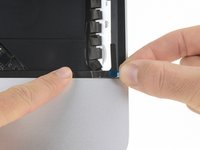
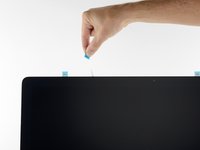
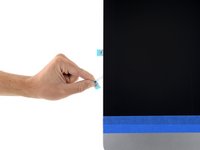
Remove the film from the two bottom strips by reaching in from above with a pair of tweezers and pulling the blue tabs straight up from the bottom edge of the display.
-
-
Инструмент, используемый на этом этапе:Microfiber Cleaning Cloths$3.99
-
Steady the display with one hand as you remove the adhesive liners in the following steps, or rest it lightly against the iMac's enclosure.
-
-
-
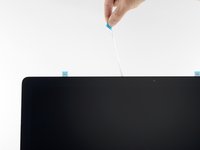
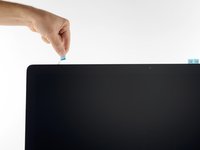
Remove one side of the protective film from strip 11 by pulling its tab straight up.
-
-
-
Repeat the previous steps to remove the protective films from all the remaining adhesive strips (labeled 11, 12, and 13).
-
-
-
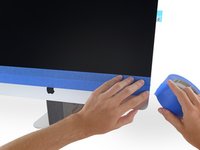
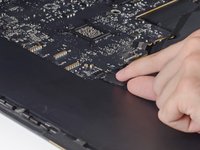
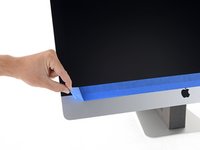
To ensure a strong bond, carefully tip the iMac flat on its back (with the screen facing straight up) and press carefully but firmly around all four edges of the display.
-
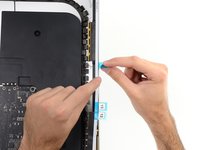
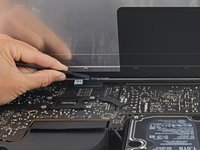
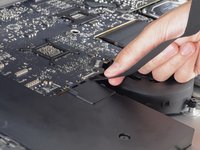
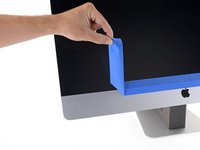
Remove the tape securing the display to the rear enclosure.
-


Отменить: Я не выполнил это руководство.
39 человек успешно провели ремонт по этому руководству.


3 Комментарии к руководству
Great guide, thanks!
Pro tip: don’t forget to plug in the 2 cables before you close the screen.. not that I had to cut open the iMac and replace the stickers again or something :-).
Well done!
It helped me 100% to avoid doing it a second time!
Thank You very Much!
I have read about these adhesive strips sometimes giving way and the screen falling. Here's some advice I got from a service place using these strips to replace iMac displays:
• Make sure to completely remove all residue from the original adhesive from both sides.
• Carefully heat/warm the housing and glass panel before and after applying the adhesive and attaching the panel.
• Apply firm, rolling pressure to the full border of the display either using your thumbs or a silicone/rubber rolling tool.
• Lie the iMac on its back, and prop it up so that the display panel is parallel to the ground. Leave it in this position for at least 4 hours (overnight is typically what we recommend)
We've yet to see a panel come loose with these steps followed. The biggest issue is if the adhesive needs to be removed in the future, since it rolls in on itself instead of splitting like the OEM strips.
I also used large binder clips with real gaffer tape on them to prevent scratching the screen/case to hold the screen tight overnight.