Эта версия возможно содержит некорректные исправления. Переключить на последнюю проверенную версию.
Выберете то, что вам нужно
-
Этот шаг не переведен. Помогите перевести
-
Power off your iPhone before beginning disassembly.
-
Remove the two 3.6 mm-long P2 Pentalobe screws next to the Lightning connector.
-
-
Этот шаг не переведен. Помогите перевести
-
Pull the blue handle backwards to unlock the Anti-Clamp's arms.
-
Slide the arms over either the left or right edge of your iPhone.
-
Position the suction cups near the bottom edge of the iPhone just above the home button—one on the front, and one on the back.
-
Squeeze the cups together to apply suction to the desired area.
-
-
Этот шаг не переведен. Помогите перевести
-
Pull the blue handle forwards to lock the arms.
-
Turn the handle clockwise 360 degrees or until the cups start to stretch.
-
Insert an opening pick under the screen when the Anti-Clamp creates a large enough gap.
-
Skip the next three steps.
-
-
Этот шаг не переведен. Помогите перевести
-
If you don't have an Anti-Clamp, use a single suction cup to lift the front panel:
-
Press a suction cup onto the screen, just above the home button.
-
-
Этот шаг не переведен. Помогите перевести
-
While holding the iPhone down with one hand, pull up on the suction cup to slightly separate the front panel assembly from the rear case.
-
Using a plastic opening tool, begin to gently pry the rear case down, away from the display assembly, while continuing to pull up with the suction cup.
-
-
Этот шаг не переведен. Помогите перевести
-
Pull the plastic nub to release the vacuum seal on the suction cup.
-
Remove the suction cup from the display assembly.
-
-
Этот шаг не переведен. Помогите перевести
-
Open the iPhone by swinging the home button end of the front panel assembly away from the rear case, using the top of the phone as a hinge.
-
-
Этот шаг не переведен. Помогите перевести
-
Open the display to about a 90º angle, and lean it against something to keep it propped up while you're working on the phone.
-
Add a rubber band to keep the display securely in place while you work. This prevents undue strain on the display cables.
-
-
Этот шаг не переведен. Помогите перевести
-
Remove the following Phillips screws from the battery connector bracket:
-
One 2.2 mm screw
-
One 3.2 mm screw
-
-
-
Этот шаг не переведен. Помогите перевести
-
Remove the metal battery connector bracket from the iPhone.
-
-
Этот шаг не переведен. Помогите перевести
-
Use a plastic opening tool to gently pry the battery connector up from its socket on the logic board.
-
-
Этот шаг не переведен. Помогите перевести
-
Remove the following five Phillips screws securing the front panel assembly cable bracket:
-
Three 1.2 mm screws
-
One 1.7 mm screw
-
One 3.1 mm screw
-
-
Этот шаг не переведен. Помогите перевести
-
Remove the front panel assembly cable bracket from the logic board.
-
-
Этот шаг не переведен. Помогите перевести
-
Use a spudger or a fingernail to disconnect the front-facing camera and sensor cable connector.
-
-
Этот шаг не переведен. Помогите перевести
-
Use a spudger or a fingernail to disconnect the home button cable connector.
-
-
Этот шаг не переведен. Помогите перевести
-
Use a spudger or a fingernail to disconnect the display data cable connector.
-
-
Этот шаг не переведен. Помогите перевести
-
Use the flat end of a spudger to disconnect the digitizer cable connector.
-
-
Этот шаг не переведен. Помогите перевести
-
Remove the following Phillips screws from the earpiece speaker/front-facing camera bracket:
-
One 2.3 mm screw
-
One 3.0 mm screw
-
One 2.2 mm screw
-
-
Этот шаг не переведен. Помогите перевести
-
Remove the earpiece speaker/front-facing camera bracket from the front panel.
-
-
Этот шаг не переведен. Помогите перевести
-
Lift the front-facing camera out of its recess in the front panel.
-
-
Этот шаг не переведен. Помогите перевести
-
Holding the front-facing camera out of the way, remove the earpiece speaker from the front panel.
-
-
Этот шаг не переведен. Помогите перевести
-
Keeping the front-facing camera out of the way, use the point of a spudger to push the ambient-light sensor up out of its recess in the front panel.
-
-
Этот шаг не переведен. Помогите перевести
-
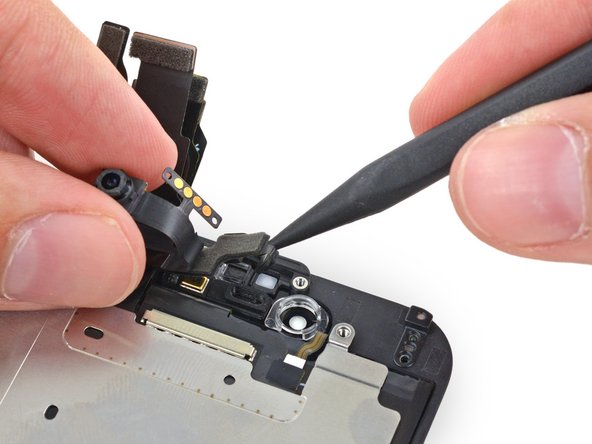
Fold the front-facing camera and sensor cable up to allow access to the microphone.
-
-
Этот шаг не переведен. Помогите перевести
-
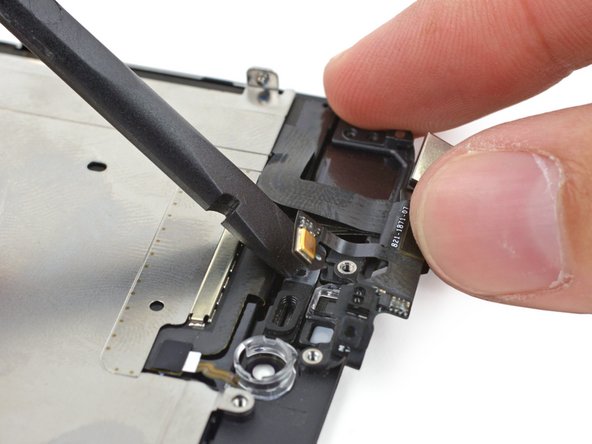
Carefully pry the microphone end of the sensor cable off of the adhesive holding it to the front panel.
-
-
Этот шаг не переведен. Помогите перевести
-
Remove the front-facing camera and sensor cable from the front panel.
-


Отменить: Я не выполнил это руководство.
410 участников успешно повторили данное руководство.


50 Комментариев
Perfect instructions, only confusion was where the sensor cable went. Would like a clear picture of sensor cable removed, as not to confuse viewer that the sensor cable is attached to the camera piece
I accidentally ordered the cable for the 6S plus. Would it still function or are they pinned differently?
I did same mistake on a iphone 6 , i ordered the i6S front camera flex, it worked and im starting to believe it improved my camera ! On my iphone 6
It looks better than before!!
We popped a 6s cable into an iPhone 6 to test. Everything fits and the camera does indeed work, although there is no improvement in resolution—the iPhone 6 doesn't seem able to use the extra pixels. We had mixed results with the other components on the cable assembly—the proximity sensor worked, but the ambient light sensor did not. We didn't test the microphone. Your mileage may vary, but I would recommend getting the correct part to avoid any unnecessary headaches. Cheers!
Hey thinking to install iphone6s or iphone7 front camera on my old iphone6 is it possible or they are differently designed conponents
Which one will work ???? Plz help
Slmanpro -