Эта версия возможно содержит некорректные исправления. Переключить на последнюю проверенную версию.
Выберете то, что вам нужно
-
Этот шаг не переведен. Помогите перевести
-
Power off your iPhone before beginning disassembly.
-
Remove the two 3.6 mm-long P2 Pentalobe screws next to the Lightning connector.
-
-
Этот шаг не переведен. Помогите перевести
-
Pull the blue handle backwards to unlock the Anti-Clamp's arms.
-
Slide the arms over either the left or right edge of your iPhone.
-
Position the suction cups near the bottom edge of the iPhone just above the home button—one on the front, and one on the back.
-
Squeeze the cups together to apply suction to the desired area.
-
-
Этот шаг не переведен. Помогите перевести
-
Pull the blue handle forwards to lock the arms.
-
Turn the handle clockwise 360 degrees or until the cups start to stretch.
-
Insert an opening pick under the screen when the Anti-Clamp creates a large enough gap.
-
Skip the next three steps.
-
-
Этот шаг не переведен. Помогите перевести
-
If you don't have an Anti-Clamp, use a single suction cup to lift the front panel:
-
Press a suction cup onto the screen, just above the home button.
-
-
Этот шаг не переведен. Помогите перевести
-
While holding the iPhone down with one hand, pull up on the suction cup to slightly separate the front panel assembly from the rear case.
-
Using a plastic opening tool, begin to gently pry the rear case down, away from the display assembly, while continuing to pull up with the suction cup.
-
-
Этот шаг не переведен. Помогите перевести
-
Pull the plastic nub to release the vacuum seal on the suction cup.
-
Remove the suction cup from the display assembly.
-
-
Этот шаг не переведен. Помогите перевести
-
Open the iPhone by swinging the home button end of the front panel assembly away from the rear case, using the top of the phone as a hinge.
-
-
Этот шаг не переведен. Помогите перевести
-
Open the display to about a 90º angle, and lean it against something to keep it propped up while you're working on the phone.
-
Add a rubber band to keep the display securely in place while you work. This prevents undue strain on the display cables.
-
-
Этот шаг не переведен. Помогите перевести
-
Remove the following Phillips screws from the battery connector bracket:
-
One 2.2 mm screw
-
One 3.2 mm screw
-
-
Этот шаг не переведен. Помогите перевести
-
Remove the metal battery connector bracket from the iPhone.
-
-
Этот шаг не переведен. Помогите перевести
-
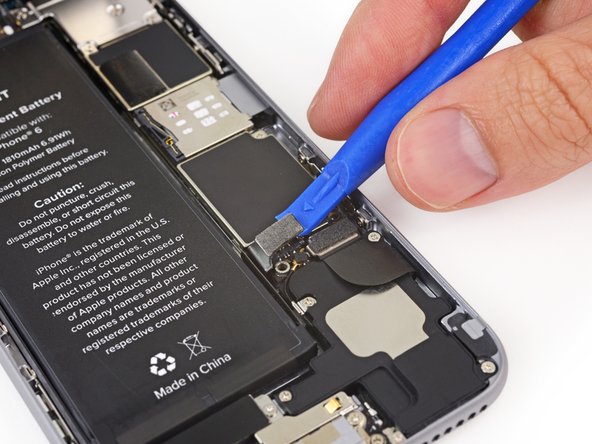
Use a plastic opening tool to gently pry the battery connector up from its socket on the logic board.
-
-
-
Этот шаг не переведен. Помогите перевести
-
Remove the following five Phillips screws securing the front panel assembly cable bracket:
-
Three 1.2 mm screws
-
One 1.7 mm screw
-
One 3.1 mm screw
-
-
Этот шаг не переведен. Помогите перевести
-
Remove the front panel assembly cable bracket from the logic board.
-
-
Этот шаг не переведен. Помогите перевести
-
Use a spudger or a fingernail to disconnect the front-facing camera and sensor cable connector.
-
-
Этот шаг не переведен. Помогите перевести
-
Use a spudger or a fingernail to disconnect the home button cable connector.
-
-
Этот шаг не переведен. Помогите перевести
-
Use a spudger or a fingernail to disconnect the display data cable connector.
-
-
Этот шаг не переведен. Помогите перевести
-
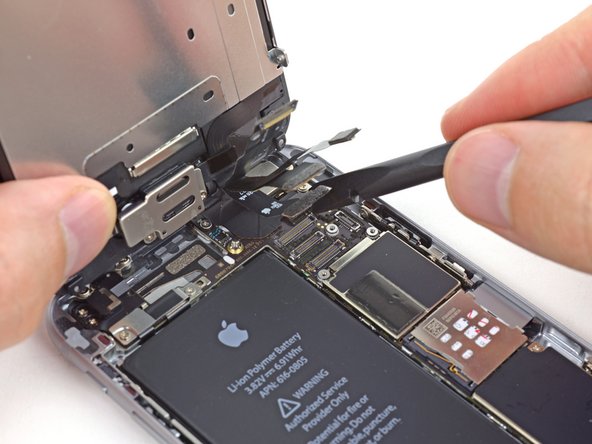
Use the flat end of a spudger to disconnect the digitizer cable connector.
-
-
-
Отклейте первую клейкую ленту от правого нижнего угла аккумулятора.
-
-
-
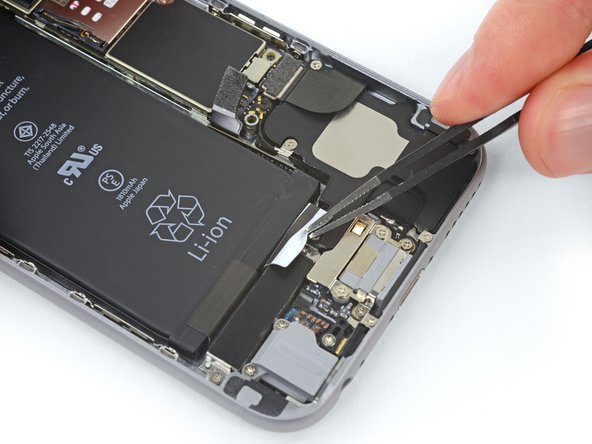
Аккуратно потяните клейкую ленту аккумулятора, по направлению к низу iPhone.
-
Старайтесь не тянуть с прижимом к аккумулятору или нижним компонентам, иначе лента может порваться.
-
Продолжайте тянуть, позволяя ленте медленно высвобождаться из пространства между аккумулятором и корпусом. Если вы почувствуете увеличение сопротивления ленты, то прекратите тянуть и перейдите к следующему шагу.
-
-
-
Когда вы почувствуете увеличившееся сопротивление ленты, то аккуратно вытяните её из-под правого нижнего угла аккумулятора.
-
Продолжайте тянуть ленту вверх и в сторону от правого края аккумулятора, что позволит ей медленно выходить из пространства между аккумулятором и корпусом, до тех пор, пока она окончательно не высвободится.
-
-
-
Переверните iPhone и вставьте пластиковую карту между корпусом и аккумулятором.
-
Не делайте этого со стороны материнской платы, иначе вы можете повредить телефон.
-
Надавливайте на карту чтобы сорвать клей под аккумулятором.
-
-
Этот шаг не переведен. Помогите перевести
-
Remove the following Phillips #00 screws from the upper cable bracket:
-
One 2.9 mm screw
-
One 2.2 mm screw
-
-
Этот шаг не переведен. Помогите перевести
-
Remove the following four Phillips #00 screws from the contact bracket:
-
One 1.5 mm screw
-
One 1.4 mm screw
-
Two 2.1 mm screws
-
-
Этот шаг не переведен. Помогите перевести
-
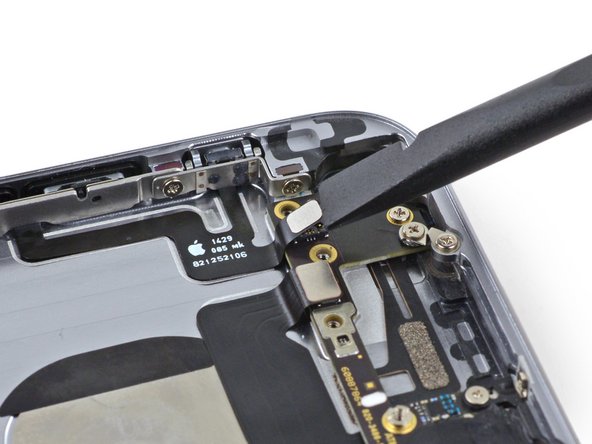
Use the flat end of a spudger to lift the volume control cable connector up off of its socket.
-
-
Этот шаг не переведен. Помогите перевести
-
Remove the following Phillips #00 screws from the volume control cable brackets:
-
Two 2.3 mm screws
-
One 1.8 mm scew
-
-
Этот шаг не переведен. Помогите перевести
-
Pull the hold switch and volume control button brackets away from the rear case to allow access to the button covers.
-
-
Этот шаг не переведен. Помогите перевести
-
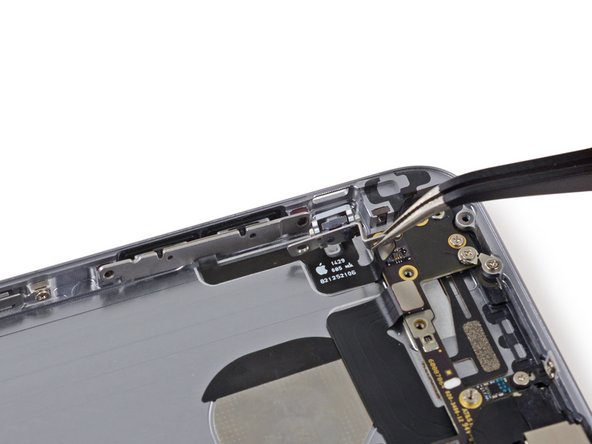
Begin to peel the volume control button cable up from the rear case starting from the connector end.
-
Be gentle when peeling the thin portions of the cable up from the case.
-
Remove the volume control button cable from the rear case.
-
-
Этот шаг не переведен. Помогите перевести
-
Pull the volume control buttons by the metal bar to remove them from the rear case.
-
The buttons are held to the case with an adhesive gasket, pull carefully to prevent ripping the membrane.
-
Отменить: Я не выполнил это руководство.
79 участников успешно повторили данное руководство.
6 Комментариев
hello guys, i have a problem with installing the frets to put in silent, I noticed that there are small springs to adhere well to the external key to the internal mechanism, only to replace it I loosened a bit, and now the clips and some smollato ... you as you have done? have you also found this problem? I hope you can help me.
Best regards
No doubt you probably have sorted it by now lol but I was struggling re-mounting the mute switch too! You’ll notice there’s small grooves/notches that the little pins off the bottom of the physical metal switch sit in. You just have to put the switch in the off position (top side when mounted) and then get it seated over the plastic switch first, and then move the little pins back under the springs either side and into the little grooves/notches on the mount. Once it’s seated in those notches just push the springs down a little so the metal switch won’t easily fall off when moving around and positioning back into the chassis ;)
Und wie klebt man die Klebedichtung wieder an?
Hab echt ein Problem….und wo bekäme man diese als ersatzteile?
Danke , freundlich grüsst
Michael
From (https://translate.google.com.au/?hl=en&t...):
“And how do you glue the adhesive seal back on?
Have a real problem .... And where would you get these as spare parts?
Thank you, friendly greetings”
—————————————————————————————————————
I was lucky enough just to get them to stick back into their spots with the existing adhesive on them. They’d be near impossible to clean anyhow, so just do your best ;)
Hello! If one of the buttons is bent, then I only need to replace the button not the whole cable right? :)


