Перейти к основному содержанию

Эта версия возможно содержит некорректные исправления. Переключить на последнюю проверенную версию.

Выберете то, что вам нужно

  1. Этот шаг не переведен. Помогите перевести

    : шаг 1, изображение 1 из 1
    • Before disassembling your iPhone, discharge the battery below 25%. A charged lithium-ion battery can catch fire and/or explode if accidentally punctured.

    • Power off your iPhone before beginning disassembly.

    • Remove the two 3.6 mm-long P2 Pentalobe screws next to the Lightning connector.

  2. Этот шаг не переведен. Помогите перевести

    : шаг 2, изображение 1 из 3 : шаг 2, изображение 2 из 3 : шаг 2, изображение 3 из 3
    Инструмент, используемый на этом этапе:
    Anti-Clamp
    $24.95
    Купить
    • The next two steps demonstrate the Anti-Clamp, a tool we designed to make the opening procedure easier. If you aren't using the Anti-Clamp, skip down three steps for an alternate method.

    • For complete instructions on how to use the Anti-Clamp, check out this guide.

    • Pull the blue handle backwards to unlock the Anti-Clamp's arms.

    • Slide the arms over either the left or right edge of your iPhone.

    • Position the suction cups near the bottom edge of the iPhone just above the home button—one on the front, and one on the back.

    • Squeeze the cups together to apply suction to the desired area.

    • If you find that the surface of your iPhone is too slippery for the Anti-Clamp to hold onto, you can use tape to create a grippier surface.

  3. Этот шаг не переведен. Помогите перевести

    : шаг 3, изображение 1 из 3 : шаг 3, изображение 2 из 3 : шаг 3, изображение 3 из 3
    • Pull the blue handle forwards to lock the arms.

    • Turn the handle clockwise 360 degrees or until the cups start to stretch.

    • Make sure the suction cups remain aligned with each other. If they begin to slip out of alignment, loosen the suction cups slightly and realign the arms.

    • Insert an opening pick under the screen when the Anti-Clamp creates a large enough gap.

    • If the Anti-Clamp doesn't create a sufficient gap, rotate the handle a quarter turn.

    • Don't crank more than a quarter turn at a time, and wait a few seconds between turns. Let the Anti-Clamp and time do the work for you.

    • Skip the next three steps.

  4. Этот шаг не переведен. Помогите перевести

    : шаг 4, изображение 1 из 1
    Инструмент, используемый на этом этапе:
    Anti-Clamp
    $24.95
    Купить
    • If you don't have an Anti-Clamp, use a single suction cup to lift the front panel:

    • Press a suction cup onto the screen, just above the home button.

    • Be sure the cup is pressed securely onto the screen to get a tight seal.

    • If your display is badly cracked, covering it with a layer of clear packing tape may allow the suction cup to adhere. Alternatively, very strong tape may be used instead of the suction cup. If all else fails, you can superglue the suction cup to the broken screen.

  5. Этот шаг не переведен. Помогите перевести

    : шаг 5, изображение 1 из 1
    • While holding the iPhone down with one hand, pull up on the suction cup to slightly separate the front panel assembly from the rear case.

    • Take your time and apply firm, constant force. The display assembly is a much tighter fit than most devices.

    • Using a plastic opening tool, begin to gently pry the rear case down, away from the display assembly, while continuing to pull up with the suction cup.

    • There are several clips holding the front panel assembly to the rear case, so you may need to use a combination of the suction cup and plastic opening tool to free the front panel assembly.

  6. Этот шаг не переведен. Помогите перевести

    : шаг 6, изображение 1 из 2 : шаг 6, изображение 2 из 2
    • Pull the plastic nub to release the vacuum seal on the suction cup.

    • Remove the suction cup from the display assembly.

  7. Этот шаг не переведен. Помогите перевести

    : шаг 7, изображение 1 из 3 : шаг 7, изображение 2 из 3 : шаг 7, изображение 3 из 3
    • Open the iPhone by swinging the home button end of the front panel assembly away from the rear case, using the top of the phone as a hinge.

    • Several clips along the top edge of the front panel form a partial hinge.

    • During reassembly, align the clips just below the top edge of the rear case. Then, slide the front panel upward until its top edge is flush with that of the rear case.

  8. Этот шаг не переведен. Помогите перевести

    : шаг 8, изображение 1 из 3 : шаг 8, изображение 2 из 3 : шаг 8, изображение 3 из 3
    • Open the display to about a 90º angle, and lean it against something to keep it propped up while you're working on the phone.

    • In a pinch, an unopened canned beverage works well for this.

    • Add a rubber band to keep the display securely in place while you work. This prevents undue strain on the display cables.

  9. Этот шаг не переведен. Помогите перевести

    : шаг 9, изображение 1 из 1
    Инструмент, используемый на этом этапе:
    Magnetic Project Mat
    $19.95
    Купить
    • Remove the following Phillips screws from the battery connector bracket:

    • One 2.2 mm screw

    • One 3.2 mm screw

    • During your repair, keep track of each screw and make sure it goes back exactly where it came from to avoid damaging your phone.

  10. Этот шаг не переведен. Помогите перевести

    : шаг 10, изображение 1 из 1
    • Remove the metal battery connector bracket from the iPhone.

  11. Этот шаг не переведен. Помогите перевести

    : шаг 11, изображение 1 из 1
    • Use a plastic opening tool to gently pry the battery connector up from its socket on the logic board.

    • Take care to only pry up on the battery connector, and not the socket on the logic board. If you pry up on the logic board socket, you may break the connector entirely.

  12. Этот шаг не переведен. Помогите перевести

    : шаг 12, изображение 1 из 1
    • Remove the following five Phillips screws securing the front panel assembly cable bracket:

    • Three 1.2 mm screws

    • One 1.7 mm screw

    • One 3.1 mm screw

    • Incorrect placement of these screws during reassembly will cause permanent damage to your iPhone's logic board.

  13. Этот шаг не переведен. Помогите перевести

    : шаг 13, изображение 1 из 1
    • Remove the front panel assembly cable bracket from the logic board.

  14. Этот шаг не переведен. Помогите перевести

    : шаг 14, изображение 1 из 2 : шаг 14, изображение 2 из 2
    • In the next four steps, take care to pry up only on the cable connectors, and not on their sockets on the logic board.

    • Use a spudger or a fingernail to disconnect the front-facing camera and sensor cable connector.

  15. Этот шаг не переведен. Помогите перевести

    : шаг 15, изображение 1 из 2 : шаг 15, изображение 2 из 2
    • Use a spudger or a fingernail to disconnect the home button cable connector.

  16. Этот шаг не переведен. Помогите перевести

    : шаг 16, изображение 1 из 2 : шаг 16, изображение 2 из 2
    • Make sure the battery is disconnected before you disconnect or reconnect the cable in this step.

    • Use a spudger or a fingernail to disconnect the display data cable connector.

    • When reassembling your phone, the display data cable may pop off its connector. This can result in white lines or a blank screen when powering your phone back on. If that happens, simply reconnect the cable and power cycle your phone. The best way to power cycle your phone is to disconnect and reconnect the battery connector.

  17. Этот шаг не переведен. Помогите перевести

    : шаг 17, изображение 1 из 2 : шаг 17, изображение 2 из 2
    • Use the flat end of a spudger to disconnect the digitizer cable connector.

    • When reconnecting the digitizer cable, do not press the center of the connector. Press one end of the connector, then press the opposite end. Pressing in the center of the connector can bend the component and cause digitizer damage.

  18. Этот шаг не переведен. Помогите перевести

    : шаг 18, изображение 1 из 1
    • Remove the front panel assembly from the rear case.

  19. , Аккумулятор: шаг 19, изображение 1 из 2 , Аккумулятор: шаг 19, изображение 2 из 2
    • Отклейте первую клейкую ленту от правого нижнего угла аккумулятора.

    • Используйте ваши пальцы или тупой пинцет, и будьте очень осторожны работая рядом с аккумулятором —прокол литий-ионного аккумулятора может высвободить химические элементы и привести к пожару.

  20. : шаг 20, изображение 1 из 3 : шаг 20, изображение 2 из 3 : шаг 20, изображение 3 из 3
    • Аккуратно потяните клейкую ленту аккумулятора, по направлению к низу iPhone.

    • Старайтесь не тянуть с прижимом к аккумулятору или нижним компонентам, иначе лента может порваться.

    • Продолжайте тянуть, позволяя ленте медленно высвобождаться из пространства между аккумулятором и корпусом. Если вы почувствуете увеличение сопротивления ленты, то прекратите тянуть и перейдите к следующему шагу.

    • Если в какой-то момент лента порвётся во время вытягивания, то используйте ваши пальцы или тупой пинцет чтобы поддеть оставшийся конец ленты и продолжите процесс.

    • Если лента порвётся под аккумулятором и не будет возможности её достать, то попробуйте сперва убрать другую ленту и затем переходите к Шагу 25.

  21. : шаг 21, изображение 1 из 3 : шаг 21, изображение 2 из 3 : шаг 21, изображение 3 из 3
    • Когда вы почувствуете увеличившееся сопротивление ленты, то аккуратно вытяните её из-под правого нижнего угла аккумулятора.

    • Продолжайте тянуть ленту вверх и в сторону от правого края аккумулятора, что позволит ей медленно выходить из пространства между аккумулятором и корпусом, до тех пор, пока она окончательно не высвободится.

    • Не позволяйте ленте зацепить разъем аккумулятора, иначе он может повредиться или оборваться.

  22. : шаг 22, изображение 1 из 2 : шаг 22, изображение 2 из 2
    • Переверните iPhone и вставьте пластиковую карту между корпусом и аккумулятором.

    • Не делайте этого со стороны материнской платы, иначе вы можете повредить телефон.

    • С большой аккуратностью держите карту как можно ровнее относительно аккумулятора для предотвращения его изгиба, в результате которого может произойти повреждение и высвобождение опасных химических элементов.

    • Надавливайте на карту чтобы сорвать клей под аккумулятором.

  23. : шаг 23, изображение 1 из 1
    • Извлеките аккумулятор из iPhone.

    • При установке аккумулятора следуйте этому руководству по замене клейких лент.

    • Сделайте жёсткую перезагрузку после сборки. Это предотвратит некоторые трудности и упростит поиск неисправностей.

  24. Этот шаг не переведен. Помогите перевести

    : шаг 24, изображение 1 из 1
    • Remove the following Phillips #00 screws from the upper cable bracket:

    • One 2.9 mm screw

    • One 2.2 mm screw

  25. Этот шаг не переведен. Помогите перевести

    : шаг 25, изображение 1 из 2 : шаг 25, изображение 2 из 2
    • Remove the upper cable bracket from the iPhone.

  26. Этот шаг не переведен. Помогите перевести

    : шаг 26, изображение 1 из 1
    • Remove the following four Phillips #00 screws from the contact bracket:

    • One 1.5 mm screw

    • One 1.4 mm screw

    • Two 2.1 mm screws

  27. Этот шаг не переведен. Помогите перевести

    : шаг 27, изображение 1 из 2 : шаг 27, изображение 2 из 2
    • Remove the contact bracket from the iPhone.

  28. Этот шаг не переведен. Помогите перевести

    : шаг 28, изображение 1 из 2 : шаг 28, изображение 2 из 2
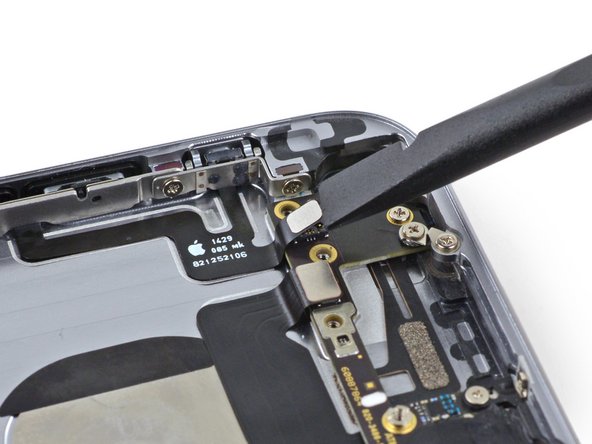
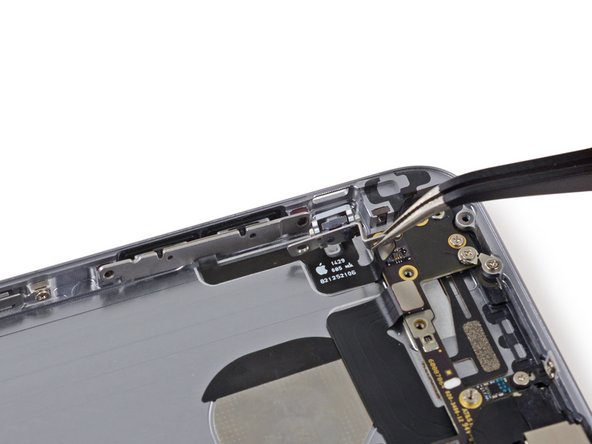
    • Use the flat end of a spudger to lift the volume control cable connector up off of its socket.

    • Only pry up on the connector, not the socket on the logic board or you risk permanent damage.

  29. Этот шаг не переведен. Помогите перевести

    : шаг 29, изображение 1 из 1
    • Remove the following Phillips #00 screws from the volume control cable brackets:

    • Two 2.3 mm screws

    • One 1.8 mm scew

  30. Этот шаг не переведен. Помогите перевести

    : шаг 30, изображение 1 из 3 : шаг 30, изображение 2 из 3 : шаг 30, изображение 3 из 3
    • Pull the hold switch and volume control button brackets away from the rear case to allow access to the button covers.

  31. Этот шаг не переведен. Помогите перевести

    : шаг 31, изображение 1 из 3 : шаг 31, изображение 2 из 3 : шаг 31, изображение 3 из 3
    • Begin to peel the volume control button cable up from the rear case starting from the connector end.

    • Be gentle when peeling the thin portions of the cable up from the case.

    • Remove the volume control button cable from the rear case.

Финишная черта

59 участников успешно повторили данное руководство.

Sam Goldheart

Участник с: 10/18/12

465 777 Репутация

Автор 538 руководств

Команда

iFixit Участник iFixit

Staff

135 членов

Автор 16 817 руководств

2 Комментариев

These instructions are so AWESOME to be able to reference! That last 1.8mm screw was a pain to get out of my phone. Step-by-Step, worked EXCELLENT. Thanks for posting these!

Brian S Graham - Ответить

TRICKY BITS: replacing the mute switch lever onto the cable assembly is a bit…interesting. It was only when I used the Head Magnifier that I was able to see the mechanics of the switch and fit it on. There needs to be a seriously microscopic shot of that mechanical fit!

But, get the magnifier, it’s great for digging out splinters from your fingers.

SUGGESTION: Once you get the switch and the bracket situated, but before you stick the control cable to the case, make sure the switch functions. I had to loosen the three screws and place pressure on the assembly, holding the switch firmly in place, before it made a solid fit-then I tightened the three screws. Voila, the switch works!

Only then should did I bond the cable to the case

And now my phone rings again! Yay, no more missed calls!

maxB - Ответить

Добавить комментарий

Просмотр статистики:

За последние 24часов: 4

За последние 7 дней: 18

За последние 30 дней: 52

За всё время: 65,029