Введение
A complicated fix for a tiny problem. Learn how to remove the screen and camera in order to access the inside of the ring to pop it out, then insert the new lense ring.
Выберете то, что вам нужно
-
-
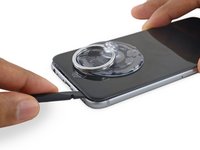
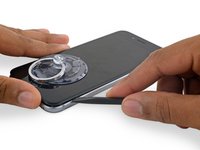
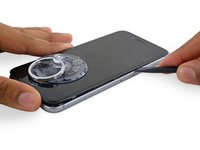
Remove the two 3.4 mm P2 Pentalobe screws on the bottom edge of the iPhone, on either side of the Lightning connector.
-
-
Инструмент, используемый на этом этапе:Clampy - Anti-Clamp$24.95
-
Apply mild heat to the lower edge of the iPhone using an iOpener or hair dryer for about a minute.
-
-
-
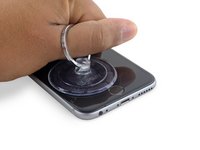
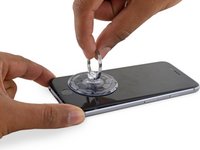
Apply a suction cup to the lower left corner of the display assembly.
-
Take care not to place the suction cup over the home button.
-
-
-
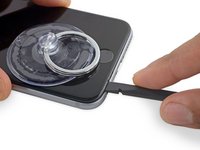
Pull up on the suction cup with firm, constant pressure to create a slight gap between the front panel and rear case.
-
-
-
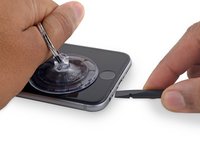
Place the flat edge of a spudger into the gap between the screen and rear case, directly above the headphone jack.
-
-
-
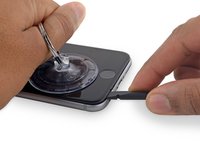
Twist the spudger to widen the gap between the front panel assembly and the rest of the phone.
-
-
-
Insert the flat end of the spudger on the left side of the phone, between the display assembly and rear case.
-
Slide the spudger up the side of the phone to separate the adhesive and pop the clips free.
-
-
-
Remove the spudger and reinsert it on the bottom edge, where you pried the phone open.
-
Slide the spudger to the right, along the bottom edge of the phone.
-
-
-
Slide the spudger up the right side to continue separating the adhesive and popping the display clips free from the iPhone.
-
-
-
Pull up on the nub on the top side of the suction cup to remove it from the front panel.
-
-
-
-
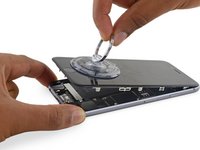
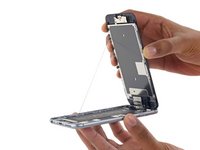
Gently grasp the display assembly and lift it up to open the phone, using the clips at the top of the front panel as a hinge.
-
Open the display to about a 90º angle, and lean it against something to keep it propped up while you're working on the phone.
-
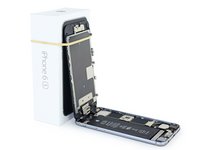
Add a rubber band to keep the display securely in place while you work. This prevents undue strain on the display cables.
-
During reassembly, pause here if you wish to replace the adhesive around the edges of the display.
-
During reassembly, the camera end of the screen body needs to hook under the edge of the body. The hooks of the screen frame need to be under the rim of the main body and snugged toward the camera end to easily close the cover and have it properly clip.
-
These hooks are not really a proper hinge but clasps that need to be under the rim of the main phone frame/edge!! This way the screen easily will return to its closed state nicely gently snapping into place.
-
During reassembly, reverse order for getting the screen clipped back in means pressing along the right side top to bottom corner. Then the left.
-
-
Инструмент, используемый на этом этапе:Magnetic Project Mat$19.95
-
Remove two Phillips screws securing the battery connector bracket, of the following lengths:
-
One 2.9 mm screw
-
One 2.2 mm screw
-
-
-
Use the point of a spudger to disconnect the battery connector by prying it straight up from the logic board.
-
-
-
Push the battery connector away from the logic board until it stays separated from its socket, so as to avoid any accidental connection to the battery while you work.
-
-
-
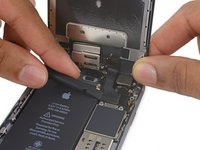
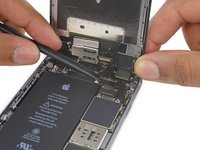
Remove the following four Phillips screws securing the display cable bracket:
-
Three 1.2 mm screws
-
One 2.8 mm screw
-
-
-
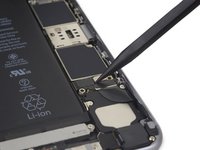
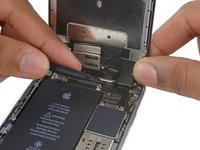
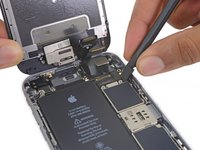
Use a spudger or a clean fingernail to disconnect the front camera flex cable by prying it straight up from its socket on the logic board.
-
-
-
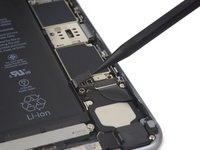
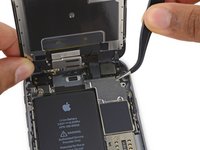
Disconnect the digitizer cable by prying it straight up from its socket on the logic board.
-
-
-
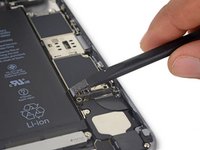
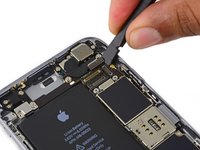
Disconnect the display cable by prying it straight up from its socket on the logic board.
-
-
-
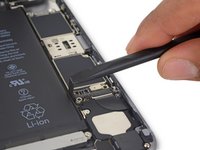
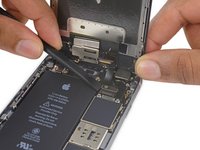
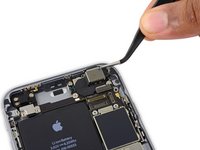
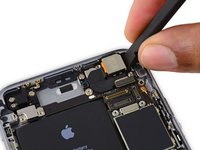
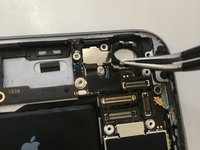
Use the flat end of a spudger to disconnect the rear camera from its socket on the logic board.
-
-
-
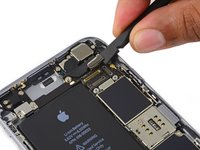
Remove the following two Phillips screws over the rear camera bracket:
-
One 1.6 mm screw
-
One 2.0 mm screw
-
-
-
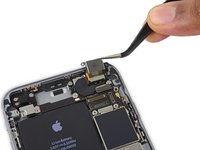
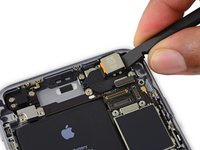
Insert a spudger to the side of the camera, between the rear case and the camera module.
-
Gently pry up on the camera to nudge it out from its housing.
-
-
-
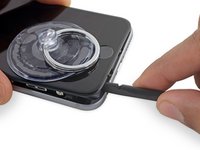
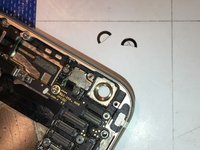
Remove the glass by pushing out from the inside of the frame
-
-
-
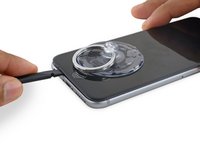
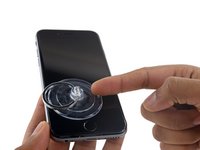
Butt the lens rim up against a raised surface with the rest of the phone on the surface and the ring over air.
-
-
-
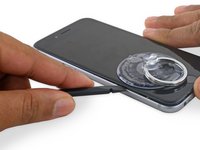
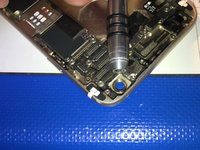
Use a driver without a bit to fit on the ring from the inside. It shouldn't rest on the frame around the ring at all. Gently tap down on the ring until it pops out while firmly holding the frame down.
-
-
-
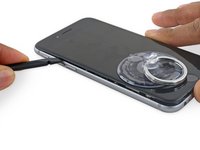
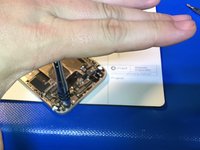
Insert new ring with tiny dots of super glue. Don't use too much glue and get it on the frame.
-


To reassemble your device, follow these instructions in reverse order.
Отменить: Я не выполнил это руководство.
47 человек успешно провели ремонт по этому руководству.

5 Комментарии к руководству
sometimes it becomes a pain to remove old ring, some devices has rolled ring so it much harder to remove carefully
I bent the frame and distorted the back panel where it started to come out trying to “pop-out” the lens ring. The lens ring was attached to an inner piece that holds the camera by a metal piece, this wasn’t described in these instructions.
Be careful of this!
You’re right! I used a previous guide that shows up until the camera is removed, then my own starts after I’ve already removed this flexible metal bracket. This bracket is used as a alignment guide and stabilizer for the camera so hard hits don’t rattle the sensitive internal magnets that stabilize the camera lenses. With a fine screwdriver, pop the 4 points that this is welded to the lens up then remove the bracket. It may get mangled a bit but it can usually be straightened back out to re-use upon camera reinstall.
The only way to get the ring out for me without damage or strain other components ,board or case was to take a 7.5mm drill and drill out the ring from the back and when the inner bracket came lose you know you are deep enough .
A little dot of CA applied with a toothpick to glue the lens inplace and a little glue on the inside to fix that bracket.
Tip: if just the lens glass piece is broken and there is no damage to the ring try to source and buy the glass lens without the ring alot easier to
repair ,you don’t have to take the screen and camera if no glass made it to the camera.
Just make sure that the ring and the rim where the glass is seated is clean and free of glass splinters and glue .
Again add a little CA with a toothpick pop in the lens and done.
Few minutes of work and no risk of breaking somthing in the proces.
first iPhone repair for me… I was trembling when I switched it back on. I was worried I didn’t put the screen and front camera connectors in place properly (it’s hard). But it went all well! Thanks for the guide, but I think it’d be really good to add the steps about the square metal thingy between the camera and the ring.