Перейти к основному содержанию

iPhone 7 Opening Procedure

Абсолютно необходимое руководство
Это руководство предназначено только для использования в качестве обязательного условия для других руководств. Оно не полностью само по себе.

Выберете то, что вам нужно

  1. iPhone 7 Opening Procedure, Pentalobe Screws: шаг 1, изображение 1 из 1
    • Before you begin, discharge your iPhone battery below 25%. A charged lithium-ion battery can catch fire and/or explode if accidentally punctured.

    • Power off your iPhone before beginning disassembly.

    • Remove the two 3.4 mm pentalobe screws on the bottom edge of the iPhone.

    • Opening the iPhone's display will compromise its waterproof seals. Have replacement seals ready before you proceed past this step, or take care to avoid liquid exposure if you reassemble your iPhone without replacing the seals.

  2. iPhone 7 Opening Procedure, iPhone 7 Opening Procedure: шаг 2, изображение 1 из 1
    • Heating the lower edge of the iPhone will help soften the adhesive securing the display, making it easier to open.

    • Use a hairdryer or prepare an iOpener and apply it to the lower edge of the iPhone for about a minute in order to soften up the adhesive underneath.

  3. iPhone 7 Opening Procedure: шаг 3, изображение 1 из 2 iPhone 7 Opening Procedure: шаг 3, изображение 2 из 2
    • Attach a suction cup to the lower half of the display assembly, just above the home button.

    • Be sure the suction cup does not overlap with the home button, as this will prevent a seal from forming between the suction cup and front glass.

    • If your display is badly cracked, covering it with a layer of clear packing tape may allow the suction cup to adhere. Alternatively, very strong tape may be used instead of the suction cup. If all else fails, you can superglue the suction cup to the broken screen.

  4. iPhone 7 Opening Procedure: шаг 4, изображение 1 из 3 iPhone 7 Opening Procedure: шаг 4, изображение 2 из 3 iPhone 7 Opening Procedure: шаг 4, изображение 3 из 3
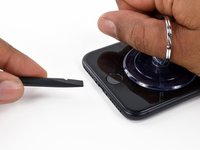
    • Pull up on the suction cup to create a small gap between the display assembly and the rear case.

    • Insert the flat end of a spudger into the gap.

    • The watertight adhesive holding the display in place is very strong, and creating this initial gap takes a significant amount of force. If you're having a hard time opening a gap, rock the screen up and down to weaken the adhesive until you can fit a spudger inside.

  5. iPhone 7 Opening Procedure: шаг 5, изображение 1 из 3 iPhone 7 Opening Procedure: шаг 5, изображение 2 из 3 iPhone 7 Opening Procedure: шаг 5, изображение 3 из 3
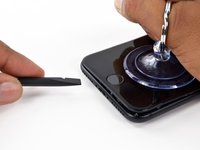
    • Slide the spudger to the left along the lower edge of the iPhone.

    • Twist the spudger to widen the gap between the display and rear case.

  6. iPhone 7 Opening Procedure: шаг 6, изображение 1 из 3 iPhone 7 Opening Procedure: шаг 6, изображение 2 из 3 iPhone 7 Opening Procedure: шаг 6, изображение 3 из 3
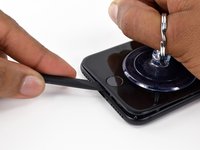
    • Slide the spudger up the left side of the iPhone, starting at the lower edge and moving towards the volume control buttons and silent switch.

    • Do not pry along the top edge of the phone, you risk damaging the plastic clips securing the display.

  7. iPhone 7 Opening Procedure: шаг 7, изображение 1 из 3 iPhone 7 Opening Procedure: шаг 7, изображение 2 из 3 iPhone 7 Opening Procedure: шаг 7, изображение 3 из 3
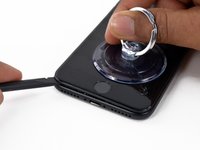
    • Insert the flat edge of a spudger into the bottom right corner of the device.

    • Twist the spudger to widen the gap between the display assembly and the rear case.

    • Slide the flat end of the spudger up the right side of the phone to break up the adhesive holding the display in place.

    • Do not insert the spudger further than the adhesive to avoid damaging delicate ribbon cables along the right edge.

  8. iPhone 7 Opening Procedure: шаг 8, изображение 1 из 2 iPhone 7 Opening Procedure: шаг 8, изображение 2 из 2
    • Pull up on the suction cup to lift up the display and open the iPhone.

    • Do not raise the display more than 10º as there are ribbon cables along the right edge of the device connecting the display to the logic board.

  9. iPhone 7 Opening Procedure: шаг 9, изображение 1 из 1
    • Pull up on the small nub on the suction cup to remove it from the front panel.

  10. iPhone 7 Opening Procedure: шаг 10, изображение 1 из 2 iPhone 7 Opening Procedure: шаг 10, изображение 2 из 2
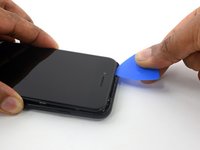
    • Slide an opening pick along the top edge of the iPhone, between the rear case and front panel, to break up the remaining adhesive holding the screen in place.

    • Be careful not to damage the plastic clips on the top edge of the phone.

  11. iPhone 7 Opening Procedure: шаг 11, изображение 1 из 3 iPhone 7 Opening Procedure: шаг 11, изображение 2 из 3 iPhone 7 Opening Procedure: шаг 11, изображение 3 из 3
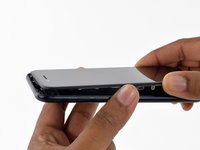
    • Pull the display assembly slightly away from the top edge of the phone to disengage the clips holding it to the rear case.

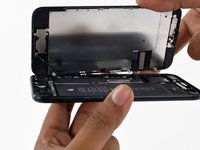
    • Open the iPhone by swinging the display up from the left side, like the back cover of a book.

    • Don't try to fully separate the display yet, as several fragile ribbon cables still connect it to the iPhone's logic board.

Заключение

To reassemble your device, follow these instructions in reverse order.

4 участников успешно повторили данное руководство.

Evan Noronha

Участник с: 02/05/15

223 163 Репутация

Автор 168 руководств

0 Комментариев

Добавить комментарий

Просмотр статистики:

За последние 24часов: 0

За последние 7 дней: 0

За последние 30 дней: 0

За всё время: 1,168