Перейти к основному содержанию
Присоединяйся к сообществу ремонтников - Создай аккаунт

The Ryobi P214 is a cordless hammer drill that operates using an 18V lithium-ion battery, with a 1/2 inch chuck, up to 600 in-lbs torque, and speeds of 0-400/0-1600 RPM. This page provides detailed information and repair guides for the P214, which includes a hammer function for masonry drilling, 24 clutch settings, and compatibility with the One+ system for battery interchangeability.

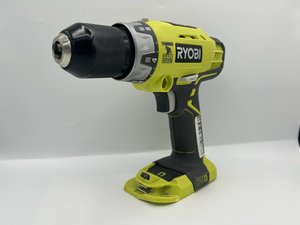
Can't remove chuck from drill

Block Image

I have the ryobi p214 cordless drill and no matter what I cant remove the chuck. I took the screw out from inside the jaws and I put an allen wrench in and held it with the jaws. I managed to turn the chuck counter clockwise but it just barely spins without loosening at all. How can I get the chuck off?

Ответ на этот вопрос У меня та же проблема

Это хороший вопрос?

Счет 1
5 Комментариев

@archiep once you got the allen wrench locked, you placed your drill in REVERSE (lowest torques setting)and you do have a full battery? Now pull the trigger. Careful, It'll kick a bit and you got to hang on to it and watch your wrist.

из

I did this, but the drill started smoking and it also kept auto braking unfortunately.

из

I have the same problem? I cant tighten the chuck enough to stop the drill bit just spinning in the chuck , so , I want to fit a new one but cant remove the old one? Cant see any screw / bolt up inside the chuck at all? Hopeless system?

из

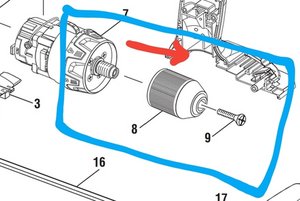
Had the same problem so dismantled the drill down to the point where I had just the shaft with 2 flats on the end, clamped it in the vice , 10mm hex key in the chuck and heated the hell out of the old chuck, it let go with a bang and the thread is not a 1/2" 20 thread as mentioned, still to indentify, be careful during disassembly as a lot of small gears and parts, photograph each stage.

из

Also good to note that the screw is a reverse thread

из

Добавить комментарий

1 ответ

Наиболее полезный ответ

A few things that may help; first instructions on how to deal with the situation. here next a reminder that this has a 3 year warranty in case that still applies and your owner's manual here in case you need it, which gives instructions on pursuing your warranty or service. Last; schematics and parts are available here

Был ли этот ответ полезен?

Счет 1

2 Комментариев:

Thank you for the useful content, however, the article link is doing something different than what I'm trying to do. I don't have a bit stuck in the chuck, I'm trying to remove the chuck from the body of the drill. I used the schematic you shared to illustrate my situation.

из

OK, well, in the very unlikely event that @oldturkey03 's advice didn't do it for you, (he's a pretty darn sharp tack) I did find an answer to that too...somewhere but should have read your question more carefully.

из

Добавить комментарий

Добавьте свой ответ

Archiep буду вечно благодарен.
Статистика просмотров:

За последние 24 часов: 3

За последние 7 дней: 12

За последние 30 дней: 68

За всё время: 2,437