Введение
This device being relatively simple the problems are quite easy to identify. Take the time despite everything to read the method to practice a repair in good conditions. Browse by following the two tutorials on the functions and how it works. This will maximize the chances of success.
-
-
The kettle is a kitchen utensil used to bring a liquid to a boil. Electric kettles, which are the subject of this study, have a built-in heater.
-
The most common models are the cordless kettles: the kettles are placed on a base (see photo) connected to an electrical outlet, during the heating phase. The container can then be detached from the base and used as an ordinary container.
-
The operation of the electric kettle is based on the Joule effect. The kettles are equipped with a heating resistor in the form of a ring-shaped tube. The current, when it passes through the resistor, causes an increase in the thermal energy of the ring: the water is heated by heat transfer.
-
To learn more about the Joule effect, visit this site. See also the definition of a "kettle" on Wikipedia
-
-
-
Our study is of the Moulinex brand model AC10-10S011. It is 1100W.
-
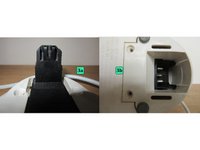
The device consists of a base 1 and a container 2. The base is equipped with a power cord. It is equipped with a device 3 which ensures the electrical continuity with the heating resistor which is in the container. This device is secured to avoid any contact with the electrical conductors.
-
In the tank is a heating element 4. A switch allows to start and stop the heating. This kettle is also equipped with an automatic stop when the water has reached the right temperature.
-
-
-
The principles are simple. The base is connected to the mains via the power cord. When the reservoir is placed on the base, the 3a 3b device powers the resistor at the bottom of the reservoir. A 6 switch on the reservoir handle switches the power on and off.
-
-
-
-
The reservoir consists of a plastic shell with a handle. Inside this handle is a 6 switch for switching on the kettle. The resistor 4 placed inside, is fixed by three screws to the connection device 3b A gasket 5 ensures watertightness.
-
The 6 switch is connected to the 3b device located at the bottom of the reservoir, by a plastic rod which, by translation, activates an electrical contact system.
-
-
-
The 3 device is the centerpiece of this kettle. It performs a number of functions: - electrical connection between the base and the reservoir - manual switching on and off of the heating element - automatic switching off when the water temperature is reached.
-
It consists of 2 parts. One, placed on the base 3a, the other placed at the base of the tank, 3b. The latter performs all 3 functions. It is made up of a system of metal fins which are activated to make electrical contact.
-
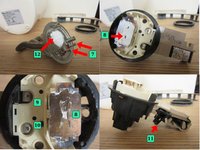
The resistor has two 7 terminals mounted on a 12 metal support. Part 3 is made of metal fins. The 9 and 10 blades come into contact with the 7 resistor terminals. The 8 blade comes into contact with the 12 support.
-
The ON/OFF switch 11 is located on top of part 3.
-
When this button is switched on, the 9 blade is activated, allowing current to flow between the socket in the base and one of the 7 terminals on the resistor.
-
The 10 reed is normally closed (the water is cold), so the current can pass through and feed the resistor, which starts to heat. When the temperature is reached, the 8 reed deforms and opens the circuit by toggling the 11 switch. The resistor stops heating. The M/A button 6 returns to its position at the stop.
-
-
-
One of the frequent failures is the resistor insulation fault. This is the case when the device is energized and the differential circuit breaker "trips". There is unfortunately not much to do, except to change the resistance.
-
The resistance can also be switched off. Not necessarily tripping at the switchboard, but the water does not heat up. To check the resistance value, you must use an ohmmeter. Knowing that the power of the kettle is between 920 and 1100W, R=U²/PR=230²/1100=48 ohms. Our resistor actually measures 54 ohms
-
Another failure may be due to the cable or the socket of the base. To check its condition, simply use a multimeter to test the continuity between the terminals of the wall socket and the socket fixed to the base. To reach the contacts of this one, press on the protection of the central contact. This releases the other 2 contacts.
-
The other causes come from the M/A device, located in the tank. We describe in step 2, a problem encountered on this element.
-
-
-
The problem was that the water would not heat up when the switch was turned on! After successfully testing the resistance and continuity of the power supply at the base, the remaining element that could be a problem is the M/A device located in the tank.
-
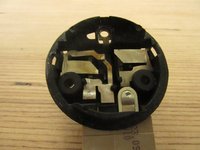
It turned out that after removing the part and disassembling it completely, the plate responsible for cutting the high temperature circuit was permanently activated.
-
This plate is in contact with the resistor support. It heats up and deforms. While deforming, it presses on a plastic "finger" which presses on another plate which cuts the circuit. Apparently, for some reason, the finger was pressing on the plate continuously, which prevented the current from passing.
-
After having shortened the length of the "finger" to approximately 1mm, the normal function was restored. It is possible that in the long run, the plate loses its original characteristics (elasticity) and the device malfunctions.
-
Important: when reassembling, do not forget to coat the plate with thermal paste to promote heat conduction with the resistor support.
-


That's it! After studying in the first two tutorials on the kettle, the features, then the different subsets that make it up, we have just reviewed the main causes of failure of this device.
We hope this has allowed you to learn more about your device and thus be able to repair it yourself.
If you liked it (or not!) Do not hesitate to leave us a comment. And if you are in the corner of the Atelier Soudé, come and see us. We organize co-repair workshops, popularization sessions and many other things....
Отменить: Я не выполнил это руководство.
3 человек успешно провели ремонт по этому руководству.
Особая благодарность этим переводчикам:
100%


Эти переводчики помогают нам починить мир! Хотите внести свой вклад?
Начните переводить ›

Команда

1 Комментарий к руководству
Bonjour, j'ai un bouilloire bomann ne s'éteint pas qu'on l'eau se chauffe, Merci de me répondre