Введение
Keyboard issues are common, thankfully this replacement is easy and should only take you 5 minutes to complete. It is very easy to break a key or to even spill something on to the keyboard.
If you are purchasing a replacement keyboard, make sure the one you buy is not only for the correct model of laptop, but also the correct nationality or you may find it has the wrong key layout or unexpected accented letters.
This guide will teach you how to replace this keyboard but there are very important details to remember. If you press to forcefully on the clips for the keyboard they will break. This goes the same for the locking ZIF connectors on the end of the ribbon cables. Along with this, do not fully remove the keyboard until you disconnect from the ZIF connectors. This will cause damage to the computer if you try to pull it out without completely disconnecting. If you have any further questions you can leave a comment and we will respond as quickly as possible!
Выберете то, что вам нужно
-
-
-
Move the battery catch to the "unlocked" position.
-
Pull back the second spring-loaded battery catch until the battery pops up.
-
Remove the battery.
 Спросите у FixBot
-
-
-
-
-
-
Unfold the laptop so that you are looking at the keyboard.
-
At the top right of the keyboard you will notice two clips above the 'Del' and 'End' keys.
-
Using your spudger, press these clips in to unlock the keyboard from the laptop
-
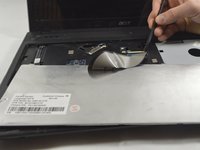
Slide the spudger along the top of the keyboard until the keyboard is able to easily be lifted up out of the laptop
-
-
-
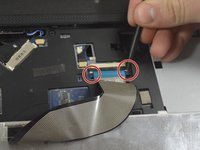
To detach this cable you must use the pointed edge of the spudger to press down on the locking mechanisms on each side.
-
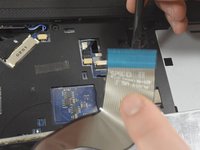
After unlocking both sides of the ZIF connector remove the keyboard for replacement.
-
-


To reassemble your device, follow these instructions in reverse order.
Отменить: Я не выполнил это руководство.
6 человек успешно провели ремонт по этому руководству.

Команда

UMass Dartmouth, Team 2-6, Isaacson Fall 2016 Участник UMass Dartmouth, Team 2-6, Isaacson Fall 2016
UMASSD-ISAACSON-F16S2G6
3 членов
Автор 45 руководств
2 Комментарии к руководству
Ik zie het vergrendelingsmechanisme bij stap drie niet. Wat ik ook naar beneden druk hij de kabel wil niet loslaten. Moet de klem misschien omhoog?
Sehen Sie sich Recognizing & Disconnecting Cable Connectors an. Möglicherweise gibt es eine Verriegelungsstange, die Sie anheben (Schritt 1) oder eine Stange, die Sie vorsichtig auf die andere Seite des Steckers drücken müssen (Schritt 7). Sobald Sie es ausgearbeitet haben, ist es einfach. (Beschuldigen Sie Google Translate, wenn dies keinen Sinn ergibt!)
