Перейти к основному содержанию
Присоединяйся к сообществу ремонтников - Создай аккаунт

Akai MPK25 Keys Replacement

Выберете то, что вам нужно

  1. Akai MPK25 Keys Replacement, Face Plate: шаг 1, изображение 1 из 1
    • Remove all the selector knob covers by pulling them off.

    Спросите у FixBot
  2. Akai MPK25 Keys Replacement: шаг 2, изображение 1 из 1
    • Using needle nose pliers, remove the washers from the four corner selector knobs.

    Спросите у FixBot
  3. Akai MPK25 Keys Replacement: шаг 3, изображение 1 из 1
    • Flip the device over. Using a Philips #2 screw driver, remove the fourteen 10.3 mm black screws holding the back panel in place.

    Спросите у FixBot
  4. Akai MPK25 Keys Replacement: шаг 4, изображение 1 из 3 Akai MPK25 Keys Replacement: шаг 4, изображение 2 из 3 Akai MPK25 Keys Replacement: шаг 4, изображение 3 из 3
    • Carefully flip the device to the front making sure you secure the face plate and the chassis together.

    • Please use care in following the step above to avoid ripping the ribbon cables connecting the two sides.

    Спросите у FixBot
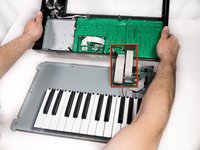
  5. Akai MPK25 Keys Replacement: шаг 5, изображение 1 из 3 Akai MPK25 Keys Replacement: шаг 5, изображение 2 из 3 Akai MPK25 Keys Replacement: шаг 5, изображение 3 из 3
    • Rotate the device 180 degrees and carefully remove the face plate by slightly lifting the screen side towards you and then sliding the bottom out from under the keys.

    • Use care when doing the step above so that the ribbon connectors which connect the top of the chassis to the top of the face plate are not damaged.

    Спросите у FixBot
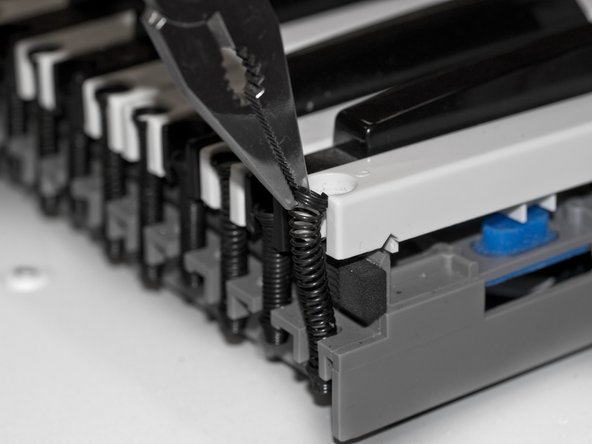
  6. Akai MPK25 Keys Replacement, Keys: шаг 6, изображение 1 из 2 Akai MPK25 Keys Replacement, Keys: шаг 6, изображение 2 из 2
    • Using needle nose pliers, grip the top of the spring coil, that is holding down the key, and gently lift the spring away from the key.

    Спросите у FixBot
  7. Akai MPK25 Keys Replacement: шаг 7, изображение 1 из 1
    • Lift the key from the front of the keyboard towards the back in order to remove it completely.

    Спросите у FixBot
Заключение

To reassemble the keyboard and close up the case, follow these instructions in reverse order.

7 человек успешно провели ремонт по этому руководству.

Will Saba

Участник с: 01/11/13

412 Репутация

Автор 2 руководств

Команда

Cal Poly, Team 20-6, Maness Winter 2013 Участник Cal Poly, Team 20-6, Maness Winter 2013

CPSU-MANESS-W13S20G6

5 членов

Автор 6 руководств

0 Комментарии к руководству

Добавить комментарий

Статистика просмотров:

За последние 24 часов: 6

За последние 7 дней: 20

За последние 30 дней: 76

За всё время: 11,873