Введение
Most replacement guides will require you to open up the Alexa to access components, so following this guide will let you access the internal components quickly and safely.
Выберете то, что вам нужно
-
-
Using your hands, gently remove the taped-in rubber foot from device.
 Спросите у FixBot
-
-
-
Carefully peel off the bottom pad to expose the fastening screws.
-
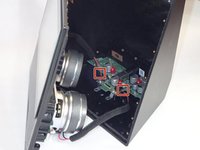
Remove three silver 1.4 T5 Torx screws on the top row.
-
Remove one green 1mm T5 Torx screw in the middle.
-
Remove a black 1.5mm T5 screw.
-
Remove three green 1mm T5 screws from the bottom row.
-
-
-
-
After the screws are removed, grip the front panel and remove, using a plastic opening tool if necessary. This will expose the inside of the device.
-
-
Инструмент, используемый на этом этапе:Tweezers$4.99
-
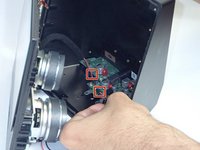
Use tweezers or your hands to carefully disconnect the red wires connecting the speakers to the power supply board.
-
Repeat this step for the other speaker, and lay the front section flat with the facing down.
-


To reassemble your device, follow these instructions in reverse order.

Команда

University of South Florida St. Petersburg, Team S1-G3, Stowe Fall 2018 Участник University of South Florida St. Petersburg, Team S1-G3, Stowe Fall 2018
USFSP-STOWE-F18S1G3
4 членов
Автор 12 руководств
2 Комментарии к руководству
this particular guide originally only had the prerequisite guide portion, so the steps to replace the top buttons were repeated across every single guide we had. I adjusted the prerequisite guide to include the separation of the two halves and moved the top button replacement guide to its own page. As this is still a private guide, it won’t be published unless we approve it.
This article has been flagged as the prerequisite guide for a few of our articles, so I ended up altering it to be such. However, the ones that are not linked to this one, I added a few steps.