Перейти к основному содержанию
Присоединяйся к сообществу ремонтников - Создай аккаунт

Apple PowerBook 520 Memory (RAM) Replacement

Выберете то, что вам нужно

  1. Apple PowerBook 520 Memory (RAM) Replacement, Case: шаг 1, изображение 1 из 2 Apple PowerBook 520 Memory (RAM) Replacement, Case: шаг 1, изображение 2 из 2
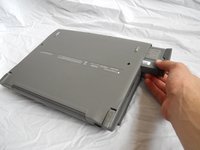
    • Turn computer over.

    • Remove battery expansion cover and battery.

    Спросите у FixBot

    Добавить комментарий

  2. Apple PowerBook 520 Memory (RAM) Replacement: шаг 2, изображение 1 из 1
    • With monitor hinge at the bottom, remove the two top center screws.

    Спросите у FixBot

    Добавить комментарий

  3. Apple PowerBook 520 Memory (RAM) Replacement: шаг 3, изображение 1 из 1
    • Remove top left and top right screws.

    Спросите у FixBot

    Добавить комментарий

  4. Apple PowerBook 520 Memory (RAM) Replacement: шаг 4, изображение 1 из 1
    • Remove middle left and middle right screws.

    Спросите у FixBot

    Добавить комментарий

  5. Apple PowerBook 520 Memory (RAM) Replacement: шаг 5, изображение 1 из 1
    • Open computer kickstands.

    • Remove screws underneath each kickstand.

    Спросите у FixBot

    Добавить комментарий

  6. Apple PowerBook 520 Memory (RAM) Replacement: шаг 6, изображение 1 из 1
    • Lift keyboard from bottom and take out of shell.

    Спросите у FixBot

    Добавить комментарий

  7. Apple PowerBook 520 Memory (RAM) Replacement: шаг 7, изображение 1 из 3 Apple PowerBook 520 Memory (RAM) Replacement: шаг 7, изображение 2 из 3 Apple PowerBook 520 Memory (RAM) Replacement: шаг 7, изображение 3 из 3
    • Lift the white ribbon clamps securing the keyboard ribbon cables to the motherboard. You can do this using a plastic opening tool.

    • Removing both ribbon cables from the motherboard will leave the clamps like so.

    • From here you can access the logic board, hard drive, and floppy drive.

    Спросите у FixBot

    Добавить комментарий

  8. Apple PowerBook 520 Memory (RAM) Replacement, Memory (RAM): шаг 8, изображение 1 из 1
    • Open the panel on back of the device. Remove 2 T8 torque screws.

    Спросите у FixBot

    Добавить комментарий

  9. Apple PowerBook 520 Memory (RAM) Replacement: шаг 9, изображение 1 из 1
    • Remove the plastic panel underneath the LCD Screen.

    Спросите у FixBot

    Добавить комментарий

  10. Apple PowerBook 520 Memory (RAM) Replacement: шаг 10, изображение 1 из 1
    • Remove the 2 T8 Torx Screws securing the logic board protection plate from the midsection of the logic board protection plate. Remove the T8 Torx Screw from the back of the plate, underneath the hinge.

    Спросите у FixBot

    Добавить комментарий

  11. Apple PowerBook 520 Memory (RAM) Replacement: шаг 11, изображение 1 из 1
    • Remove the logic board protection plate.

    Спросите у FixBot

    Добавить комментарий

  12. Apple PowerBook 520 Memory (RAM) Replacement: шаг 12, изображение 1 из 1
    • Using a plastic spudger, gently pry up the uppermost board fixture. This is the Memory (RAM).

    Спросите у FixBot

    Добавить комментарий

  13. Apple PowerBook 520 Memory (RAM) Replacement: шаг 13, изображение 1 из 1
    • Once the old Memory board is removed, replace it with the new Memory board.

    Спросите у FixBot

    Добавить комментарий

Заключение

To reassemble your device, follow these instructions in reverse order.

Отменить: Я не выполнил это руководство.

2 человек успешно провели ремонт по этому руководству.

Tyler

Участник с: 04/10/11

148 Репутация

Автор 2 руководств

Команда

Cal Poly, Team 20-66, Walters Spring 2011 Участник Cal Poly, Team 20-66, Walters Spring 2011

CPSU-WALTERS-S11S20G66

4 членов

Автор 3 руководств

1 Комментарий к руководству

Добавить комментарий

Статистика просмотров:

За последние 24 часов: 0

За последние 7 дней: 6

За последние 30 дней: 49

За всё время: 4,051