Перейти к основному содержанию

Apple Watch SE Screen Replacement

Выберете то, что вам нужно

  1. Apple Watch SE Screen Replacement, Power down your watch: шаг 1, изображение 1 из 2 Apple Watch SE Screen Replacement, Power down your watch: шаг 1, изображение 2 из 2
  2. Apple Watch SE Screen Replacement, Safety requirements: шаг 2, изображение 1 из 3 Apple Watch SE Screen Replacement, Safety requirements: шаг 2, изображение 2 из 3 Apple Watch SE Screen Replacement, Safety requirements: шаг 2, изображение 3 из 3
    Инструмент, используемый на этом этапе:
    Safety Glasses
    $3.19
    Купить
    • Because the gap between the screen and watch body is so thin, a sharp blade is needed to separate the two. Read the following warnings carefully before proceeding.

    • Protect your fingers by keeping them completely clear of the knife. If in doubt, protect your free hand with a heavy glove, such as a leather shop glove or gardening glove.

    • Be careful not to apply too much pressure, as this might cause the knife to slip and cut you, or damage the watch.

    • Wear eye protection. The knife or glass may break, sending pieces flying.

    • Attach or remove the watch band as needed to provide more control as you make repairs.

  3. Apple Watch SE Screen Replacement, Soften the display adhesive: шаг 3, изображение 1 из 1
    • Prepare an iOpener (or use a hair dryer or heat gun) and heat the face of the watch to loosen the display adhesive.

    • Leave the iOpener on the watch for at least two minutes to fully heat the screen and soften the adhesive holding it to the case.

    • You may need to reheat the iOpener and repeat this procedure several times until the display adhesive softens.

  4. Apple Watch SE Screen Replacement, Display opening: шаг 4, изображение 1 из 3 Apple Watch SE Screen Replacement, Display opening: шаг 4, изображение 2 из 3 Apple Watch SE Screen Replacement, Display opening: шаг 4, изображение 3 из 3
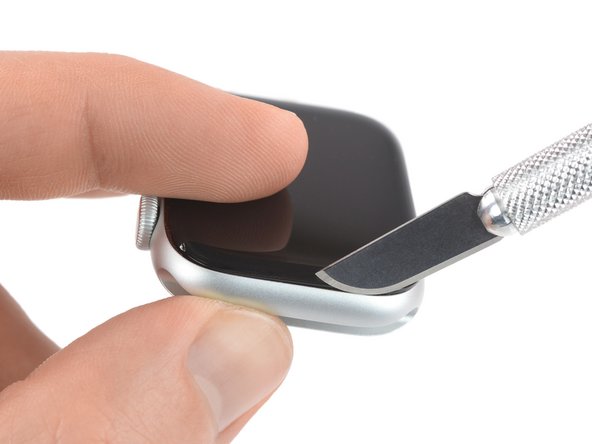
    • Place the edge of a curved blade into the thin gap between the display and the outer case. Start at the short side of the display, closest to the digital crown.

    • Press firmly straight down into the gap.

    • Once inserted, tilt the blade to pry the display open slightly.

  5. Apple Watch SE Screen Replacement: шаг 5, изображение 1 из 3 Apple Watch SE Screen Replacement: шаг 5, изображение 2 из 3 Apple Watch SE Screen Replacement: шаг 5, изображение 3 из 3
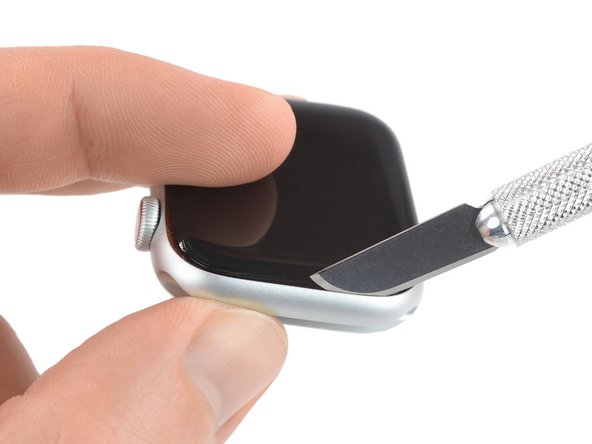
    • Insert an opening pick in the gap you've created.

    • Slide the opening pick along the short edge of the watch to cut the adhesive.

  6. Apple Watch SE Screen Replacement: шаг 6, изображение 1 из 2 Apple Watch SE Screen Replacement: шаг 6, изображение 2 из 2
    • When slicing near the crown, don't insert the opening pick deeper than 1/16th of an inch (~2 mm).

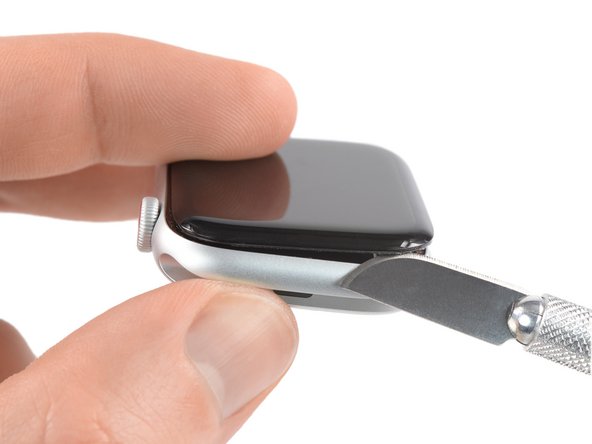
    • Slide the opening pick around the corner and along the long edge where the crown is located to cut the display adhesive.

  7. Apple Watch SE Screen Replacement: шаг 7, изображение 1 из 2 Apple Watch SE Screen Replacement: шаг 7, изображение 2 из 2
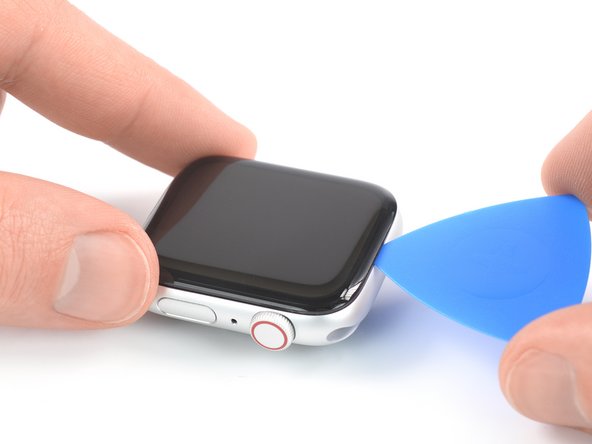
    • Slide the opening pick around the corner to cut the remaining adhesive on the short edge farthest away from the crown.

  8. Apple Watch SE Screen Replacement: шаг 8, изображение 1 из 2 Apple Watch SE Screen Replacement: шаг 8, изображение 2 из 2
    • Place the watch on a flat surface and use an opening pick to slice through any remaining adhesive.

    • When slicing near the crown, don't insert the opening pick deeper than 1/16th of an inch (~2 mm).

    • Slide an opening pick under the opposite display edge of the watch crown.

  9. Apple Watch SE Screen Replacement: шаг 9, изображение 1 из 2 Apple Watch SE Screen Replacement: шаг 9, изображение 2 из 2
    • Reinsert the opening pick on the short edge of the watch, next to the watch crown.

    • Twist the opening pick to loosen the display off the watch case.

    • Don't try to remove the display. It is still connected to the watch assembly.

  10. Apple Watch SE Screen Replacement: шаг 10, изображение 1 из 3 Apple Watch SE Screen Replacement: шаг 10, изображение 2 из 3 Apple Watch SE Screen Replacement: шаг 10, изображение 3 из 3
    • Be careful not to strain the display cables when you fold the display to the side.

    • Lift the display and carefully pull it in direction of the short edge farthest away from the crown.

    • Swing the display open to an upward position.

  11. Apple Watch SE Screen Replacement, Loosen the adhesive: шаг 11, изображение 1 из 2 Apple Watch SE Screen Replacement, Loosen the adhesive: шаг 11, изображение 2 из 2
    • The black foil which covers the display connectors is very fragile and likely to rip. To keep the tape intact while peeling it off, it's necessary to use high isopropyl alcohol or an iOpener.

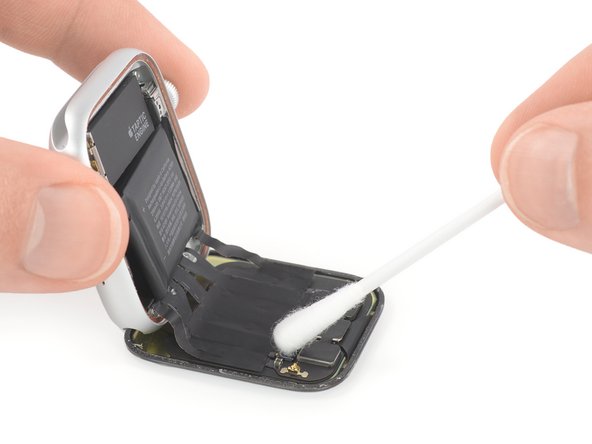
    • Prepare an iOpener (or use a hair dryer or heat gun) and heat the face of the watch to loosen the adhesive tape.

    • You may need to reheat the iOpener and repeat this procedure several times until adhesive softens.

    • Alternatively, apply a little bit of high-concentration isopropyl alcohol (>90%) to a Q-tip and apply it to the black adhesive foil on top of the display connectors. Let it penetrate the adhesive for about two minutes.

  12. Apple Watch SE Screen Replacement, Peel off the foil: шаг 12, изображение 1 из 2 Apple Watch SE Screen Replacement, Peel off the foil: шаг 12, изображение 2 из 2
    Инструмент, используемый на этом этапе:
    Tweezers
    $4.99
    Купить
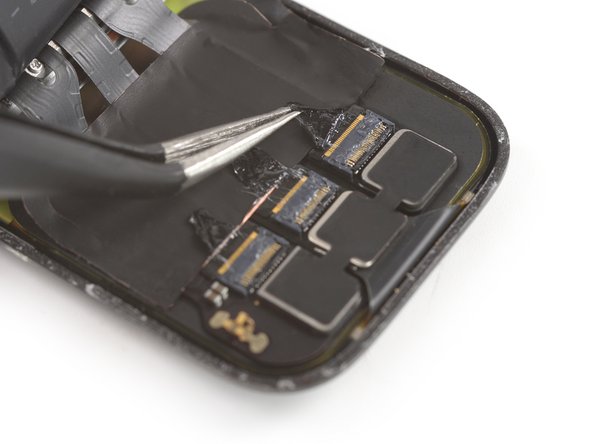
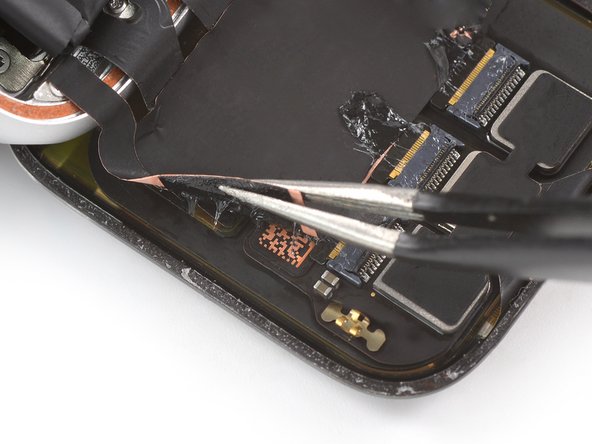
    • Use a pair of tweezers to carefully peel off the tape covering the right display cable connector.

  13. Apple Watch SE Screen Replacement: шаг 13, изображение 1 из 2 Apple Watch SE Screen Replacement: шаг 13, изображение 2 из 2
    • Use a pair of tweezers to carefully peel off the tape covering the middle and left display cable connector.

  14. Apple Watch SE Screen Replacement, Open the ZIF connectors: шаг 14, изображение 1 из 2 Apple Watch SE Screen Replacement, Open the ZIF connectors: шаг 14, изображение 2 из 2
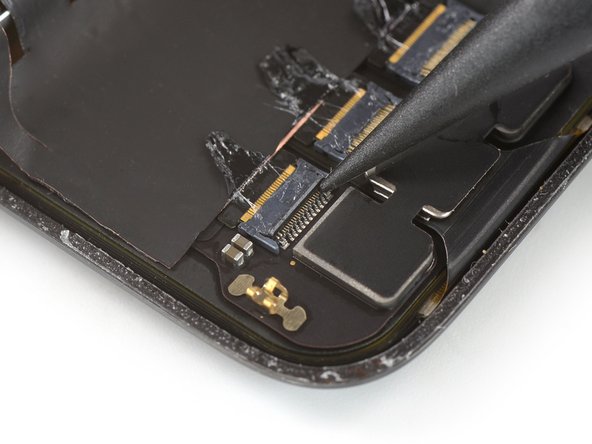
    • Use the pointed end of a spudger to open the right ZIF connector on the rear side of the display by bringing its flap in an upright position.

  15. Apple Watch SE Screen Replacement: шаг 15, изображение 1 из 2 Apple Watch SE Screen Replacement: шаг 15, изображение 2 из 2
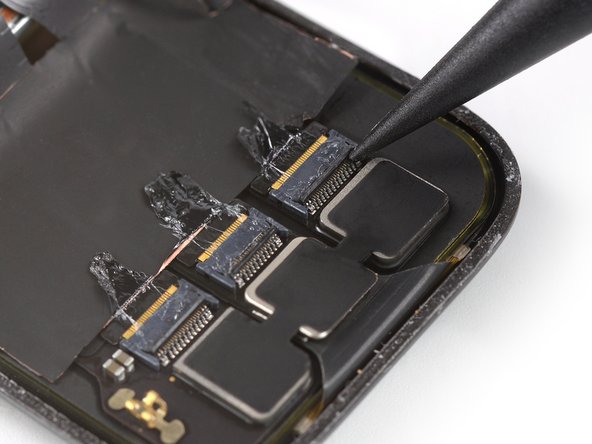
    • Use the pointed end of a spudger to open the middle and left ZIF connectors by bringing their flaps to an upright position.

  16. Apple Watch SE Screen Replacement, Peel off the display cable sticker: шаг 16, изображение 1 из 2 Apple Watch SE Screen Replacement, Peel off the display cable sticker: шаг 16, изображение 2 из 2
    • Use a pair of tweezers to peel the left edge off the display cable sticker off the rear side of the display.

    • Do not try to remove the sticker all the way, you will reuse it when reassembling your watch. Only peel the area off which adheres the cable to the rear side of the display.

  17. Apple Watch SE Screen Replacement: шаг 17, изображение 1 из 2 Apple Watch SE Screen Replacement: шаг 17, изображение 2 из 2
    • Use a pair of tweezers to peel the right edge off the display cable sticker off the rear side of the display.

  18. Apple Watch SE Screen Replacement, Pull the cable out of the ZIF connector: шаг 18, изображение 1 из 3 Apple Watch SE Screen Replacement, Pull the cable out of the ZIF connector: шаг 18, изображение 2 из 3 Apple Watch SE Screen Replacement, Pull the cable out of the ZIF connector: шаг 18, изображение 3 из 3
    • Carefully pull the display flex cables out of their ZIF connectors.

    • Only pull close to the ZIF connector and not on the watch body. Otherwise the display cable might rip.

  19. Apple Watch SE Screen Replacement, Remove the display: шаг 19, изображение 1 из 1
    • Separate the watch assembly and the display.

Заключение

To reassemble your Apple Watch SE follow these instructions in reverse order to reattach the screen and the battery.

Apply a little bit of high isopropyl alcohol (>90%) to a Q-tip or use a cleaning pad to gently remove the leftover adhesive on the edges of the watch case and the screen before installing new adhesive.

Take your e-waste to an R2 or e-Stewards certified recycler.

Repair didn’t go as planned? Check out our Answers community for troubleshooting help.

32 участников успешно повторили данное руководство.

Dominik Schnabelrauch

Участник с: 11/23/16

204 319 Репутация

Автор 682 руководств

Команда

iFixit Участник iFixit

Staff

135 членов

Автор 17 288 руководств

6 Комментариев

any idea where I can purchase the replacement screen itself?

donald maida - Ответить

Would have nice to know about the NFC antenna before this. I now have no Apple Pay.

Care O - Ответить

Where is the NFC antenna? I wish they showed how the new one will adhere to the body. They have listed to buy a roll of adhesive tape but I don't get it.

David -

Does the pre-cut adhesive card have the necessary cuts to re-attach the crystal ?

RLRams - Ответить

Will I be able to preserve the NFC antenna after replacing the screen?

Jake_a_spade - Ответить

Добавить комментарий

Просмотр статистики:

За последние 24часов: 109

За последние 7 дней: 897

За последние 30 дней: 4,160

За всё время: 98,769