Перейти к основному содержанию
Присоединяйся к сообществу ремонтников - Создай аккаунт

Asus X502C-RB01 Fan Replacement

Выберете то, что вам нужно

    1. Asus X502C-RB01 Fan Replacement, Keyboard Panel: шаг 1, изображение 1 из 1
      • Turn off the laptop and flip it face down.

      • Using a Phillips #0 screwdriver, remove the seven 9mm screws circled in red.

      • With the same screwdriver, remove the four 5mm screws circled in orange.

      Спросите у FixBot

      Добавить комментарий

    2. Asus X502C-RB01 Fan Replacement: шаг 2, изображение 1 из 1
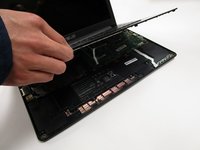
      • Flip the laptop face up and open the lid.

      • Use the plastic opening tool to pry around the entire edge of the keyboard panel to loosen the panel from the base.

      • Be careful not to lift the panel just yet, as it is still connected to the motherboard.

      Спросите у FixBot

      Добавить комментарий

    3. Asus X502C-RB01 Fan Replacement: шаг 3, изображение 1 из 2 Asus X502C-RB01 Fan Replacement: шаг 3, изображение 2 из 2
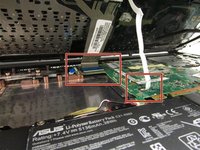
      • Partially lift the panel up, revealing the two cables connected to the motherboard.

      Спросите у FixBot

      Добавить комментарий

    4. Asus X502C-RB01 Fan Replacement: шаг 4, изображение 1 из 2 Asus X502C-RB01 Fan Replacement: шаг 4, изображение 2 из 2
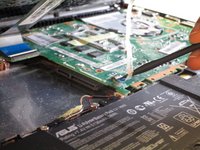
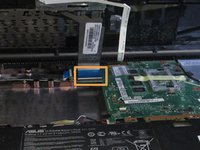
      • Disconnect the first ZIF cable by lifting the tab using the spuger tool or your fingernail and gently pull the cable out.

      • Disconnect the second ZIF cable by lifting the tab using your fingernail and gently pull the cable out. This one is more difficult to reach with the spudger.

      Спросите у FixBot

      Добавить комментарий

    5. Asus X502C-RB01 Fan Replacement: шаг 5, изображение 1 из 1
      • Remove the keyboard panel completely and set it aside. The internal components of the laptop are now exposed.

      Спросите у FixBot

      Добавить комментарий

    1. Asus X502C-RB01 Fan Replacement, Hard Drive: шаг 6, изображение 1 из 1
      • Locate the hard drive in the area highlighted in red.

      • This demonstration model does not have a mounting bracket around the hard drive.

      Спросите у FixBot

      Добавить комментарий

    2. Asus X502C-RB01 Fan Replacement: шаг 7, изображение 1 из 1
      • Remove the four 5mm screws from the hard drive mounting bracket using the Phillips #0 screwdriver.

      Спросите у FixBot

      Добавить комментарий

    3. Asus X502C-RB01 Fan Replacement: шаг 8, изображение 1 из 1
      • Slide the hard drive in the direction away from the connector and lift it up to remove it.

      Спросите у FixBot

      Добавить комментарий

    1. Asus X502C-RB01 Fan Replacement, Motherboard: шаг 9, изображение 1 из 1
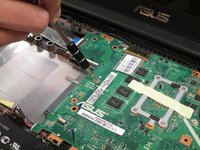
      • Unplug the battery from the laptop by lifting the connector up with the flat end of the spudger.

      • Unplug the two ZIF cables by lifting the tab using the spudger tool or your fingernail then pulling the cable out gently.

      Спросите у FixBot

      Добавить комментарий

    2. Asus X502C-RB01 Fan Replacement: шаг 10, изображение 1 из 1
      • Unplug the bundled cable by pulling it away from the connector with a bit of force.

      • Unplug the display cable connector by lifting the tape and pulling it away from the connector.

      • Unplug the two antenna cables connected to the network interface card by prying it off with the flat end of the spudger.

      Спросите у FixBot

      Добавить комментарий

    3. Asus X502C-RB01 Fan Replacement: шаг 11, изображение 1 из 2 Asus X502C-RB01 Fan Replacement: шаг 11, изображение 2 из 2
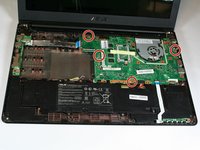
      • Remove the four 5.5mm screws using the Phillips #0 screwdriver.

      Спросите у FixBot

      Добавить комментарий

    4. Asus X502C-RB01 Fan Replacement: шаг 12, изображение 1 из 1
      • Gently lift the motherboard out of the casing.

      Спросите у FixBot

      Добавить комментарий

    1. Asus X502C-RB01 Fan Replacement, Fan: шаг 13, изображение 1 из 1
      • Flip the motherboard over so the fan is right side up.

      Спросите у FixBot

      Добавить комментарий

    2. Asus X502C-RB01 Fan Replacement: шаг 14, изображение 1 из 1
      • Disconnect the fan from the motherboard by pulling the power cable connector.

      Спросите у FixBot

      Добавить комментарий

    3. Asus X502C-RB01 Fan Replacement: шаг 15, изображение 1 из 1
      • Remove the two 5.5mm screws using a Phillips #0 head screwdriver.

      Спросите у FixBot

      Добавить комментарий

    4. Asus X502C-RB01 Fan Replacement: шаг 16, изображение 1 из 1
      • Detach the tape that connects the fan to the heatsink.

      Спросите у FixBot

      Добавить комментарий

    5. Asus X502C-RB01 Fan Replacement: шаг 17, изображение 1 из 1
      • Lift the fan off to remove it from the motherboard.

      Спросите у FixBot

      Добавить комментарий

Заключение

To reassemble your device, follow these instructions in reverse order.

Отменить: Я не выполнил это руководство.

2 человек успешно провели ремонт по этому руководству.

Frances Tan

Участник с: 01/19/17

143 Репутация

1 руководство автора

Команда

UC Davis, Team 1-5, Rodger Winter 2017 Участник UC Davis, Team 1-5, Rodger Winter 2017

UCD-RODGER-W17S1G5

4 членов

Автор 54 руководств

1 Комментарий к руководству

Great guide. Re: STEP 11 - my Asus notebook had 5 screws securing the mb.

u1oo - Ответить Поделиться

Добавить комментарий

Статистика просмотров:

За последние 24 часов: 1

За последние 7 дней: 7

За последние 30 дней: 25

За всё время: 1,139