Введение
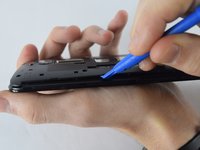
To begin with, replacing the antenna is not that hard. All you need is a JIS size 00 head screwdriver, and a prying tool. CAUTION: The screws from the back of the phone are small, so we recommend using a mat or paper to help keep the screws together and from getting lost.
Выберете то, что вам нужно
-
-
Use your fingernail to gently pry off the phone's back cover at the indicated location. While your fingernail is under the back cover slide your finger around the edges of the phone until the cover pops off.
-
-
-
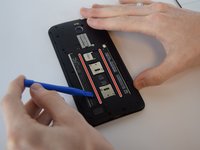
Remove the thirteen black screws and the single silver screw from the back of the phone with a JIS size 00 screwdriver.
-
The black screws are 2.8 mm in length.
-
The silver screw is 5.5 mm in length.
-
-
-
-
Use a plastic opening tool to remove the inner phone backing.
-
-
-
Take the speaker out of the back of the phone. It should come out easily as soon as the inner back is removed because nothing is holding it down in place anymore.
-
-
-
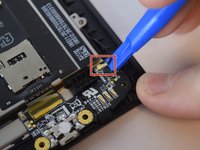
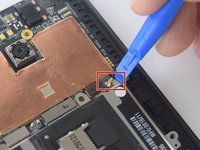
Use a plastic opening tool to gently pry up both ends of the antenna.
-
Carefully remove the antenna wire from the plastic keepers along the side. Note their position for reassembly.
-


Reassemble your device by following the instructions in reverse order.
Отменить: Я не выполнил это руководство.
37 человек успешно провели ремонт по этому руководству.
Команда

USF Tampa, Team 2-5, Sullivan Spring 2016 Участник USF Tampa, Team 2-5, Sullivan Spring 2016
USFT-SULLIVAN-S16S2G5
4 членов
Автор 19 руководств
8 Комментарии к руководству
Hi , do you know if this antenna is the only one? I mean is there another antenna for gps signal?
Thanks
Fabio
What happens when the cable comes off with the little thing underneath?
I was pretty easily happened to me. I don't even know if it is possible to fix.
It was broken and I soldered it.....afterwards sim1 is not working, but sim2 works well, please help me
Could you solve it? I had the fact same problem, sadly on the motherboard end, otherwise I'd just replace the USB board, I tried soldering the cable with no luck, sim 1 still won't work.