Перейти к основному содержанию
Присоединяйся к сообществу ремонтников - Создай аккаунт

Canon CanoScan N670U Sensor Bar Replacement

Выберете то, что вам нужно

  1. Canon CanoScan N670U Sensor Bar Replacement, Canon CanoScan N670U Disassembly: шаг 1, изображение 1 из 1
    • Open up your Canon CanoScan N670U to an upright position.

    Спросите у FixBot

    Добавить комментарий

  2. Canon CanoScan N670U Sensor Bar Replacement: шаг 2, изображение 1 из 1
    • Turn your device so that you're facing the long side of the Canon CanoScan N670U.

    • Locate the small crevice between the plastic components of the scanner bed and the scanner base.

    Спросите у FixBot

    Добавить комментарий

  3. Canon CanoScan N670U Sensor Bar Replacement: шаг 3, изображение 1 из 1
    • Carefully insert a metal spudger tool in the crevice and slowly cut through the adhesive between the plastic components.

    • You may cut small bits of the plastic as you're slicing the adhesive. Do not forcefully bend the plastic strip as you're cutting or it will snap.

    Спросите у FixBot

    Добавить комментарий

  4. Canon CanoScan N670U Sensor Bar Replacement: шаг 4, изображение 1 из 1
    • Once the adhesive strip is sliced through, the plastic bar that is attached should release. Set aside the plastic bar.

    Спросите у FixBot

    Добавить комментарий

  5. Canon CanoScan N670U Sensor Bar Replacement: шаг 5, изображение 1 из 1
    • Repeat steps 2-4 for the other side of the scanner.

    Спросите у FixBot

    Добавить комментарий

  6. Canon CanoScan N670U Sensor Bar Replacement: шаг 6, изображение 1 из 1
    • Use your hands or a metal spudger tool to push the plastic bar at the bottom of the glass scanner bed forward until you can't push it any farther.

    Спросите у FixBot

    Добавить комментарий

  7. Canon CanoScan N670U Sensor Bar Replacement: шаг 7, изображение 1 из 1
    • Insert the metal spudger tool underneath the glass scanner bed. The front of the scanner bed should be resting on top of the tool.

    Спросите у FixBot

    Добавить комментарий

  8. Canon CanoScan N670U Sensor Bar Replacement: шаг 8, изображение 1 из 1
    • Slowly pull the glass scanner bed towards you and set the piece aside.

    Спросите у FixBot

    Добавить комментарий

  9. Canon CanoScan N670U Sensor Bar Replacement, Sensor Bar: шаг 9, изображение 1 из 1
    • This is the sensor bar that you will replace.

    Спросите у FixBot

    Добавить комментарий

  10. Canon CanoScan N670U Sensor Bar Replacement: шаг 10, изображение 1 из 2 Canon CanoScan N670U Sensor Bar Replacement: шаг 10, изображение 2 из 2
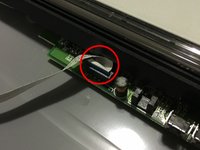
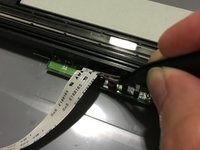
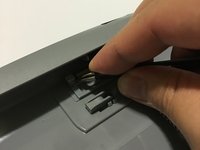
    • Locate the small plug where the white strip of cable is connected to.

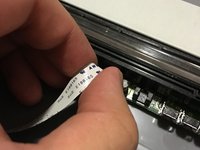
    • Unfurl the cable strip if it's tucked in.
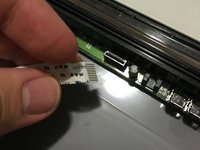
    Спросите у FixBot

    Добавить комментарий

  11. Canon CanoScan N670U Sensor Bar Replacement: шаг 11, изображение 1 из 3 Canon CanoScan N670U Sensor Bar Replacement: шаг 11, изображение 2 из 3 Canon CanoScan N670U Sensor Bar Replacement: шаг 11, изображение 3 из 3
    Инструмент, используемый на этом этапе:
    Tweezers
    $4.99
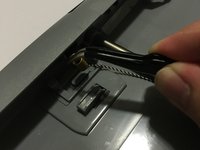
    • Gently use tweezers or your fingers to rock the cable back and forth to disconnect the it.

    • Do not apply too much pressure or you may damage some delicate components.

    Спросите у FixBot

    Добавить комментарий

  12. Canon CanoScan N670U Sensor Bar Replacement: шаг 12, изображение 1 из 1
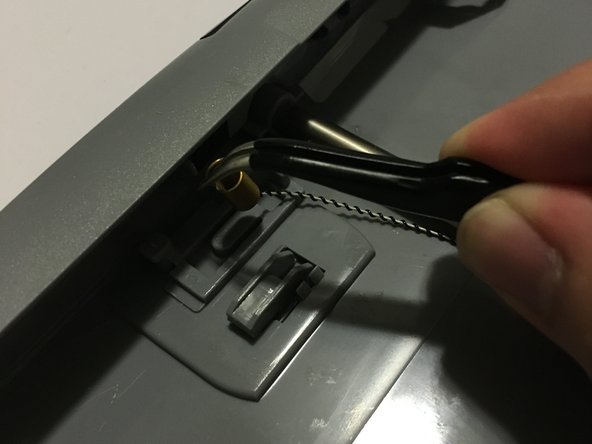
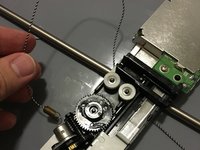
    • Locate the small metal spring behind the front buttons of the Canon CanoScan N670U.

    Спросите у FixBot

    Добавить комментарий

  13. Canon CanoScan N670U Sensor Bar Replacement: шаг 13, изображение 1 из 2 Canon CanoScan N670U Sensor Bar Replacement: шаг 13, изображение 2 из 2
    • Use tweezers to gently remove the metal spring from the plastic hook.

    • Due to the tension of the spring, it can be difficult to pull the metal end. You may attempt to use your hands to pull the spring itself if necessary.

    • Take caution to not bend the metal.

    Спросите у FixBot

    Добавить комментарий

  14. Canon CanoScan N670U Sensor Bar Replacement: шаг 14, изображение 1 из 2 Canon CanoScan N670U Sensor Bar Replacement: шаг 14, изображение 2 из 2
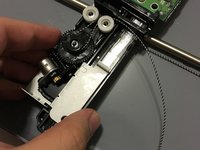
    • Flip the sensor bar over and unwind the belt from the gear system.

    Спросите у FixBot

    Добавить комментарий

  15. Canon CanoScan N670U Sensor Bar Replacement: шаг 15, изображение 1 из 1
    • Remove the sensor bar from the scanner and replace it with the new one.

    Спросите у FixBot

    Добавить комментарий

Заключение

To reassemble your device, follow these instructions in reverse order.

Отменить: Я не выполнил это руководство.

Еще один человек закончил это руководство.

Stephen Bui

Участник с: 09/19/15

558 Репутация

Автор 4 руководств

Команда

USF Sarasota-Manatee, Team 1-1, Stewart Fall 2015 Участник USF Sarasota-Manatee, Team 1-1, Stewart Fall 2015

USFSM-STEWART-F15S1G1

5 членов

Автор 20 руководств

0 Комментарии к руководству

Добавить комментарий

Статистика просмотров:

За последние 24 часов: 0

За последние 7 дней: 8

За последние 30 дней: 32

За всё время: 1,193