Введение
This guide will require you to use a Phillips head screwdriver to remove the screws holding the screen in place.
Выберете то, что вам нужно
-
-
-
First, remove the batteries and memory card.
-
Remove the 5.0 mm black screw with a Phillips #00 screwdriver.
-
Remove the 5.0 mm silver screw with a Phillips #00 screwdriver.
 Спросите у FixBot
-
-
-
Remove the 5.0 mm black screw on the right with a Phillips #00 screwdriver.
-
-
-
Remove the 5.0 mm screw on the left with a Phillips #00 screwdriver.
-
-
-
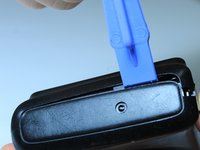
Begin taking off the back cover with a plastic opening tool.
-
Begin by wedging the plastic opening tool behind the bottom left corner of the LCD screen as shown.
-
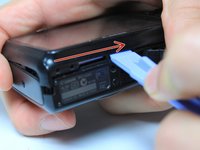
Slide the plastic opening tool to the right, along the mating edge, to pry off the back cover.
-
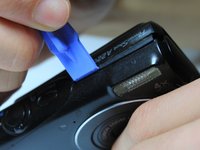
Continue taking off the back cover along the left side of the camera as seen in the third picture.
-
-
-
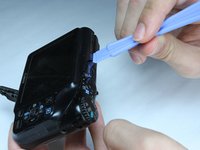
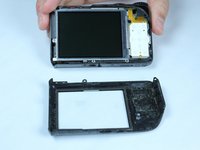
Use the plastic opening tool to separate the top section of the back cover from the frame.
-
Once there is enough separation between the back cover and the frame, remove the back cover for replacement.
-
-
-
-
-
-
Remove the internal 4.4mm screw with a Phillips 00 screwdriver.
-
-
-
Gently lift of the buttons for replacement. They should come off without excessive force.
-
If the buttons do not lift off easily, you may have unscrewed the wrong screw. Revert to previous step.
-
-
-
-
-
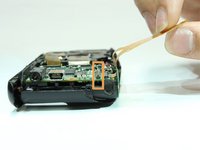
Lift up the electrical ribbon shown to access the next screw.
-
Remove the 3.9 mm screw with a Phillips #00 screwdriver.
-
-
-
Remove the two 3.9 mm screws shown with a Phillips #00 screwdriver.
-
-
-
There is an electrical flap that holds the LCD ribbon down. Note the flap in is closed position.
-
Lift up the flap with a plastic opening tool.
-
-
-
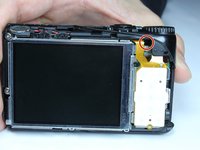
Holding the outer frame of the LCD screen, gently lift the LCD screen for replacement.
-
-
-
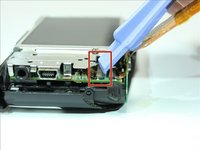
Locate ribbon flap, enclosed in red. (picture 1)
-
Using a plastic opening tool, lift up the ribbon flap to allow insertion of the LCD ribbon. (picture 2)
-
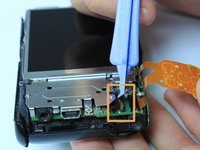
Place the LCD screen on the camera and align the ribbon underneath the open ribbon flap. Close the ribbon flap onto the ribbon. (picture 3)
-
-


To reassemble your device, follow these instructions in reverse order, starting with the last guide step.
Отменить: Я не выполнил это руководство.
Еще один человек закончил это руководство.

Команда

Baylor, Team 4-5, Williams Spring 2015 Участник Baylor, Team 4-5, Williams Spring 2015
BU-WILLIAMS-S15S4G5
4 членов
Автор 13 руководств
2 Комментарии к руководству
Step 11, “lift up the flap” did the trick - thanks !!
Mine got wet with seawater, I cleaned the electronics wih alcohol and it works again.
My problem is after taking a photo and seeing the preview instead of going back to “live” display for the next photo the screen goes black but the camera settings still show. Would changing the screen solve this problem?