Перейти к основному содержанию
Присоединяйся к сообществу ремонтников - Создай аккаунт

Canon PowerShot A2300 Flash Assembly Replacement

Выберете то, что вам нужно

  1. Canon PowerShot A2300 Flash Assembly Replacement, Front Cover: шаг 1, изображение 1 из 1
    • Open the A/V Out Digital port cover on the function button side to reveal a screw.

    Спросите у FixBot
  2. Canon PowerShot A2300 Flash Assembly Replacement: шаг 2, изображение 1 из 3 Canon PowerShot A2300 Flash Assembly Replacement: шаг 2, изображение 2 из 3 Canon PowerShot A2300 Flash Assembly Replacement: шаг 2, изображение 3 из 3
    • Remove all 6 screws(2.70 mm), 2 on each side and 2 on the bottom.

    • Screws are small and very easily lost.

    Спросите у FixBot
  3. Canon PowerShot A2300 Flash Assembly Replacement: шаг 3, изображение 1 из 2 Canon PowerShot A2300 Flash Assembly Replacement: шаг 3, изображение 2 из 2
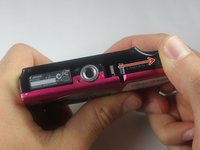
    • Open the card/battery latch by sliding the cover away from the camera in the direction indicated by the arrow.

    • Doing this gives a spot to grip on the bottom of the front cover. This will make it easier to handle when removing.

    Спросите у FixBot
  4. Canon PowerShot A2300 Flash Assembly Replacement: шаг 4, изображение 1 из 1
    • Gently lift the bottom of the front cover to roughly a 30 degree angle.

    Спросите у FixBot
  5. Canon PowerShot A2300 Flash Assembly Replacement: шаг 5, изображение 1 из 1
    • Pull the top of the front cover away from the camera by gripping the top of the front cover by the corners where the cover is still attached to the body.

    Спросите у FixBot
  6. Canon PowerShot A2300 Flash Assembly Replacement, Back Cover: шаг 6, изображение 1 из 1
    • Hold the camera in your hands with both thumbs on the screen with the screen faced up.

    • Keep close to the table top in case the camera falls out of your hands.

    Спросите у FixBot
  7. Canon PowerShot A2300 Flash Assembly Replacement: шаг 7, изображение 1 из 1
    • Pull the the bottom left corner of the cover up about an inch to the point shown in the picture.

    • Do not completely remove the back cover by pulling on the side as shown. The cover is still attached on the top of the camera.

    Спросите у FixBot
  8. Canon PowerShot A2300 Flash Assembly Replacement: шаг 8, изображение 1 из 1
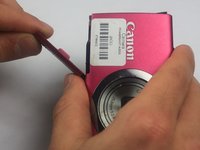
    • Pry the top off by sliding the spudger under the On/Off button.

    Спросите у FixBot
  9. Canon PowerShot A2300 Flash Assembly Replacement: шаг 9, изображение 1 из 1
    • Slide the cover to the right and off the camera.

    • Gently pry using the spudger on the right side if necessary.

    • The A/V OUT DIGITAL cover will sometimes become loose and disconnect from the cover

    Спросите у FixBot
  10. Canon PowerShot A2300 Flash Assembly Replacement, Flash Assembly: шаг 10, изображение 1 из 1
    • Raise the screen by wedging the spudger between the bottom of the screen and the mount hole.

    Спросите у FixBot
  11. Canon PowerShot A2300 Flash Assembly Replacement: шаг 11, изображение 1 из 1
    • Remove the metal sheet that is under the screen.

    Спросите у FixBot
  12. Canon PowerShot A2300 Flash Assembly Replacement: шаг 12, изображение 1 из 1
    • Remove the top left screw on the metal sheet that is behind the screen.

    • This screw connects the flash to the metal sheet.

    Спросите у FixBot
  13. Canon PowerShot A2300 Flash Assembly Replacement: шаг 13, изображение 1 из 1
    Инструмент, используемый на этом этапе:
    Tweezers
    $4.99
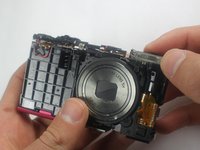
    • Use one side of the tweezers to raise the orange retaining flap on the zero insertion force (ZIF) connector to a vertical position.

    Спросите у FixBot
  14. Canon PowerShot A2300 Flash Assembly Replacement: шаг 14, изображение 1 из 1
    • Gently pull the orange ribbon cable out of the ZIF connector using the tweezers.

    Спросите у FixBot
  15. Canon PowerShot A2300 Flash Assembly Replacement: шаг 15, изображение 1 из 2 Canon PowerShot A2300 Flash Assembly Replacement: шаг 15, изображение 2 из 2
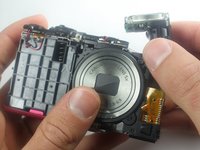
    • Remove the flash by gently rotating slightly back and forth and pulling up.

    Спросите у FixBot
Заключение

To reassemble your device, follow these instructions in reverse order.

3 человек успешно провели ремонт по этому руководству.

Nathan McMillan

Участник с: 03/23/15

405 Репутация

Автор 2 руководств

Команда

Baylor, Team 7-14, Williams Spring 2015 Участник Baylor, Team 7-14, Williams Spring 2015

BU-WILLIAMS-S15S7G14

4 членов

Автор 10 руководств

0 Комментарии к руководству

Добавить комментарий

Статистика просмотров:

За последние 24 часов: 7

За последние 7 дней: 20

За последние 30 дней: 77

За всё время: 2,421