Перейти к основному содержанию
Присоединяйся к сообществу ремонтников - Создай аккаунт

Canon PowerShot S500 LCD Replacement

Выберете то, что вам нужно

    1. Canon PowerShot S500 LCD Replacement, Front and Rear Casing : шаг 1, изображение 1 из 2 Canon PowerShot S500 LCD Replacement, Front and Rear Casing : шаг 1, изображение 2 из 2
      • Unscrew five Phillips screws using a #0 Phillips screwdriver.

      • One screw is on upper right corner of the back panel.

      • The other four screws are on the bottom of the camera.

      Спросите у FixBot

      Добавить комментарий

    2. Canon PowerShot S500 LCD Replacement: шаг 2, изображение 1 из 1
      • Open the memory card cover by moving the slide switch toward the top end of of the camera.

      • Remove the memory card from the slot.

      Спросите у FixBot

      Добавить комментарий

    3. Canon PowerShot S500 LCD Replacement: шаг 3, изображение 1 из 1
      • Remove the rear cover from the rest of the camera.

      • This may require gentle rocking of the case to free it.

      Спросите у FixBot

      Добавить комментарий

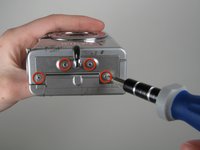
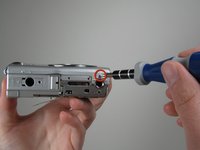
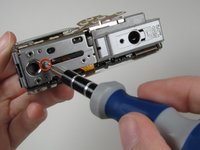
    4. Canon PowerShot S500 LCD Replacement: шаг 4, изображение 1 из 2 Canon PowerShot S500 LCD Replacement: шаг 4, изображение 2 из 2
      • Unscrew the four Phillips screws from the side of the casing and one screw from the bottom using a #0 Phillips screwdriver.

      Спросите у FixBot

      Добавить комментарий

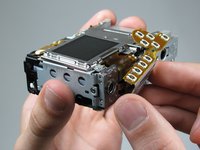
    5. Canon PowerShot S500 LCD Replacement: шаг 5, изображение 1 из 1
      • Free the front cover from the rest of the camera.

      • The cover may require gentle rocking to remove.

      Спросите у FixBot

      Добавить комментарий

    1. Canon PowerShot S500 LCD Replacement, LCD: шаг 6, изображение 1 из 1
      • Unscrew two Phillips screws above the LCD using a #0 Phillips screwdriver.

      Спросите у FixBot

      Добавить комментарий

    2. Canon PowerShot S500 LCD Replacement: шаг 7, изображение 1 из 1
      • Gently separate the top of LCD from the rest of the camera using your thumb.

      • Be careful not pull the LCD too far because of the ribbon cable connection.

      • Place the Spudger in the hole of the electrical ribbon.

      • Gently pull the ribbon down using the Spudger until it is free from the camera but still connected to the LCD.

      • The LCD will still be connected to the rest of the camera

      Спросите у FixBot

      Добавить комментарий

    3. Canon PowerShot S500 LCD Replacement: шаг 8, изображение 1 из 2 Canon PowerShot S500 LCD Replacement: шаг 8, изображение 2 из 2
      • Unscrew single Phillips screw with a #0 Phillips screwdriver.

      • Free the bottom panel and attached ribbon from the rest of the camera.

      • Be careful not to damage the ribbon.

      Спросите у FixBot

      Добавить комментарий

    4. Canon PowerShot S500 LCD Replacement: шаг 9, изображение 1 из 1
      • Turn over the camera.

      • Lift the clear plastic from the face of the camera, peeling the adhesive just below the zoom lens.

      • The plastic will still be connected on the left side.

      Спросите у FixBot

      Добавить комментарий

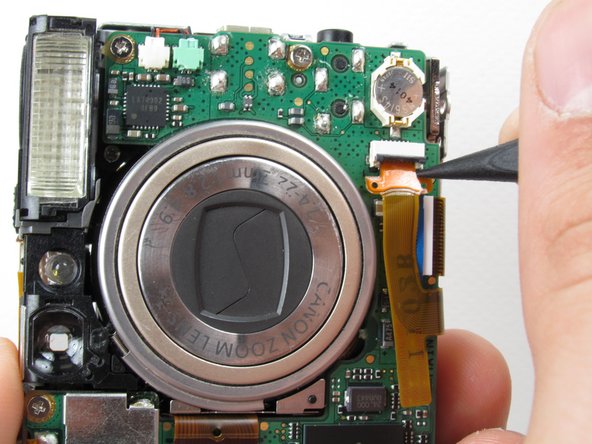
    5. Canon PowerShot S500 LCD Replacement: шаг 10, изображение 1 из 1
      • Place the Spudger between the orange ribbon and the black ribbon gate.

      • Lift the ribbon gate using the Spudger.

      Спросите у FixBot

      Добавить комментарий

    6. Canon PowerShot S500 LCD Replacement: шаг 11, изображение 1 из 1
      • Place the Spudger in the corner of the ribbon above the hole.

      • Remove the ribbon from the ribbon gate by pulling the Spudger away from the gate.

      Спросите у FixBot

      Добавить комментарий

    7. Canon PowerShot S500 LCD Replacement: шаг 12, изображение 1 из 1
      • Free this ribbon and the bottom panel from the rest of the camera.

      • Be careful not to damage the ribbon.

      Спросите у FixBot

      Добавить комментарий

    8. Canon PowerShot S500 LCD Replacement: шаг 13, изображение 1 из 1
      • Turn the camera over so you can see the LCD.

      • Remove single Phillips screw below the LCD using a #0 Phillips screwdriver.

      Спросите у FixBot

      Добавить комментарий

    9. Canon PowerShot S500 LCD Replacement: шаг 14, изображение 1 из 1
      • Lift the blue ribbon gate using the Spudger.

      Спросите у FixBot

      Добавить комментарий

    10. Canon PowerShot S500 LCD Replacement: шаг 15, изображение 1 из 1
      • Insert the Spudger into the hole of the ribbon.

      • Move the Spudger away from the gate to fully remove ribbon.

      • Be careful not to damage the ribbon.

      Спросите у FixBot

      Добавить комментарий

    11. Canon PowerShot S500 LCD Replacement: шаг 16, изображение 1 из 1
      • Lift the LCD away from the rest of the camera.

      Спросите у FixBot

      Добавить комментарий

Заключение

To reassemble your device, follow these instructions in reverse order.

Отменить: Я не выполнил это руководство.

Nathan Balcom

Участник с: 01/21/10

102 Репутация

Автор 8 руководств

Команда

Cal Poly, Team 16-28, Maness Winter 2010 Участник Cal Poly, Team 16-28, Maness Winter 2010

CPSU-MANESS-W10S16G28

4 членов

Автор 9 руководств

0 Комментарии к руководству

Добавить комментарий

Статистика просмотров:

За последние 24 часов: 2

За последние 7 дней: 6

За последние 30 дней: 33

За всё время: 3,676