Перейти к основному содержанию
Присоединяйся к сообществу ремонтников - Создай аккаунт

Canon PowerShot SD1200 IS Flash Assembly Replacement

Выберете то, что вам нужно

    1. Canon PowerShot SD1200 IS Flash Assembly Replacement, Front and Rear Covers: шаг 1, изображение 1 из 1
      • Remove the battery.

      Спросите у FixBot
      Добавить комментарий

    2. Canon PowerShot SD1200 IS Flash Assembly Replacement: шаг 2, изображение 1 из 3 Canon PowerShot SD1200 IS Flash Assembly Replacement: шаг 2, изображение 2 из 3 Canon PowerShot SD1200 IS Flash Assembly Replacement: шаг 2, изображение 3 из 3
      • Remove the two screws from the side of the camera casing with the strap. (4mm Phillips 00)

      • Remove the two screws from the bottom of the camera. (4mm Phillips 00)

      • Remove the two screws from the right side of the camera opposite the strap. (2mm Phillips 00)

      Спросите у FixBot
      Добавить комментарий

    3. Canon PowerShot SD1200 IS Flash Assembly Replacement: шаг 3, изображение 1 из 2 Canon PowerShot SD1200 IS Flash Assembly Replacement: шаг 3, изображение 2 из 2
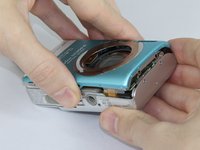
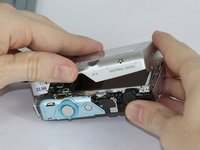
      • Pull off the front cover.

      • If the top of the cover sticks, use gentle downward pressure on the retention clips above the lens to release.

      • Remove the back cover.

      Спросите у FixBot

      Добавить комментарий

    1. Canon PowerShot SD1200 IS Flash Assembly Replacement, LCD: шаг 4, изображение 1 из 3 Canon PowerShot SD1200 IS Flash Assembly Replacement, LCD: шаг 4, изображение 2 из 3 Canon PowerShot SD1200 IS Flash Assembly Replacement, LCD: шаг 4, изображение 3 из 3
      Инструмент, используемый на этом этапе:
      Tweezers
      $4.99
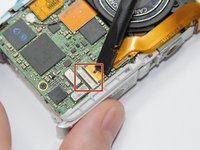
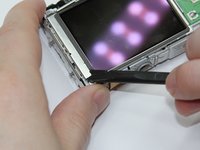
      • Use the spudger to lift the retaining flap on the Zero Insertion Force (ZIF) tab securing the thick ribbon cable.

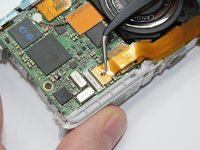
      • Slide out the ribbon cable using fingers or tweezers.

      • Be sure you are prying up on the hinged retaining flap, not the connector.

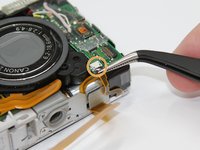
      • Using tweezers, disconnect the small ribbon cable below the flash assembly from the No Fuss Connector by simply pulling the ribbon cable straight out.

      Спросите у FixBot

      Добавить комментарий

    2. Canon PowerShot SD1200 IS Flash Assembly Replacement: шаг 5, изображение 1 из 3 Canon PowerShot SD1200 IS Flash Assembly Replacement: шаг 5, изображение 2 из 3 Canon PowerShot SD1200 IS Flash Assembly Replacement: шаг 5, изображение 3 из 3
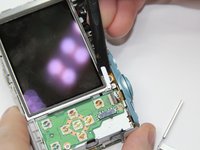
      • Remove the L shaped brackets from the left and right side of the LCD screen with the spudger tool.

      • The Brackets have tabs that need to be pried up.

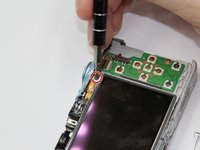
      • Remove the screw below the shutter button. (2.5mm Phillips 00)

      • Holding the sides of the LCD screen, lift the screen up and away to remove.

      Спросите у FixBot

      Добавить комментарий

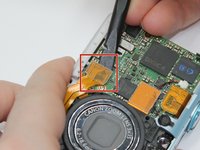
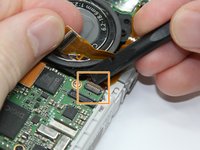
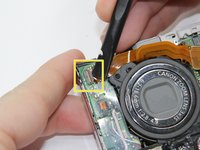
    1. Canon PowerShot SD1200 IS Flash Assembly Replacement, Flash Assembly: шаг 6, изображение 1 из 3 Canon PowerShot SD1200 IS Flash Assembly Replacement, Flash Assembly: шаг 6, изображение 2 из 3 Canon PowerShot SD1200 IS Flash Assembly Replacement, Flash Assembly: шаг 6, изображение 3 из 3
      • Use the spudger to pry up each side of the lens assembly Flat-Topped Connector at the bottom of the motherboard.

      • Holding back the lens assembly ribbon cable, use the spudger to lift the Zero Insertion Force (ZIF) connector tab . Slide out the ribbon cable.

      • Be sure you are prying up on the hinged retaining flap, not the connector itself.

      • Use the spudger to lift the Zero Insertion Force (ZIF) connector tab located on the flash unit. Remove the ribbon cable.

      Спросите у FixBot
      Добавить комментарий

    2. Canon PowerShot SD1200 IS Flash Assembly Replacement: шаг 7, изображение 1 из 1
      • Remove the two screws (2 mm Phillips 00) along the back edge of the camera frame directly behind the flash assembly.

      Спросите у FixBot
      Добавить комментарий

    3. Canon PowerShot SD1200 IS Flash Assembly Replacement: шаг 8, изображение 1 из 1
      • Lift out the flash assembly.

      Спросите у FixBot
      Добавить комментарий

Заключение

To reassemble your device, follow these instructions in reverse order.

Отменить: Я не выполнил это руководство.

Jeff Casper

Участник с: 09/15/16

897 Репутация

Автор 7 руководств

Команда

USF Tampa, Team 17-5, Blackwell Fall 2016 Участник USF Tampa, Team 17-5, Blackwell Fall 2016

USFT-BLACKWELL-F16S17G5

3 членов

Автор 14 руководств

0 Комментарии к руководству

Добавить комментарий

Статистика просмотров:

За последние 24 часов: 3

За последние 7 дней: 11

За последние 30 дней: 34

За всё время: 780