Перейти к основному содержанию
Присоединяйся к сообществу ремонтников - Создай аккаунт

Canon PowerShot SX600 HS Flash Assembly Replacement

Выберете то, что вам нужно

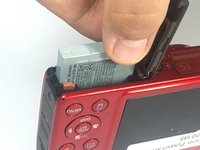
  1. Canon PowerShot SX600 HS Flash Assembly Replacement, Battery: шаг 1, изображение 1 из 1
    • To remove the battery, locate the battery cover on the bottom of the camera.

    • Using your thumb, press down on the cover and slide it outwards.

    Спросите у FixBot
  2. Canon PowerShot SX600 HS Flash Assembly Replacement: шаг 2, изображение 1 из 1
    • Depress the orange lever holding the battery in place to unlock it.

    Спросите у FixBot
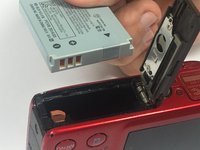
  3. Canon PowerShot SX600 HS Flash Assembly Replacement: шаг 3, изображение 1 из 2 Canon PowerShot SX600 HS Flash Assembly Replacement: шаг 3, изображение 2 из 2
    • Use your fingers to remove the battery.

    • Be sure to remember the alignment of the nodes for reassembly.

    Спросите у FixBot
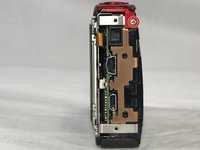
  4. Canon PowerShot SX600 HS Flash Assembly Replacement, Power and Shutter Buttons: шаг 4, изображение 1 из 1
    • Use a #000 Phillips screwdriver to unscrew the four 4mm screws located on the sides of the camera (2 for each side).

    Спросите у FixBot
  5. Canon PowerShot SX600 HS Flash Assembly Replacement: шаг 5, изображение 1 из 1
    • Unscrew the four 2mm located on the bottom of the camera using a Phillips #000 screwdriver.

    Спросите у FixBot
  6. Canon PowerShot SX600 HS Flash Assembly Replacement: шаг 6, изображение 1 из 1
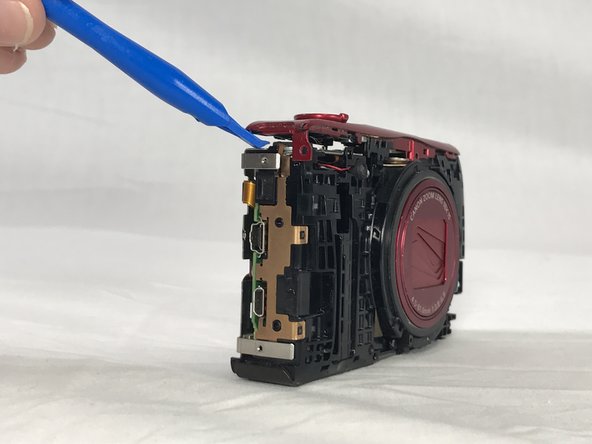
    • Use a plastic opening tool to loosen and remove both the front and back plates of the camera, as well as the two side pieces.

    Спросите у FixBot
  7. Canon PowerShot SX600 HS Flash Assembly Replacement: шаг 7, изображение 1 из 2 Canon PowerShot SX600 HS Flash Assembly Replacement: шаг 7, изображение 2 из 2
    • Unscrew the three 2mm screws attaching the piece to the camera frame with a #000 Phillips screwdriver.

    Спросите у FixBot
  8. Canon PowerShot SX600 HS Flash Assembly Replacement: шаг 8, изображение 1 из 1
    • Use an opening tool to gently remove the power and shutter button assembly from the frame.

    Спросите у FixBot
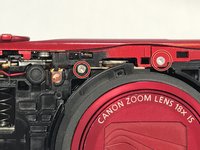
  9. Canon PowerShot SX600 HS Flash Assembly Replacement, Display Screen: шаг 9, изображение 1 из 2 Canon PowerShot SX600 HS Flash Assembly Replacement, Display Screen: шаг 9, изображение 2 из 2
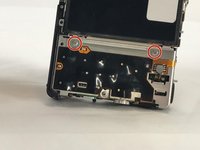
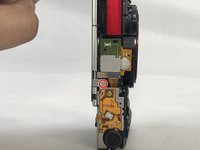
    • Unscrew the 2mm screw connections of the main board protector from the camera frame using a #000 Phillips head screwdriver (2 on front, 1 on top)

    Спросите у FixBot
  10. Canon PowerShot SX600 HS Flash Assembly Replacement: шаг 10, изображение 1 из 1
    • Use a Phillips #000 screwdriver to unscrew the 4mm screw.

    Спросите у FixBot
  11. Canon PowerShot SX600 HS Flash Assembly Replacement: шаг 11, изображение 1 из 1
    Инструмент, используемый на этом этапе:
    Tweezers
    $4.99
    • Use a pair of tweezers to remove the no-fuss connector from its holder.

    Спросите у FixBot
  12. Canon PowerShot SX600 HS Flash Assembly Replacement: шаг 12, изображение 1 из 1
    • Gently lift the protector from the frame.

    Спросите у FixBot
  13. Canon PowerShot SX600 HS Flash Assembly Replacement: шаг 13, изображение 1 из 1
    • Lift the LCD screen ZIF connector tab and remove the ribbon cable.

    • Detach the no-fuss connector.

    • Lift the screen from its holder.

    Спросите у FixBot
  14. Canon PowerShot SX600 HS Flash Assembly Replacement, Flash Assembly: шаг 14, изображение 1 из 1
    • Unplug the assembly from the main no-fuss connector.

    Спросите у FixBot
  15. Canon PowerShot SX600 HS Flash Assembly Replacement: шаг 15, изображение 1 из 1
    • Unplug the assembly from its flat-top connection.

    Спросите у FixBot
  16. Canon PowerShot SX600 HS Flash Assembly Replacement: шаг 16, изображение 1 из 1
    • Use a #000 Phillips screwdriver to remove the three 4mm screws that hold the assembly to the frame.

    Спросите у FixBot
  17. Canon PowerShot SX600 HS Flash Assembly Replacement: шаг 17, изображение 1 из 1
    • Gently lift the assembly out of its place.

    Спросите у FixBot
Заключение

Fix your Canon's flash in order to take bright, vibrant photographs.

2 человек успешно провели ремонт по этому руководству.

Scott Childress

Участник с: 02/15/17

752 Репутация

Автор 3 руководств

Команда

USF Tampa, Team S6-G4, Lacy Spring 2017 Участник USF Tampa, Team S6-G4, Lacy Spring 2017

USFT-LACY-S17S6G4

3 членов

Автор 9 руководств

1 Комментарий к руководству

my SX610 HS flash didn't work. im trying to just troubleshoot it to see if it might came loose or anything. do i still need to do all steps?

Nurul Huda Mohd Asri - Ответить Поделиться

Добавить комментарий

Статистика просмотров:

За последние 24 часов: 1

За последние 7 дней: 8

За последние 30 дней: 54

За всё время: 1,380