Перейти к основному содержанию
Присоединяйся к сообществу ремонтников - Создай аккаунт

Dell Inspiron 8600 Lower Case Replacement

Выберете то, что вам нужно

    1. Dell Inspiron 8600 Lower Case Replacement, Battery: шаг 1, изображение 1 из 1
      • Remove the battery from the bottom left of the laptop as shown.

      • Remove the battery before operating on the computer to avoid electrocution.

      Спросите у FixBot

      Добавить комментарий

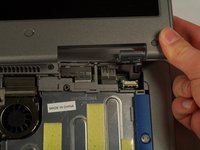
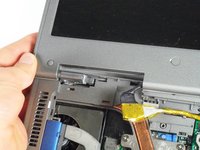
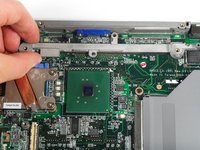
    1. Dell Inspiron 8600 Lower Case Replacement, Hinge Cover: шаг 2, изображение 1 из 3 Dell Inspiron 8600 Lower Case Replacement, Hinge Cover: шаг 2, изображение 2 из 3 Dell Inspiron 8600 Lower Case Replacement, Hinge Cover: шаг 2, изображение 3 из 3
      • Insert a spudger into the notch at the far left side of the top blue panel and pry the hinge cover off.

      • You may need to pry the other side off as well. You can do this by inserting the spudger between the hinge and the top cover.

      • Be careful of the wire attached to the underside of the hinge cover.

      Спросите у FixBot

      Добавить комментарий

    2. Dell Inspiron 8600 Lower Case Replacement: шаг 3, изображение 1 из 1
      • Pull the small black tab on the right hand side of the laptop.

      • You have now removed the hinge cover.

      Спросите у FixBot

      Добавить комментарий

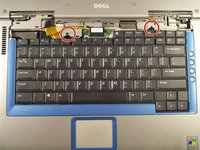
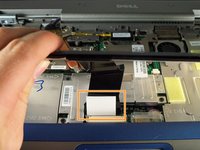
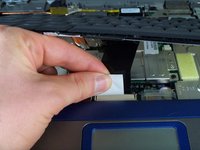
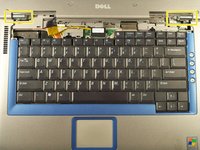
    1. Dell Inspiron 8600 Lower Case Replacement, Keyboard: шаг 4, изображение 1 из 3 Dell Inspiron 8600 Lower Case Replacement, Keyboard: шаг 4, изображение 2 из 3 Dell Inspiron 8600 Lower Case Replacement, Keyboard: шаг 4, изображение 3 из 3
      • Using the Phillips #1 remove the screws at the top of the keyboard as indicated.

      • Do not just lift up. There is a tab underneath the keyboard that is still connected to the mother board.

      • You will need to pull out the white tab underneath the keyboard upwards until it pops out of its socket.

      • The keyboard should be easily removable at this point.

      Спросите у FixBot

      Добавить комментарий

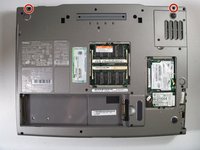
    1. Dell Inspiron 8600 Lower Case Replacement, Display Module: шаг 5, изображение 1 из 2 Dell Inspiron 8600 Lower Case Replacement, Display Module: шаг 5, изображение 2 из 2
      • Flip the laptop over and remove the indicated screws.

      • Flip the laptop back over.

      • Find the two places where the display module is attached to the base of the computer.

      Спросите у FixBot

      Добавить комментарий

    2. Dell Inspiron 8600 Lower Case Replacement: шаг 6, изображение 1 из 1
      • Disconnect the video card from the display module by gently lifting upwards on the black tab.

      Спросите у FixBot

      Добавить комментарий

    3. Dell Inspiron 8600 Lower Case Replacement: шаг 7, изображение 1 из 2 Dell Inspiron 8600 Lower Case Replacement: шаг 7, изображение 2 из 2
      • Lift the display module directly upwards from the base of the computer.

      Спросите у FixBot

      Добавить комментарий

    4. Dell Inspiron 8600 Lower Case Replacement: шаг 8, изображение 1 из 1
      • Now remove the display module.

      Спросите у FixBot

      Добавить комментарий

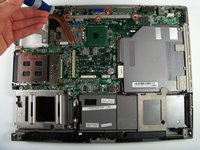
    1. Dell Inspiron 8600 Lower Case Replacement, Lower Case: шаг 9, изображение 1 из 1
      • Remove the two screws holding down the upper case with a Phillips #1 screwdriver.

      Спросите у FixBot

      Добавить комментарий

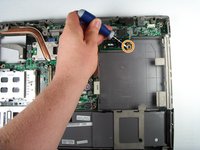
    2. Dell Inspiron 8600 Lower Case Replacement: шаг 10, изображение 1 из 2 Dell Inspiron 8600 Lower Case Replacement: шаг 10, изображение 2 из 2
      • Using a Phillips #1 screwdriver, remove four screws attaching the metal bar to the motherboard.

      • Remove the metal bar which connects the motherboard to the lower case.

      Спросите у FixBot

      Добавить комментарий

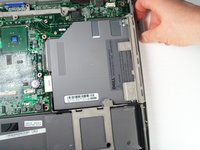
    3. Dell Inspiron 8600 Lower Case Replacement: шаг 11, изображение 1 из 1
      • Disconnect the optical disk drive by gently pulling upward on the plastic connector to prevent connection damage.

      Спросите у FixBot

      Добавить комментарий

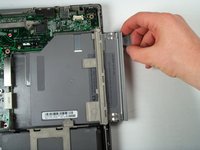
    4. Dell Inspiron 8600 Lower Case Replacement: шаг 12, изображение 1 из 3 Dell Inspiron 8600 Lower Case Replacement: шаг 12, изображение 2 из 3 Dell Inspiron 8600 Lower Case Replacement: шаг 12, изображение 3 из 3
      • Remove the optical disc drive by pushing a small release button on the side of the laptop and then pulling it.

      • This will uncover one final screw. Use the Phillips # 1 to remove the screw.

      Спросите у FixBot

      Добавить комментарий

    5. Dell Inspiron 8600 Lower Case Replacement: шаг 13, изображение 1 из 1
      • Now, pop off the lower case for repair or replacement.

      Спросите у FixBot

      Добавить комментарий

Заключение

To reassemble your device, follow these instructions in reverse order.

Отменить: Я не выполнил это руководство.

John Nesthus

Участник с: 04/13/11

186 Репутация

Автор 6 руководств

Команда

Cal Poly, Team 18-22, Garner Spring 2011 Участник Cal Poly, Team 18-22, Garner Spring 2011

CPSU-GARNER-S11S18G22

4 членов

Автор 135 руководств

0 Комментарии к руководству

Добавить комментарий

Статистика просмотров:

За последние 24 часов: 1

За последние 7 дней: 10

За последние 30 дней: 25

За всё время: 4,018