Введение
If the Dell Precision M3800 is showing the “Blue Screen of Death” or any other error mentioning RAM or memory issues, use this guide to replace the RAM.
The RAM in a computer functions as the memory, and faulty RAM can cause errors in the computer that stop it from functioning.
Before beginning, be sure to power down the laptop, and unplug from the external power source(s).
Выберете то, что вам нужно
-
-
Use a T5 Torx screwdriver to unscrew the ten 3mm screws on the laptop back cover.
-
Lift up the silver cover from the back panel to reveal two screws.
-
Use a Phillips screwdriver to remove the two screws underneath the silver cover.
-
-
-
Use an opening tool to pry around the edges of the back panel to loosen the panel.
-
Remove the back panel.
-
-
-
-
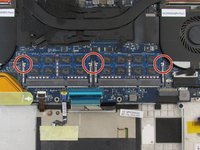
Disconnect the battery cable from the system board [1].
-
Use a Phillips screwdriver to remove the four screws securing the battery to the laptop.
-
Lift the battery off the computer [2].
-
-
-
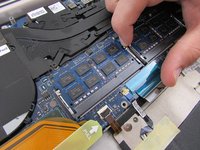
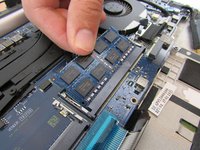
Pull the small silver RAM tabs outwards to pop it out of its place in the laptop body.
-
Remove the RAM from the laptop body (it should easily come out after pulling the silver tabs).
-


To reassemble your device, follow these instructions in reverse order.
Отменить: Я не выполнил это руководство.
Еще один человек закончил это руководство.

Команда

Embry-Riddle Aeronautical University, Team S12-G2, Lamothe Fall 2019 Участник Embry-Riddle Aeronautical University, Team S12-G2, Lamothe Fall 2019
ERAU-LAMOTHE-F19S12G2
4 членов
Автор 7 руководств