Перейти к основному содержанию
Присоединяйся к сообществу ремонтников - Создай аккаунт

Depth Sensor Node Bridge Mounted Replacement Procedure

Выберете то, что вам нужно

    1. Depth Sensor Node Bridge Mounted Replacement Procedure, Removing the U-brackets from the bridge mount: шаг 1, изображение 1 из 3 Depth Sensor Node Bridge Mounted Replacement Procedure, Removing the U-brackets from the bridge mount: шаг 1, изображение 2 из 3 Depth Sensor Node Bridge Mounted Replacement Procedure, Removing the U-brackets from the bridge mount: шаг 1, изображение 3 из 3
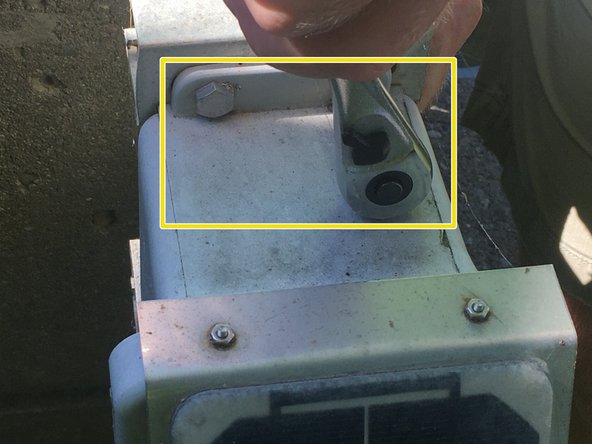
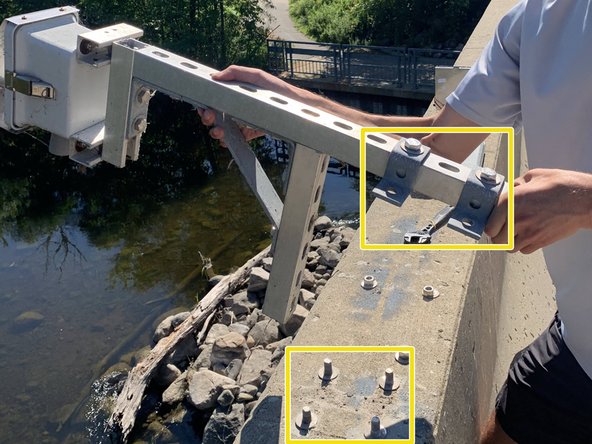
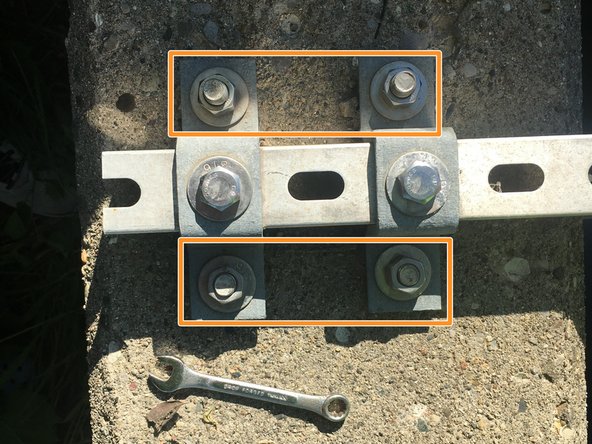
      • Using an adjustable or socket wrench, remove the four 3/4" nuts and washers from the U-brackets attaching the long strut channel to the bridge.

      • Hold the node and long strut channel securely to ensure that they do not fall during this process.

      • Note: You do not have to remove the two 3/4" hex head screws and washers attaching the U-brackets to the long strut channel.

      Спросите у FixBot

      Добавить комментарий

    2. Depth Sensor Node Bridge Mounted Replacement Procedure, Removing the old depth sensor node from the small strut channels: шаг 2, изображение 1 из 3 Depth Sensor Node Bridge Mounted Replacement Procedure, Removing the old depth sensor node from the small strut channels: шаг 2, изображение 2 из 3 Depth Sensor Node Bridge Mounted Replacement Procedure, Removing the old depth sensor node from the small strut channels: шаг 2, изображение 3 из 3
      • These are the two small strut channels attaching the node to the long strut channel.

      • Before removing any parts, rotate the long strut channel (still attached to the node) so that it is no longer over the water.

      • Using a 1/2" adjustable or socket wrench, remove the four 1/2" hex head screws attaching the old node to the small strut channels.

      • Be sure to remove the nuts and washers on the inside of the small strut channels as well. (Total: Four 1/2" hex head screws, four 1/2" nuts, and four washers)

      Спросите у FixBot

      Добавить комментарий

    3. Depth Sensor Node Bridge Mounted Replacement Procedure, Locking the new depth sensor node: шаг 3, изображение 1 из 1
      • Obtain a new depth sensor node and attach a padlock to the new depth sensor node.

      • Projects have set lock combinations. Please ask the lab for guidance.

      Спросите у FixBot

      Добавить комментарий

    4. Depth Sensor Node Bridge Mounted Replacement Procedure, Attaching the new depth sensor node to the small strut channels: шаг 4, изображение 1 из 3 Depth Sensor Node Bridge Mounted Replacement Procedure, Attaching the new depth sensor node to the small strut channels: шаг 4, изображение 2 из 3 Depth Sensor Node Bridge Mounted Replacement Procedure, Attaching the new depth sensor node to the small strut channels: шаг 4, изображение 3 из 3
      • This step will use the same 1/2" hex head screws, 1/2" nuts, and washers from the removal of the old depth sensor node.

      • Using a rag (if handy), clean any dirt or debris off of all screws, nuts, washers, strut channels, etc. before attaching the new depth sensor node.

      • Using a 1/2" adjustable or socket wrench, attach the new depth sensor node to the small strut channels with four 1/2" hex head screws, 1/2" nuts, and washers. Tighten and secure.

      Спросите у FixBot

      Добавить комментарий

    5. Depth Sensor Node Bridge Mounted Replacement Procedure, Attaching the U-brackets to the bridge mount: шаг 5, изображение 1 из 3 Depth Sensor Node Bridge Mounted Replacement Procedure, Attaching the U-brackets to the bridge mount: шаг 5, изображение 2 из 3 Depth Sensor Node Bridge Mounted Replacement Procedure, Attaching the U-brackets to the bridge mount: шаг 5, изображение 3 из 3
      • This is what the bridge mount looks like before reattaching the long strut channel with the new depth sensor node.

      • Line up and place the U-brackets, still attached to the long strut channel, onto the bridge mount.

      • Once again, hold the node securely to ensure it does not fall while the U-brackets are being attached to the bridge mount.

      • This step will use the same 3/4" nuts and washers from the first step.

      • Using a 3/4" adjustable or socket wrench, secure the long strut channel and U-brackets to the bridge with the 3/4" nuts and washers. Tighten and secure.

      Спросите у FixBot

      Добавить комментарий

    6. Depth Sensor Node Bridge Mounted Replacement Procedure, Measure and record the distance from the bottom of the depth sensor node to the bottom of the river: шаг 6, изображение 1 из 2 Depth Sensor Node Bridge Mounted Replacement Procedure, Measure and record the distance from the bottom of the depth sensor node to the bottom of the river: шаг 6, изображение 2 из 2
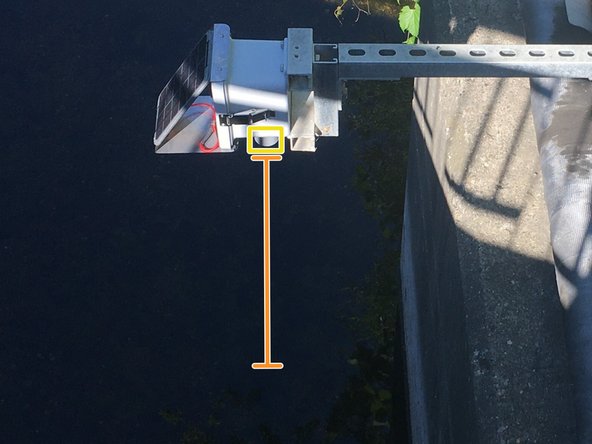
      • Using a (weighted) tape measure, measure and record the distance from the bottom of the depth sensor node to the bottom of the river.

      • The bottom of the depth sensor node is defined as the bottom of the sensor cone.

      Спросите у FixBot

      Добавить комментарий

Заключение

To reassemble your device, follow these instructions in reverse order.

Отменить: Я не выполнил это руководство.

Еще один человек закончил это руководство.

Brooke Mason

Участник с: 05/29/19

2 958 Репутация

Автор 17 руководств

Команда

Open-Storm Участник Open-Storm

Community

14 членов

Автор 49 руководств

0 Комментарии к руководству

Добавить комментарий

Статистика просмотров:

За последние 24 часов: 1

За последние 7 дней: 2

За последние 30 дней: 16

За всё время: 561