Перейти к основному содержанию
Присоединяйся к сообществу ремонтников - Создай аккаунт

Disassembling Canon EOS 60D Removing Back Panel

Выберете то, что вам нужно

    1. Disassembling Canon EOS 60D Removing Back Panel, Eye piece and Battery door: шаг 1, изображение 1 из 2 Disassembling Canon EOS 60D Removing Back Panel, Eye piece and Battery door: шаг 1, изображение 2 из 2
      • Removing the eyepiece is easy. There are two methods, you can do it yourself, or put it in your camera bag a dozen times and at least once, it will fall off.

      • Grip the eyepiece by the sides firmly (index finger and thumb). Wiggle it upwards until it is off.

      Спросите у FixBot

      Добавить комментарий

    2. Disassembling Canon EOS 60D Removing Back Panel: шаг 2, изображение 1 из 2 Disassembling Canon EOS 60D Removing Back Panel: шаг 2, изображение 2 из 2
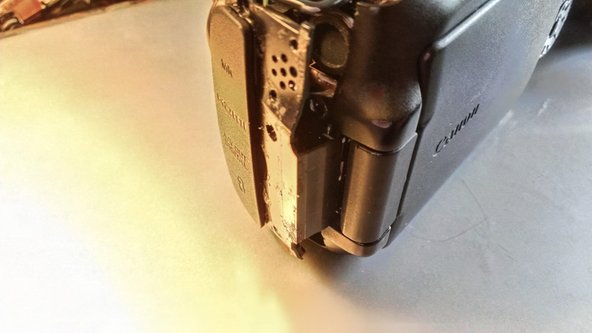
      • Open the battery door

      • Rotate the door so the one side of the hinge pops out (see photo #2)

      • Slide other pin out (it pops out the same, but this is easier)

      Спросите у FixBot

      Добавить комментарий

    1. Disassembling Canon EOS 60D Removing Back Panel, Rubber grips: шаг 3, изображение 1 из 1
      • Use a thin piece of plastic, spudger, or fingernail (if you have them) to lift up the edge of the grip, and pull up slowly.

      • Repeat for the other two grips

      • The large one on the battery-side is the easiest to start with. This is required to remove the front & back panels

      • The small one on the back is a bit difficult to get started, but not really difficult to remove.

      • The one on the AV panel will be easier if you open up the AV port cover.

      • Remove the adhesive like you would rubber cement, just rub your finger against it, it will come off.

      • Optionally throw the balled up adhesive at people pretending its a booger :)

      Спросите у FixBot

      Добавить комментарий

    1. Disassembling Canon EOS 60D Removing Back Panel, Left-Side Port Cover: шаг 4, изображение 1 из 1
      • Remove 3 screws

      Спросите у FixBot

      Добавить комментарий

      • Remove the small Screw under the Flip cover too

      Спросите у FixBot

      Добавить комментарий

    2. Disassembling Canon EOS 60D Removing Back Panel: шаг 6, изображение 1 из 1
      • Using a Spudger, fingernail, or other thin plastic tool to wedge the panel off of the camera

      • Start at the camera's front. Pulling on the rubber av-cover may be enough to get it to move off the body

      • Only pull about 1/4" (3-5mm). There is a tab that will need to slide out

      Спросите у FixBot

      Добавить комментарий

    3. Disassembling Canon EOS 60D Removing Back Panel: шаг 7, изображение 1 из 1
      • Slide the rear part of the cover out.

      Спросите у FixBot

      Добавить комментарий

    4. Disassembling Canon EOS 60D Removing Back Panel: шаг 8, изображение 1 из 2 Disassembling Canon EOS 60D Removing Back Panel: шаг 8, изображение 2 из 2
      • At this point, the only thing holding on is the dust-cover is hooked onto the front panel

      • Slide down to remove without damaging the cover. (see photo with cover removed)

      • You can see how the cover, and side piece fit together in the second image.

      Спросите у FixBot

      Добавить комментарий

Заключение

To reassemble your device, follow these instructions in reverse order.

Отменить: Я не выполнил это руководство.

4 человек успешно провели ремонт по этому руководству.

Eric D

Участник с: 11/13/12

1 377 Репутация

Автор 5 руководств

0 Комментарии к руководству

Добавить комментарий

Статистика просмотров:

За последние 24 часов: 3

За последние 7 дней: 10

За последние 30 дней: 50

За всё время: 5,749