Перейти к основному содержанию
Присоединяйся к сообществу ремонтников - Создай аккаунт

Disassembling Flip Video USB Port

Выберете то, что вам нужно

    1. Disassembling Flip Video USB Port, Outer Shell: шаг 1, изображение 1 из 2 Disassembling Flip Video USB Port, Outer Shell: шаг 1, изображение 2 из 2
      • Turn off the device and take the batteries out.

      • Remove metal sticker under the LCD screen with a spudger.

      • This may require a large force to pry off the glued sticker.

      Спросите у FixBot

      Добавить комментарий

    2. Disassembling Flip Video USB Port: шаг 2, изображение 1 из 1
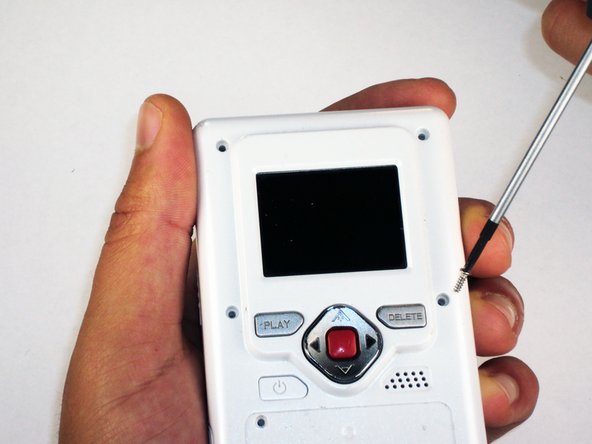
      • Remove the 4 gray screw caps with the spudger. These cover the screw heads and protect from dirt or grime.

      Спросите у FixBot

      Добавить комментарий

    3. Disassembling Flip Video USB Port: шаг 3, изображение 1 из 2 Disassembling Flip Video USB Port: шаг 3, изображение 2 из 2
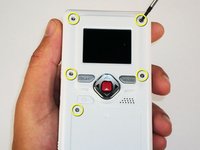
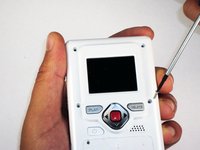
      • Remove the 5 10mm screws with the #00 Phillips screwdriver. These connect the back of the outer shell to the front of the outer shell.

      Спросите у FixBot

      Добавить комментарий

    4. Disassembling Flip Video USB Port: шаг 4, изображение 1 из 1
      • Open battery door. This can be done by gently depressing and sliding the battery down downward.

      Спросите у FixBot

      Добавить комментарий

    5. Disassembling Flip Video USB Port: шаг 5, изображение 1 из 1
      • Use the spudger to separate outer shells.

      • The spudger must be inserted between the shell halves to pry the edges apart.

      • Slowly work around the outside to separate the halves.

      Спросите у FixBot

      Добавить комментарий

    1. Disassembling Flip Video USB Port, Circuit Board: шаг 6, изображение 1 из 1
      • Remove the 3 5mm screws securing the circuit board to the front shell with the #00 Phillips screwdriver.

      Спросите у FixBot

      Добавить комментарий

    2. Disassembling Flip Video USB Port: шаг 7, изображение 1 из 1
      • Slowly lift the left side of the circuit board.

      • Do not attempt to remove the circuit board completely yet. It is still connected to the device.

      Спросите у FixBot

      Добавить комментарий

    3. Disassembling Flip Video USB Port: шаг 8, изображение 1 из 1
      • Disconnect the USB port cable from the back side of the circuit board.

      Спросите у FixBot

      Добавить комментарий

    4. Disassembling Flip Video USB Port: шаг 9, изображение 1 из 1
      • Slide out the battery contacts.

      • Battery contacts

      • Slot where battery contacts were located

      Спросите у FixBot

      Добавить комментарий

    1. Disassembling Flip Video USB Port, USB Port: шаг 10, изображение 1 из 1
      • Remove black 3mm screw that secures wire to outer shell with #00 Phillips screwdriver.

      Спросите у FixBot

      Добавить комментарий

    2. Disassembling Flip Video USB Port: шаг 11, изображение 1 из 1
      • Lift wire out of the outer shell slot.

      • The wire mount should stay attached to the wire.

      Спросите у FixBot

      Добавить комментарий

    3. Disassembling Flip Video USB Port: шаг 12, изображение 1 из 1
      Инструмент, используемый на этом этапе:
      Tweezers
      $4.99
      • Use tweezers to remove the spring that holds the port door shut.

      • Make sure the spring is firmly grasped by the tweezers so that it does not shoot off of the case.

      Спросите у FixBot

      Добавить комментарий

    4. Disassembling Flip Video USB Port: шаг 13, изображение 1 из 1
      • Remove the 3 screws securing USB port cover to the outer case with the #00 Phillips screwdriver.

      Спросите у FixBot

      Добавить комментарий

    5. Disassembling Flip Video USB Port: шаг 14, изображение 1 из 1
      • Remove the USB port cover.

      Спросите у FixBot

      Добавить комментарий

    6. Disassembling Flip Video USB Port: шаг 15, изображение 1 из 1
      • Remove the USB slider.

      Спросите у FixBot

      Добавить комментарий

    7. Disassembling Flip Video USB Port: шаг 16, изображение 1 из 1
      • Lift out the USB port slowly.

      • Since the hinge is spring loaded, be careful that no pieces fall out when the port is lifted.

      Спросите у FixBot

      Добавить комментарий

Заключение

To reassemble your device, follow these instructions in reverse order.

Отменить: Я не выполнил это руководство.

Еще один человек закончил это руководство.

Elizabeth

Участник с: 04/15/10

100 Репутация

Автор 6 руководств

Команда

Cal Poly, Team 26-21, Regan Spring 2010 Участник Cal Poly, Team 26-21, Regan Spring 2010

CPSU-REGAN-S10S26G21

4 членов

Автор 12 руководств

0 Комментарии к руководству

Добавить комментарий

Статистика просмотров:

За последние 24 часов: 1

За последние 7 дней: 6

За последние 30 дней: 23

За всё время: 4,508