Перейти к основному содержанию
Присоединяйся к сообществу ремонтников - Создай аккаунт

Disconnect the Battery

Абсолютно необходимое руководство
Это руководство только для предварительной подготовки! Этот гайд является частью другой процедуры и не предназначен для самостоятельного использования.

Выберете то, что вам нужно

  1. Disconnect the Battery, Apply a heated iOpener: шаг 1, изображение 1 из 1
    • Power off your phone before beginning disassembly.

    • Use a hairdryer, a heatgun, or prepare an iOpener and apply it to the right edge of the back of the phone for about a minute to soften the adhesive underneath.

    Спросите у FixBot

    Добавить комментарий

  2. Disconnect the Battery, Insert an opening pick: шаг 2, изображение 1 из 3 Disconnect the Battery, Insert an opening pick: шаг 2, изображение 2 из 3 Disconnect the Battery, Insert an opening pick: шаг 2, изображение 3 из 3
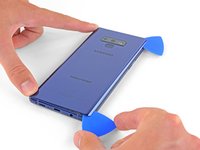
    • Apply a suction handle to the back cover.

    • Lift with a suction handle to create a gap between the back cover and the frame of the phone.

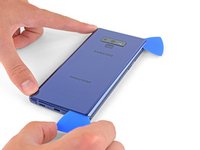
    • Insert an opening pick into the gap.

    • If the glass is badly cracked, cover it in packing tape to create a surface for the suction cup to adhere to.

    • If the adhesive won't budge, apply more heat, not excessive force. Too much force could break the glass.

    Спросите у FixBot

    Добавить комментарий

  3. Disconnect the Battery, Cut through the adhesive: шаг 3, изображение 1 из 1
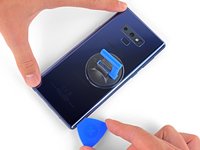
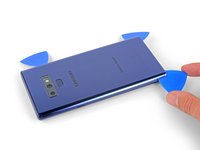
    • Note that there is more adhesive along the top edge and around the camera bezel than around the rest of the phone.

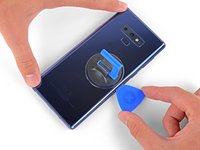
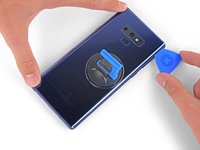
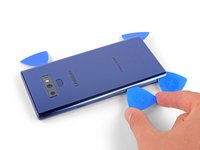
    • Cut carefully around the left edge near the fingerprint sensor or you risk damaging the ribbon cable inside.

    • If, at any point, the adhesive feels stubborn, apply more heat—not more force.

    Спросите у FixBot

    Добавить комментарий

  4. Disconnect the Battery, Slide the opening pick: шаг 4, изображение 1 из 3 Disconnect the Battery, Slide the opening pick: шаг 4, изображение 2 из 3 Disconnect the Battery, Slide the opening pick: шаг 4, изображение 3 из 3
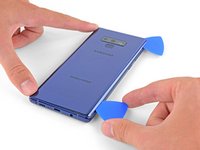
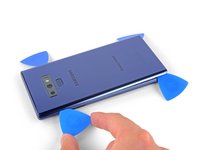
    • Starting from the center, cut the adhesive up and down the right side with an opening pick.

    • Do not insert the pick more than halfway into the phone when cutting near the fingerprint sensor or cameras, or you risk damaging internal components.

    Спросите у FixBot

    Добавить комментарий

  5. Disconnect the Battery: шаг 5, изображение 1 из 3 Disconnect the Battery: шаг 5, изображение 2 из 3 Disconnect the Battery: шаг 5, изображение 3 из 3
    • Be careful near the corner, as the glass is very weak. Apply more heat at any time if the adhesive becomes stuck.

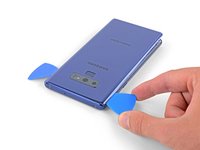
    • Leave an opening pick in the upper-right corner.

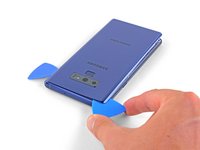
    • Use another opening pick to cut the adhesive around the bottom-right corner.

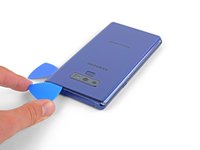
    • Leave that opening pick in the phone.

    Спросите у FixBot

    Добавить комментарий

  6. Disconnect the Battery: шаг 6, изображение 1 из 1
    • Use a heat gun or hair dryer or apply a heated iOpener to the left side of the rear panel for at three minutes to soften the adhesive underneath.

    Спросите у FixBot

    Добавить комментарий

  7. Disconnect the Battery: шаг 7, изображение 1 из 3 Disconnect the Battery: шаг 7, изображение 2 из 3 Disconnect the Battery: шаг 7, изображение 3 из 3
    • Be careful near the corners, as the glass is weakest there.

    • Insert an opening pick into the lower-left corner of the rear panel.

    • Using another opening pick, cut the adhesive along the left edge of the rear panel.

    • Don't insert an opening pick in more than halfway on the left edge near the fingerprint sensor or you may damage the ribbon cable inside.

    • It is fine if opening picks fall out as the back cover becomes separated.

    Спросите у FixBot

    Добавить комментарий

  8. Disconnect the Battery: шаг 8, изображение 1 из 3 Disconnect the Battery: шаг 8, изображение 2 из 3 Disconnect the Battery: шаг 8, изображение 3 из 3
    • Using the inserted opening pick, carefully cut the adhesive around the upper-left corner of the rear panel.

    • Finally, cut the last of the adhesive along the top of the phone.

    • Use an iOpener, hair dryer, or heat gun to apply more heat as needed where you are cutting the adhesive.

    Спросите у FixBot

    Добавить комментарий

  9. Disconnect the Battery: шаг 9, изображение 1 из 2 Disconnect the Battery: шаг 9, изображение 2 из 2
    • Separate the right side of the rear cover first.

    • Tilt the cover up along the left edge to expose the fingerprint sensor ribbon cable.

    • Do not pull out the fingerprint sensor ribbon cable yet.

    • The fingerprint sensor cover might stay attached to the midframe.

    Спросите у FixBot

    Добавить комментарий

  10. Disconnect the Battery, Disconnect the fingerprint sensor: шаг 10, изображение 1 из 2 Disconnect the Battery, Disconnect the fingerprint sensor: шаг 10, изображение 2 из 2
    • Use the tip of a spudger to pry the fingerprint sensor ribbon cable up and out of its socket.

    Спросите у FixBot

    Добавить комментарий

  11. Disconnect the Battery: шаг 11, изображение 1 из 1
    Инструмент, используемый на этом этапе:
    Tweezers
    $4.99
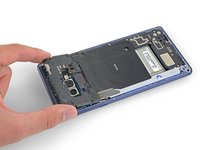
    • Remove the back cover.

    • To re-install the back cover:

    • Use tweezers to peel away any remaining adhesive from the phone's chassis. Then clean the adhesion areas with high concentration isopropyl alcohol (at least 90%) and a lint-free cloth to prep the surface for the new adhesive. You don't have to clear out adhesive down to the plastic but larger pieces should be removed.

    • Turn on your phone and test your repair before installing new adhesive and resealing the phone.

    • Carefully apply the new adhesive to the back cover, then line up one edge of the glass against the phone chassis and firmly press the glass into the phone.

    Спросите у FixBot

    Добавить комментарий

  12. Disconnect the Battery, Remove the upper midframe: шаг 12, изображение 1 из 2 Disconnect the Battery, Remove the upper midframe: шаг 12, изображение 2 из 2
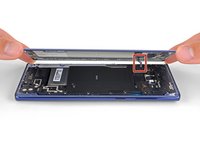
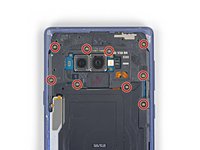
    • Use a Phillips screwdriver to remove the nine 4 mm screws securing the upper midframe.

    Спросите у FixBot

    Добавить комментарий

  13. Disconnect the Battery: шаг 13, изображение 1 из 2 Disconnect the Battery: шаг 13, изображение 2 из 2
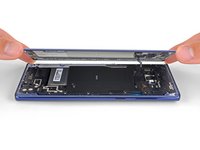
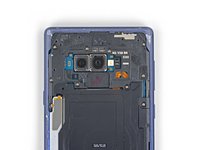
    • Insert the tip of a spudger into the upper-left corner of the upper midframe.

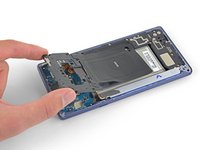
    • Pry the upper midframe out of the phone.

    • The upper midframe snaps into and out of place.

    Спросите у FixBot

    Добавить комментарий

  14. Disconnect the Battery: шаг 14, изображение 1 из 3 Disconnect the Battery: шаг 14, изображение 2 из 3 Disconnect the Battery: шаг 14, изображение 3 из 3
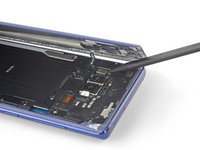
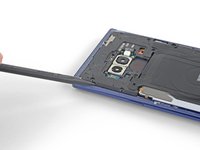
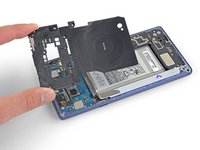
    • Peel the wireless charging coil off the battery starting with the left side.

    • The adhesive is weak but you can use an opening pick to cut it if necessary.

    • During reassembly start by snapping the midframe into place first before adhering the wireless charging coil.

    Спросите у FixBot

    Добавить комментарий

  15. Disconnect the Battery, Disconnect the battery: шаг 15, изображение 1 из 2 Disconnect the Battery, Disconnect the battery: шаг 15, изображение 2 из 2
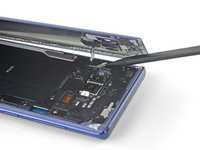
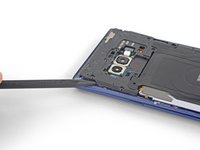
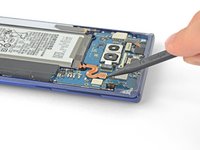
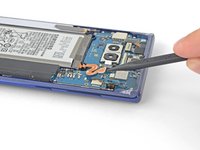
    • Use the tip of a spudger to disconnect the orange ribbon cable connecting the battery to the motherboard.

    Спросите у FixBot

    Добавить комментарий

Заключение

To reassemble your device, follow these instructions in reverse order.

Отменить: Я не выполнил это руководство.

Sam Omiotek

Участник с: 02/25/19

98 765 Репутация

Автор 290 руководств

0 Комментарии к руководству

Добавить комментарий

Статистика просмотров:

За последние 24 часов: 0

За последние 7 дней: 10

За последние 30 дней: 100

За всё время: 616