Перейти к основному содержанию

Emerson Ceiling Fan Flywheel Replacement

Выберете то, что вам нужно

  1. Emerson Ceiling Fan  Flywheel Replacement, Remove Ceiling Fan Blades: шаг 1, изображение 1 из 3 Emerson Ceiling Fan  Flywheel Replacement, Remove Ceiling Fan Blades: шаг 1, изображение 2 из 3 Emerson Ceiling Fan  Flywheel Replacement, Remove Ceiling Fan Blades: шаг 1, изображение 3 из 3
    • Make sure power to the ceiling fan is off!

    • Use a Phillips #0 screwdriver to remove the ten 12.7 mm screws from the ceiling fan blades.

    • It is easier to work on the ceiling fan if you remove the motor.

  2. Emerson Ceiling Fan  Flywheel Replacement, Open Switch Housing: шаг 2, изображение 1 из 2 Emerson Ceiling Fan  Flywheel Replacement, Open Switch Housing: шаг 2, изображение 2 из 2
    • Remove light bulbs before working on switch housing.

    • Open the switch housing using a Phillips #0 screwdriver to remove the three 7.9 mm screws.

  3. Emerson Ceiling Fan  Flywheel Replacement, Disconnect Wires: шаг 3, изображение 1 из 2 Emerson Ceiling Fan  Flywheel Replacement, Disconnect Wires: шаг 3, изображение 2 из 2
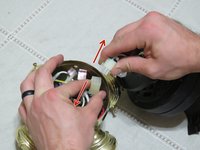
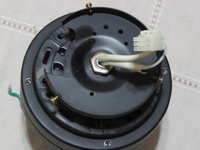
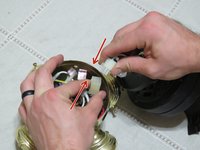
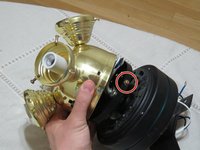
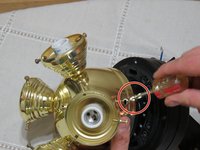
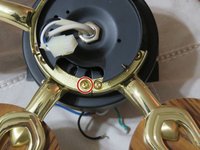
    • Disconnect wires that are attached to the switch housing and the motor.

    • Make sure you know where to reconnect them.

  4. Emerson Ceiling Fan  Flywheel Replacement, Remove Broken Flywheel: шаг 4, изображение 1 из 3 Emerson Ceiling Fan  Flywheel Replacement, Remove Broken Flywheel: шаг 4, изображение 2 из 3 Emerson Ceiling Fan  Flywheel Replacement, Remove Broken Flywheel: шаг 4, изображение 3 из 3
    • Remove the broken flywheel.

    • Make note of its exact placement on the shaft.

    • It may be a good idea to mark the location with a marker.

  5. Emerson Ceiling Fan  Flywheel Replacement, Attach New Flywheel: шаг 5, изображение 1 из 3 Emerson Ceiling Fan  Flywheel Replacement, Attach New Flywheel: шаг 5, изображение 2 из 3 Emerson Ceiling Fan  Flywheel Replacement, Attach New Flywheel: шаг 5, изображение 3 из 3
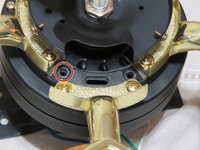
    • Slide the new flywheel into place making sure all the holes line up.

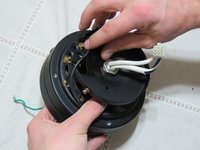
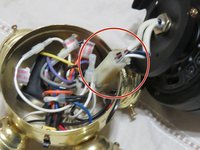
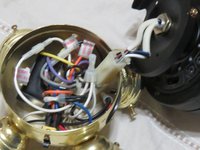
    • Place any wires through the same holes as they were before

    • Replace any other parts you removed during the process.

  6. Emerson Ceiling Fan  Flywheel Replacement, Reconnect Wires: шаг 6, изображение 1 из 2 Emerson Ceiling Fan  Flywheel Replacement, Reconnect Wires: шаг 6, изображение 2 из 2
    • Reconnect the wires from the switch housing to the motor.

    • Make sure you connect the wires to the correct match.

  7. Emerson Ceiling Fan  Flywheel Replacement, Close Switch Housing: шаг 7, изображение 1 из 3 Emerson Ceiling Fan  Flywheel Replacement, Close Switch Housing: шаг 7, изображение 2 из 3 Emerson Ceiling Fan  Flywheel Replacement, Close Switch Housing: шаг 7, изображение 3 из 3
    • Screw back on the three 7.9 mm screws to the switch housing using a Phillips #0 screwdriver.

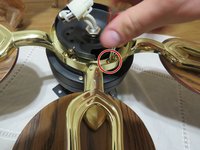
    • Screw the light bulbs back in.

  8. Emerson Ceiling Fan  Flywheel Replacement, Reconnect Ceiling Fan Blades: шаг 8, изображение 1 из 3 Emerson Ceiling Fan  Flywheel Replacement, Reconnect Ceiling Fan Blades: шаг 8, изображение 2 из 3 Emerson Ceiling Fan  Flywheel Replacement, Reconnect Ceiling Fan Blades: шаг 8, изображение 3 из 3
    • Using a Phillips #0 screwdriver, reconnect ceiling fan blades by re-screwing on ten 12.7 mm Phillip screws.

    • If you removed the motor, reconnect it after blades are on.

Заключение

Test your fan. It should be running quietly with no problems. If something is wrong make sure to double check you hooked the wires up correctly.

Еще один человек закончил это руководство.

Tanner Brook

Участник с: 10/21/19

178 Репутация

1 руководство автора

Команда

Eastern Washington University, Team S27-G4, Munoz Fall 2019 Участник Eastern Washington University, Team S27-G4, Munoz Fall 2019

EWU-MUNOZ-F19S27G4

2 членов

Автор 1 руководств

0 Комментариев

Добавить комментарий

Просмотр статистики:

За последние 24часов: 1

За последние 7 дней: 6

За последние 30 дней: 55

За всё время: 3,565