Введение
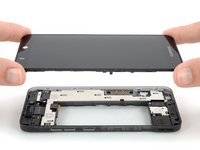
Use this guide to replace the top module in your Fairphone 3.
Выберете то, что вам нужно
-
-
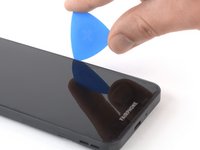
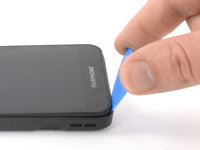
Insert a thumbnail, or a prying tool like a spudger, into the notch at the bottom right of the back cover.
-
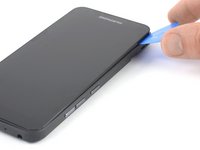
Pry the back cover up to start separating its plastic clips.
 Спросите у FixBot
-
-
-
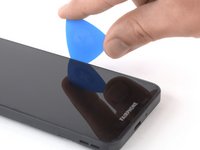
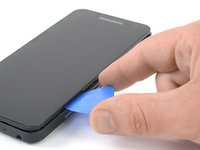
Slide around the bottom right corner of the back cover to loosen the lower plastic clips.
-
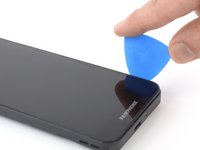
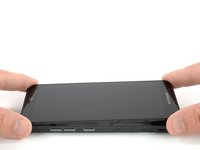
Lift the back cover to release the rest of the plastic clips and remove it.
-
-
-
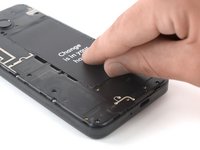
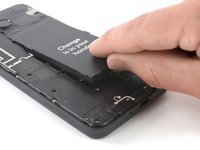
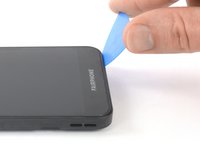
Use a fingernail or a prying tool at the marked notch to lever the battery out of its recess.
-
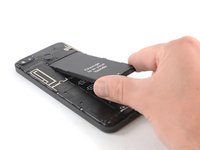
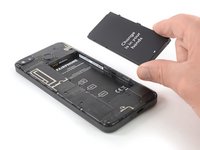
Lever the battery up until you can get a good grip.
-
-
-
Remove the thirteen Phillips #00 screws (4 mm length).
-
-
-
-
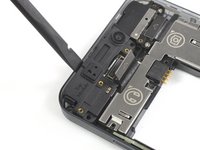
Insert an opening pick between the midframe and the display module on the right edge of the phone.
-
Slide the opening pick down to the bottom right corner to pry open the plastic clamps of the display module.
-
-
-
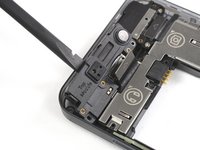
Slide the opening pick around the bottom right corner and use it to disengage the plastic clamps at the bottom of the display module.
-
-
-
Slide the opening pick along the left side to pry the display module up.
-
-
-
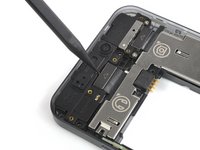
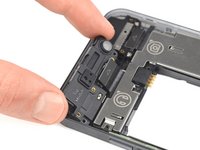
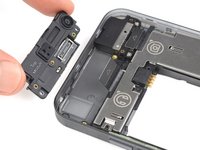
Use a spudger to pry up and disconnect the top module connecting cable.
-


To reassemble your device, follow these instructions in reverse order.
Information on what to do with the old module can be found on the FairPhone support page and in the FairPhone forum.
Take your e-waste to an R2 or e-Stewards certified recycler.
Repair didn’t go as planned? Try some basic troubleshooting, or ask our Answers community for help.
Отменить: Я не выполнил это руководство.
12 человек успешно провели ремонт по этому руководству.


3 Комментарии к руководству
I just did exactly that, and the camera won't work. both of the cameras. when I open the camera app, it is all black, and seems like still loading for around 10 seconds, and afterwards it prompts the error: "open camera error id =0".
I tried to replace it back to the old top module and the problem remained the same.. @fairops
tried the fairphone builtin checks from "myFairphone" app, and both front and back camera failed for not presenting anything.. used the automatic form to reach fairphone customer support, but they should reply me in about 9 days...
meanwhile I cannot use my phone camera!
so please if anyone knows how to handle it please help
now I see I can't use my flashlight too, the button is disabled and it says "camera in use"... although the green sign that should be on the top right corner to inform of camera status does not appear, so it seems like the phone thinks the camera is in use although it is not in use... disturbing..
solved! (kinda..)
the connecting part of the new top module I tried to install was dirty, and so, after installing it, the connecting part in the phone itself got dirty too, which blocked the old top module to connect back successfully.
after cleaning the old top module and the connecting part of the phone, the old top module connected back successfully!
although when I tried to clean the dirty new one(which caused the troubles from the first place), and connected it, it still didn't work.
so not greatly happy about it I keep using the old top module.
disclaimer: the new top module I tried to install was a top module from a fairphone that was ran over by a car, lucky me that other parts survived and I'm currently using them on my fairphone without any troubles.