Перейти к основному содержанию
Присоединяйся к сообществу ремонтников - Создай аккаунт

Game Boy Micro Battery Replacement

Выберете то, что вам нужно

    1. Game Boy Micro Battery Replacement, Remove the Cover: шаг 1, изображение 1 из 2 Game Boy Micro Battery Replacement, Remove the Cover: шаг 1, изображение 2 из 2
      • Remove the Phillips #00 screw on the side of the Game Boy closest to the directional pad.

      • Once the screw has been loosened, lift the cover off the back of the device.

      Спросите у FixBot

      Добавить комментарий

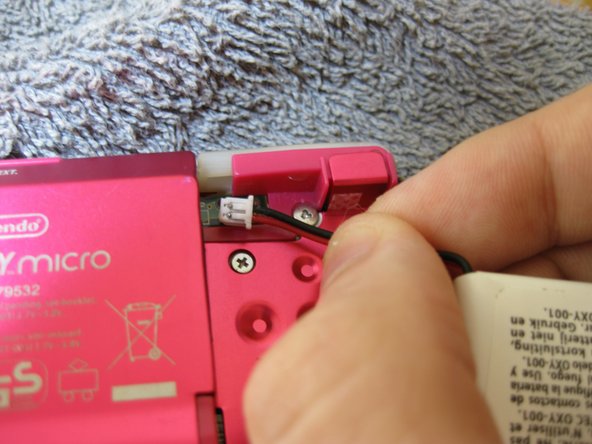
    1. Game Boy Micro Battery Replacement, Remove battery: шаг 2, изображение 1 из 3 Game Boy Micro Battery Replacement, Remove battery: шаг 2, изображение 2 из 3 Game Boy Micro Battery Replacement, Remove battery: шаг 2, изображение 3 из 3
      • Grip, and gently pull outwards on the cable as close to the battery connector as you can

      • Pull in level with the back cover in the direction as indicated by the arrow (not upwards, and not sideways), otherwise you could damage the connector, the cable, or just rip everything off.

      • When plugging the battery back in, make sure to use a non-conductive tool with a flat head to push the battery plug back into the connector, to avoid shorting the battery pins in the plug.

      Спросите у FixBot

      Добавить комментарий

Заключение

To reassemble your device, follow these instructions in reverse order.

Отменить: Я не выполнил это руководство.

Еще один человек закончил это руководство.

SonoSooS

Участник с: 07/30/24

242 Репутация

Автор 2 руководств

0 Комментарии к руководству

Добавить комментарий

Статистика просмотров:

За последние 24 часов: 6

За последние 7 дней: 37

За последние 30 дней: 188

За всё время: 3,277