Перейти к основному содержанию
Присоединяйся к сообществу ремонтников - Создай аккаунт

Gateway Lt4004u Keyboard Replacement

Выберете то, что вам нужно

  1. Gateway Lt4004u Keyboard Replacement, Battery: шаг 1, изображение 1 из 3 Gateway Lt4004u Keyboard Replacement, Battery: шаг 1, изображение 2 из 3 Gateway Lt4004u Keyboard Replacement, Battery: шаг 1, изображение 3 из 3
    • Place the laptop face down in front of you.

    • Locate the battery lock switches on the left and right top corners of the bottom of the device indicated by the red circles.

    • Pinch the switches and slide toward the edges of the computer to unlock.

    Спросите у FixBot

    Добавить комментарий

  2. Gateway Lt4004u Keyboard Replacement: шаг 2, изображение 1 из 2 Gateway Lt4004u Keyboard Replacement: шаг 2, изображение 2 из 2
    • Once the switches have both been unlocked, push the battery upwards away from the rest of the laptop.

    • Remove the battery from the laptop.

    Спросите у FixBot

    Добавить комментарий

  3. Gateway Lt4004u Keyboard Replacement, Keyboard: шаг 3, изображение 1 из 3 Gateway Lt4004u Keyboard Replacement, Keyboard: шаг 3, изображение 2 из 3 Gateway Lt4004u Keyboard Replacement, Keyboard: шаг 3, изображение 3 из 3
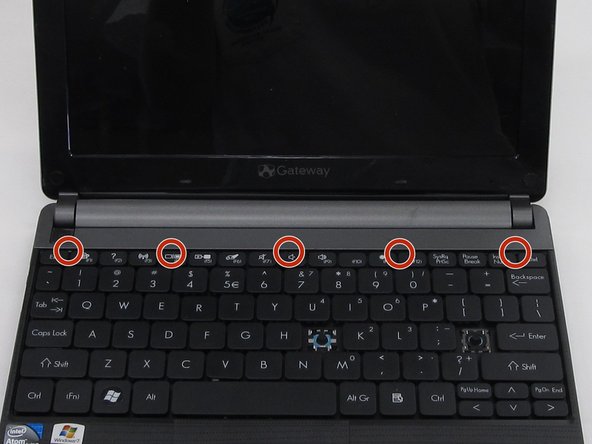
    • Open the laptop so that the screen and keyboard are facing you.

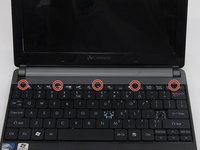
    • Identify the 5 tabs above the function keys in the crevice that attaches the keyboard to the main frame.

    Спросите у FixBot

    Добавить комментарий

  4. Gateway Lt4004u Keyboard Replacement: шаг 4, изображение 1 из 3 Gateway Lt4004u Keyboard Replacement: шаг 4, изображение 2 из 3 Gateway Lt4004u Keyboard Replacement: шаг 4, изображение 3 из 3
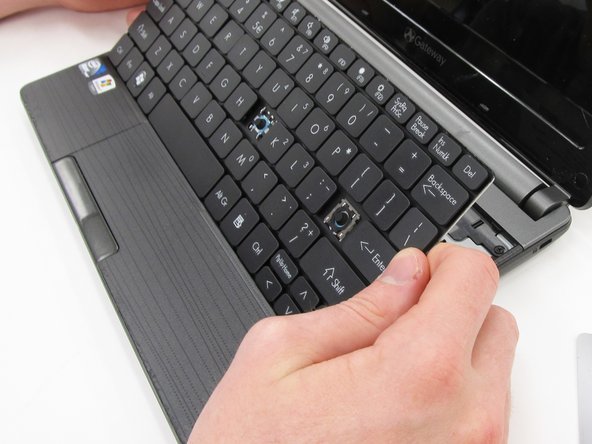
    • Use an opening pick to push each tab away from you.

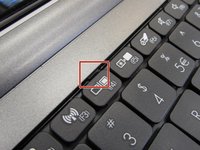
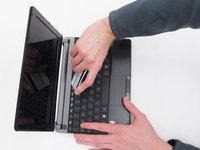
    • Use an opening tool to push the middle tab until you hear a click. Begin to push the tool downward into the computer and slide the card along the length of the keyboard, as you overcome the five tabs.
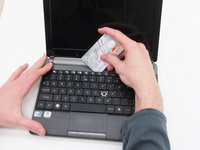
    • A clicking sound is normal and no cause for alarm.

    Спросите у FixBot

    Добавить комментарий

  5. Gateway Lt4004u Keyboard Replacement: шаг 5, изображение 1 из 3 Gateway Lt4004u Keyboard Replacement: шаг 5, изображение 2 из 3 Gateway Lt4004u Keyboard Replacement: шаг 5, изображение 3 из 3
    Инструмент, используемый на этом этапе:
    Plastic Cards
    $2.99
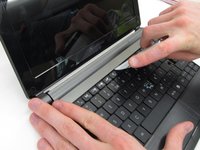
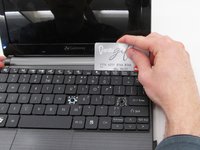
    • Begin to slide the plastic card under the top edge of the keyboard. You will hear popping sounds and the keyboard will eventually be released.

    • Carefully pry the keyboard from the main frame, starting at the top section.

    • Look at the intel sticker in this step and the next to orient your computer with the pictures.

    Спросите у FixBot

    Добавить комментарий

  6. Gateway Lt4004u Keyboard Replacement: шаг 6, изображение 1 из 2 Gateway Lt4004u Keyboard Replacement: шаг 6, изображение 2 из 2
    • Look at the intel sticker in this step and the previous step to orient your computer with the pictures.

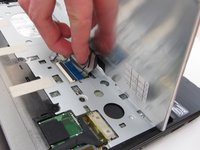
    • Unplug the thin blue connection piece beneath the keyboard. It may pop off on its own while you are prying off the keyboard.

    • The popping noise will not hurt the computer.

    • Once the thin blue plastic has been detached, remove the keyboard from the rest of the laptop.

    Спросите у FixBot

    Добавить комментарий

Заключение

To reassemble your device, follow these instructions in reverse order.

Отменить: Я не выполнил это руководство.

Carlisle Hiott

Участник с: 03/21/16

821 Репутация

Автор 7 руководств

Команда

Clemson, Team 6-5, Benson Spring 2016 Участник Clemson, Team 6-5, Benson Spring 2016

CLEM-BENSON-S16S6G5

4 членов

Автор 16 руководств

0 Комментарии к руководству

Добавить комментарий

Статистика просмотров:

За последние 24 часов: 1

За последние 7 дней: 6

За последние 30 дней: 28

За всё время: 869