Перейти к основному содержанию
Присоединяйся к сообществу ремонтников - Создай аккаунт

HP G62-223CL Hard Drive Replacement

Выберете то, что вам нужно

    1. HP G62-223CL Hard Drive Replacement, Battery Removal: шаг 1, изображение 1 из 2 HP G62-223CL Hard Drive Replacement, Battery Removal: шаг 1, изображение 2 из 2
      • Removing the battery while the laptop is still on may corrupt your files.

      • Turn the device over to expose the bottom of the device.

      • Slide the battery release all the way to the left.

      • There will be a click and the battery will be released from its compartment.

      Спросите у FixBot

      Добавить комментарий

    2. HP G62-223CL Hard Drive Replacement: шаг 2, изображение 1 из 1
      • Carefully remove the battery from its compartment.

      Спросите у FixBot

      Добавить комментарий

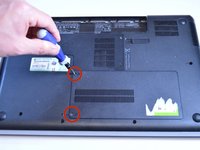
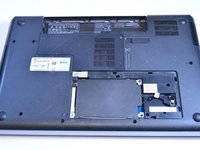
    1. HP G62-223CL Hard Drive Replacement, Hard Drive: шаг 3, изображение 1 из 2 HP G62-223CL Hard Drive Replacement, Hard Drive: шаг 3, изображение 2 из 2
      • Locate the two Phillips head retaining screws which secure the hard drive compartment.

      • Use a Phillips #0 screwdriver to loosen the retaining screws.

      • Remove the panel covering the compartment.

      • Ground yourself before attempting to touch any components. To ground yourself, touch a conductive metal to eliminate any static buildup in your body, which can damage computer components.

      Спросите у FixBot

      Добавить комментарий

    2. HP G62-223CL Hard Drive Replacement: шаг 4, изображение 1 из 1
      • Locate the three 6 mm Phillips head screws for the hard drive.

      • Use a Phillips #0 screwdriver to remove the screws.

      Спросите у FixBot

      Добавить комментарий

    3. HP G62-223CL Hard Drive Replacement: шаг 5, изображение 1 из 1
      • Remove the hard drive from the compartment.

      • Pull the connector cable from the end of the hard drive.

      Спросите у FixBot

      Добавить комментарий

    4. HP G62-223CL Hard Drive Replacement: шаг 6, изображение 1 из 1
      • Locate the two 6 mm Phillips head screws on each side of the hard drive.

      • Use a Phillips #0 screwdriver to remove the screws.

      • Remove the cover from the hard drive.

      Спросите у FixBot

      Добавить комментарий

Заключение

To reassemble your device, follow these instructions in reverse order.

Отменить: Я не выполнил это руководство.

3 человек успешно провели ремонт по этому руководству.

Garret Layton

Участник с: 01/13/15

687 Репутация

Автор 5 руководств

Команда

USF Tampa, Team 1-4, Sullivan Winter 2015 Участник USF Tampa, Team 1-4, Sullivan Winter 2015

USFT-SULLIVAN-W15S1G4

4 членов

Автор 45 руководств

0 Комментарии к руководству

Добавить комментарий

Статистика просмотров:

За последние 24 часов: 4

За последние 7 дней: 17

За последние 30 дней: 49

За всё время: 3,113