Перейти к основному содержанию
Присоединяйся к сообществу ремонтников - Создай аккаунт

HP Mini 210-1199DX RAM Replacement

Выберете то, что вам нужно

    1. HP Mini 210-1199DX RAM Replacement, Battery: шаг 1, изображение 1 из 2 HP Mini 210-1199DX RAM Replacement, Battery: шаг 1, изображение 2 из 2
      • Unplug the netbook.

      • Secure the netbook in a upright position.

      • Slide the plastic battery latch that secures it into the netbook.

      • Keep thumb secure on the right tab as you begin to remove the battery.

      Спросите у FixBot

      Добавить комментарий

    2. HP Mini 210-1199DX RAM Replacement: шаг 2, изображение 1 из 1
      • Remove the battery from the device.

      Спросите у FixBot

      Добавить комментарий

    1. HP Mini 210-1199DX RAM Replacement, Bottom Cover: шаг 3, изображение 1 из 1
      • Press down on the two orange buttons to release.

      • If the case does not pop off, begin to use Spudger to pry the case off the back.

      Спросите у FixBot

      Добавить комментарий

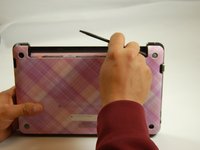
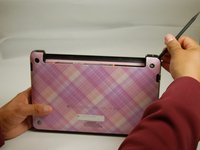
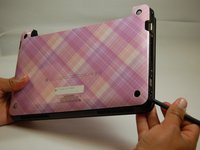
    2. HP Mini 210-1199DX RAM Replacement: шаг 4, изображение 1 из 3 HP Mini 210-1199DX RAM Replacement: шаг 4, изображение 2 из 3 HP Mini 210-1199DX RAM Replacement: шаг 4, изображение 3 из 3
      • Place the spudger on corners and openings in order to begin removal of the back.

      • Continue this on all corner until the case comes fully off of the back.

      Спросите у FixBot

      Добавить комментарий

    3. HP Mini 210-1199DX RAM Replacement: шаг 5, изображение 1 из 1
      • Pull the case off of the device

      Спросите у FixBot

      Добавить комментарий

    1. HP Mini 210-1199DX RAM Replacement, RAM: шаг 6, изображение 1 из 1
      • Locate RAM systems.

      Спросите у FixBot

      Добавить комментарий

    2. HP Mini 210-1199DX RAM Replacement: шаг 7, изображение 1 из 1
      • Use spudger to carefully pull the holding devices back.

      • RAM should pop out once this is completed.

      Спросите у FixBot

      Добавить комментарий

    3. HP Mini 210-1199DX RAM Replacement: шаг 8, изображение 1 из 1
      • Carefully pull the RAM card out.

      Спросите у FixBot

      Добавить комментарий

Заключение

To reassemble your device, follow these instructions in reverse order.

Отменить: Я не выполнил это руководство.

Еще один человек закончил это руководство.

Phillip Winston

Участник с: 03/21/17

655 Репутация

Автор 6 руководств

Команда

Texas Tech, Team S46-G3, Bennett Spring 2017 Участник Texas Tech, Team S46-G3, Bennett Spring 2017

TTU-BENNETT-S17S46G3

3 членов

Автор 44 руководств

0 Комментарии к руководству

Добавить комментарий

Статистика просмотров:

За последние 24 часов: 0

За последние 7 дней: 10

За последние 30 дней: 24

За всё время: 632