Перейти к основному содержанию
Присоединяйся к сообществу ремонтников - Создай аккаунт

HP Stream 11-d010nr Battery Replacement

Выберете то, что вам нужно

  1. HP Stream 11-d010nr Battery Replacement, Pry out the inserts: шаг 1, изображение 1 из 2 HP Stream 11-d010nr Battery Replacement, Pry out the inserts: шаг 1, изображение 2 из 2
    • Unplug and turn off the HP Stream 11 before disassembling the device.

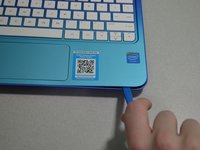
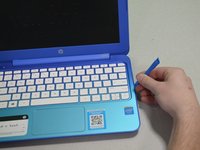
    • Using a spudger, gently pry off the two elliptical rubber inserts located in the top corners.

    • Carefully remove the two circular rubber inserts positioned beneath the removed elliptical inserts.

  2. HP Stream 11-d010nr Battery Replacement, Unscrew the back cover: шаг 2, изображение 1 из 1
    • Using a Phillips #1 screwdriver, remove the eleven 5.6 mm screws securing the back cover.

    • Keep the screws in a safe place for reassembly.

  3. HP Stream 11-d010nr Battery Replacement, Pry the keyboard casing up: шаг 3, изображение 1 из 2 HP Stream 11-d010nr Battery Replacement, Pry the keyboard casing up: шаг 3, изображение 2 из 2
    • Using an iFixit opening tool, carefully pry open the case to separate the keyboard from the main body. Work slowly to avoid damaging the edges.

    • HP Stream 11s tend to be really difficult to open. If your device is not opening with a standard iFixit opening tool, use a nylon spudger, then the metal spudger, or a metal Jimmy as the last resort.

    • When using the metal spudger or Jimmy, be careful not to bring these tools into contact with any electronic components of the device as this can damage the device.

  4. HP Stream 11-d010nr Battery Replacement, Identify the connectors: шаг 4, изображение 1 из 1
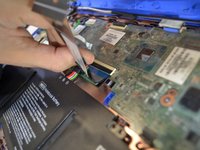
    • Carefully lift the keyboard and identify the three ribbon cables connecting the main body of the laptop to the keyboard.

    • Lift the keyboard with extreme care to avoid damaging the delicate ribbon cables. Applying excessive force can easily tear or break them easily.

  5. HP Stream 11-d010nr Battery Replacement, Disconnect the cables: шаг 5, изображение 1 из 3 HP Stream 11-d010nr Battery Replacement, Disconnect the cables: шаг 5, изображение 2 из 3 HP Stream 11-d010nr Battery Replacement, Disconnect the cables: шаг 5, изображение 3 из 3
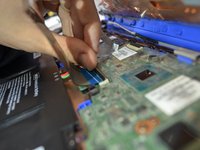
    • Using a spudger, gently lift the flaps on the ZIF connectors to release the three ribbon cables securely attached to them.

    • Carefully disconnect the three ribbon cables.

  6. HP Stream 11-d010nr Battery Replacement, Lift the keyboard out: шаг 6, изображение 1 из 1
    • Gently lift the keyboard out of the laptop to fully detach it from the device.

    • While handling, avoid damaging any remaining components.

  7. HP Stream 11-d010nr Battery Replacement, Battery: шаг 7, изображение 1 из 1
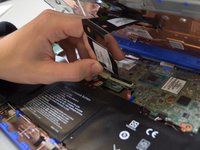
    • Remove any tape holding the battery connector in place.

    • Using your fingers, carefully unplug the battery.

  8. HP Stream 11-d010nr Battery Replacement: шаг 8, изображение 1 из 2 HP Stream 11-d010nr Battery Replacement: шаг 8, изображение 2 из 2
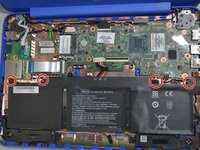
    • Remove the four 3mm #000 Phillips screws holding the battery in place.

    • Carefully lift the battery out of the laptop.

Заключение

To reassemble your device, follow these instructions in reverse order.

3 человек успешно провели ремонт по этому руководству.

Zachary Heisler

Участник с: 01/24/19

367 Репутация

Автор 3 руководств

Команда

Cal Poly, Team S1-G3, White Winter 2019 Участник Cal Poly, Team S1-G3, White Winter 2019

CPSU-WHITE-W19S1G3

4 членов

Автор 11 руководств

3 Комментарии к руководству

HP lists the screws on the back cover as size pm1.9x5.6. What is wrong with HP that they would use such an odd size? I tried 2x6mm and they seem to work fine.

Greg Worrel - Ответить

Me podrias ayudar con el numero de serie del boton de encendido

sam Carrizales - Ответить

O donde lo puedo conseguir

sam Carrizales - Ответить

Добавить комментарий

Статистика просмотров:

За последние 24 часов: 2

За последние 7 дней: 15

За последние 30 дней: 69

За всё время: 3,259