Введение
If you notice your laptop no longer keeping a charge, you may need to replace the battery. This device is kind of strange because the battery isn't one of the first things you remove. This makes it hazardous because you may accidentally turn on your laptop while taking it apart. So be careful when removing the cover and use caution around the power button to ensure you don't turn it on.
Выберете то, что вам нужно
-
-
Pry off the two elliptical rubber inserts (one in each corner).
-
Pry off the two circular rubber inserts below the removed elliptical inserts (one in each corner).
 Спросите у FixBot
-
-
-
Turn the computer upright and lift the screen.
-
Carefully use a spudger to pry the plastic keyboard cover from the base.
-
Work the spudger around the cover to release the clips attaching the cover to the base.
-
-
-
-
Disconnect the cable connecting the ClickPad to the base.
-
Remove the plastic keyboard cover.
-
-
-
Tilt the top of the keyboard plate up until you separate it from the base.
-
Tilt the keyboard toward you slowly but do not remove it, it is still connected with ribbon cables.
-
-
-
Lift up the retaining flaps on the ZIF connectors securing the two keyboard ribbon cables.
-
After disengaging the connectors, gently unplug both ribbon cables.
-
-
-
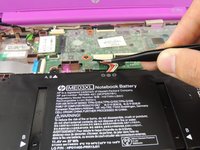
Remove any tape covering the battery connector.
-
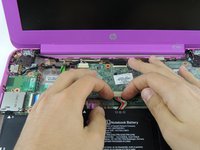
Disconnect the battery cable from its socket on the motherboard.
-
-
-
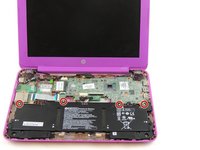
Unscrew the four 3.3mm Phillips #000 screws.
-
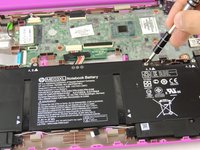
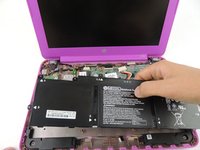
Lift the battery out gently.
-


To reassemble your device, follow these instructions in reverse order.
Отменить: Я не выполнил это руководство.
22 человек успешно провели ремонт по этому руководству.
Команда

USF Tampa, Team 3-5, Wollert Spring 2016 Участник USF Tampa, Team 3-5, Wollert Spring 2016
USFT-WOLLERT-S16S3G5
5 членов
Автор 19 руководств
4 Комментарии к руководству
Thank you for the guide. For us it was enough to unplug the battery and then plug it back in. The problem we encountered was that the capslock would blink on startup for the HP Stream 11.
Would this fix work for a HP notebook Model 11-N012NA. ?
Would this work for my House notebook PC 11-d011wm?
If I put the charger the thing will Will just start blinking
Worked fine but I didn’t need to unplug the ribbon cables. Merely had to lean the keyboard against the screen and remove the battery.
Would advise taking a picture of the ribbon cables to make sure they are in far enough on completion.