Перейти к основному содержанию
Присоединяйся к сообществу ремонтников - Создай аккаунт

HP Stream 11-d020nr Screen Replacement

Выберете то, что вам нужно

    1. HP Stream 11-d020nr Screen Replacement, Lower Case: шаг 1, изображение 1 из 3 HP Stream 11-d020nr Screen Replacement, Lower Case: шаг 1, изображение 2 из 3 HP Stream 11-d020nr Screen Replacement, Lower Case: шаг 1, изображение 3 из 3
      • Before disassembly, unplug and power off the Stream 11.

      • Pry off the two elliptical rubber inserts (one in each corner).

      • Pry off the two circular rubber inserts below the removed elliptical inserts (one in each corner).

      Спросите у FixBot

      Добавить комментарий

    2. HP Stream 11-d020nr Screen Replacement: шаг 2, изображение 1 из 2 HP Stream 11-d020nr Screen Replacement: шаг 2, изображение 2 из 2
      • Remove the eleven 5.6 mm Phillips #00 screws.

      Спросите у FixBot

      Добавить комментарий

    3. HP Stream 11-d020nr Screen Replacement: шаг 3, изображение 1 из 3 HP Stream 11-d020nr Screen Replacement: шаг 3, изображение 2 из 3 HP Stream 11-d020nr Screen Replacement: шаг 3, изображение 3 из 3
      • Turn the computer upright and lift the screen.

      • Carefully use a spudger to pry the plastic keyboard cover from the base.

      • When using the metal spudger, be careful not to press into the components underneath the keyboard cover. If possible, use a standard spudger or plastic opening tool to remove the keyboard cover.

      • Work the spudger around the cover to release the clips attaching the cover to the base.

      • Be patient when removing the cover, as there are many clips and it may take some time.

      Спросите у FixBot

      Добавить комментарий

    4. HP Stream 11-d020nr Screen Replacement: шаг 4, изображение 1 из 3 HP Stream 11-d020nr Screen Replacement: шаг 4, изображение 2 из 3 HP Stream 11-d020nr Screen Replacement: шаг 4, изображение 3 из 3
      • Disconnect the cable connecting the ClickPad to the base.

      • Remove the plastic keyboard cover.

      • The cover is attached to the ClickPad by a cable. Be careful not to lift the cover too far so you do not damage this cable.

      Спросите у FixBot

      Добавить комментарий

    1. HP Stream 11-d020nr Screen Replacement, Keyboard: шаг 5, изображение 1 из 2 HP Stream 11-d020nr Screen Replacement, Keyboard: шаг 5, изображение 2 из 2
      • Tilt the top of the keyboard plate up until you separate it from the base.

      • Tilt the keyboard toward you slowly but do not remove it, it is still connected with ribbon cables.

      Спросите у FixBot

      Добавить комментарий

    2. HP Stream 11-d020nr Screen Replacement: шаг 6, изображение 1 из 3 HP Stream 11-d020nr Screen Replacement: шаг 6, изображение 2 из 3 HP Stream 11-d020nr Screen Replacement: шаг 6, изображение 3 из 3
      • Lift up the retaining flaps on the ZIF connectors securing the two keyboard ribbon cables.

      • After disengaging the connectors, gently unplug both ribbon cables.

      Спросите у FixBot

      Добавить комментарий

    1. HP Stream 11-d020nr Screen Replacement, Lid: шаг 7, изображение 1 из 3 HP Stream 11-d020nr Screen Replacement, Lid: шаг 7, изображение 2 из 3 HP Stream 11-d020nr Screen Replacement, Lid: шаг 7, изображение 3 из 3
      • Lift the black flap on the display cable ZIF connector.

      • After lifting the flap, gently pull the display cable from its socket.

      • Disconnect the wireless antenna from the wireless card.

      • Remove the four 2.2 mm Phillips #00 screws on the left and right sides of the laptop.

      Спросите у FixBot

      Добавить комментарий

    2. HP Stream 11-d020nr Screen Replacement: шаг 8, изображение 1 из 3 HP Stream 11-d020nr Screen Replacement: шаг 8, изображение 2 из 3 HP Stream 11-d020nr Screen Replacement: шаг 8, изображение 3 из 3
      Инструмент, используемый на этом этапе:
      Tweezers
      $4.99
      • Use tweezers to remove the screw covers from the lid.

      • Remove the two 2.2 mm Phillips #000 screws.

      • Use a plastic opening tool to disengage the front part of the lid.

      Спросите у FixBot

      Добавить комментарий

    1. HP Stream 11-d020nr Screen Replacement, Screen: шаг 9, изображение 1 из 2 HP Stream 11-d020nr Screen Replacement, Screen: шаг 9, изображение 2 из 2
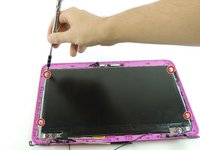
      • Unscrew the four 3.3mm Phillips #000 screws as indicated.

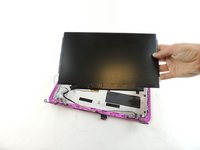
      • Lift the screen from the lid carefully.

      Спросите у FixBot

      Добавить комментарий

Заключение

To reassemble your device, follow these instructions in reverse order.

Отменить: Я не выполнил это руководство.

11 человек успешно провели ремонт по этому руководству.

Spenser Mason

Участник с: 02/04/16

1 781 Репутация

Автор 6 руководств

Команда

USF Tampa, Team 3-5, Wollert Spring 2016 Участник USF Tampa, Team 3-5, Wollert Spring 2016

USFT-WOLLERT-S16S3G5

5 членов

Автор 52 руководств

0 Комментарии к руководству

Добавить комментарий

Статистика просмотров:

За последние 24 часов: 1

За последние 7 дней: 6

За последние 30 дней: 26

За всё время: 6,433