Введение
In order to access the brush assembly, the front cover of the alternator will need to removed first. The brushes play an important in role in transferring voltage from the rotor to the rest of the alternator.
Выберете то, что вам нужно
-
-
-
Remove 4, 7.9mm nuts using a 7.9mm socket driver head
 Спросите у FixBot
-
-
-
Pull cover off the body of the alternator
-
Once you have done this, you should be able to see the internal components of the alternator, particularly the bridge assembly that houses the rectifier, voltage regulator and brushes.
-
-
-
-
-
-
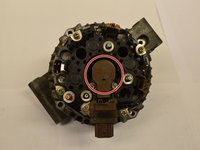
You should now be able to see the recifier assembly, the brushes are located in the middle of the recifier assembly.
-
Remove the brush assembly by unscrewing 2, 6mm center screws using a #2 Phillips head screw driver
-
-
-
Inspect the brushes. If they are scored and not smooth you will need to replace the entire assembly.
-
When reinserting the brushes, make sure the springs keep the brushes in contact with the stator.
-
-


To reassemble your device, follow these instructions in reverse order.
Отменить: Я не выполнил это руководство.
3 человек успешно провели ремонт по этому руководству.
Команда

Cal Poly, Team 25-1, Maness Spring 2016 Участник Cal Poly, Team 25-1, Maness Spring 2016
CPSU-MANESS-S16S25G1
4 членов
Автор 15 руководств