Введение
Use this guide to replace a weak battery in your Huawei Mate 10 Pro.
Before disassembling your phone, discharge the battery below 25%. The battery can catch fire and/or explode if accidentally punctured, but the chances of that happening are much lower if discharged.
Выберете то, что вам нужно
-
-
Switch off your phone.
-
Prepare an iOpener and apply it to the back of the phone for about two minutes to loosen the adhesive beneath the back cover.
-
-
Инструмент, используемый на этом этапе:Halberd Spudger$2.99
-
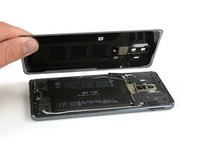
Lift up the back cover with a suction cup until you can insert the flat end of a halberd spudger.
-
Use the halberd spudger to cut the adhesive beneath the back cover on all sides of the phone.
Faire attention à ne pas enfoncer trop le cutter/spatule hallebarde. Surtout à l’approche des boutons ON/OFF et volume, la nappe ne passe pas loin et se branche à coté de l’empreinte digitale.
Bilan, j’ai coupé cette nappe et n’ai plus de bouton volume et on/off.
Plus qu’à chercher la piece de rechange pendant que le telephone est ouvert ;)
I found it easiest to insert the first pick on the side of the phone, not the top as shown in the pictures. The side is slightly more flexible than the ends because it is longer.
-
-
-
Flip the back cover over to the side.
-
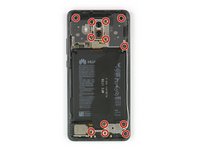
Remove the Phillips #00 screw which holds down the metal shield, sitting on top of the connection of the fingerprint sensor cable.
When re-assembling, you can test the phone before putting the covers back on. If you test it before you connect the fingerprint reader then you need to re-start the phone before the fingerprint reader will work.
-
-
-
Инструмент, используемый на этом этапе:Tweezers$4.99
-
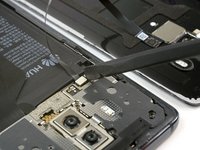
Use a pair tweezers to remove the metal shield covering the connector of the fingerprint sensor.
-
Disconnect the fingerprint sensor cable with a spudger.
-
-
-
Remove the twelve Phillips #00 screws.
-
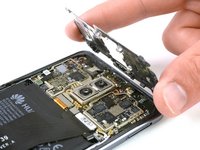
Carefully remove the shields on top of the motherboard and the charging board.
When re-assembling, you can test the phone before putting the covers back on. However, if you test it before you fit the top inner cover (the one in the middle picture above) the speaker will not work.
The top and bottom inner covers both have tiny flanges which you need to insert into slots in the outside edge of the phone before you drop the rest of the cover into place. If you don't put the flanges in first the covers will not fit properly.
-
-
-
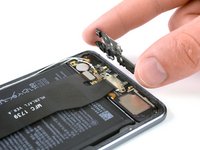
Use a spudger to disconnect the charging port flex cable from the motherboard and from the daughterboard.
-
-
Инструмент, используемый на этом этапе:Tweezers$4.99
-
Use a pair of tweezers to carefully remove the charging port including its flex cable.
Do I need to apply a new sealer / adhesive tape in order to assemble the phone back together? If yes, where can this be purchased for Huawei Mate 10 Pro?
If the adhesive on the back cover is damaged too much and/or doesn’t stick any more it is recommended to remove the old adhesive from the back cover and clean off any residue with isopropyl alcohol (>90%). Then use thin double sided adhesive tape and apply new strips of adhesive.
Hi David,
opening the Mate 10 Pro will damage the waterproof sealing on the device. If you do not replace the adhesive seals, your phone will function normally, but will loose its water-protection.
Hi there, I completed the battery replacement nicely with all your steps, the phone could turn on and function normally, the only issue after the battery replacement is the phone has no sound and vibration. I have ensure all connectors are back to place securely. Does anyone have any clue of the cause of no sound and no vibration?
-
-
-
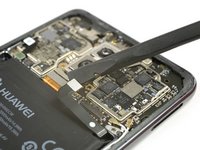
Use a spudger to disconnect the battery flex cable.
-
Apply an iOpener on the screen for at least one minute to loosen the adhesive beneath the battery.
Hier auf KEINEN Fall ein Werkzeug aus Metall (wie den iSesame) verwenden!
Die Funken die dabei sprühen sollten sehr klar machen, daß das keine Gute Idee für den Akku ist. XD
-
-
-
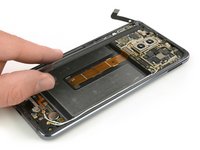
Use a spudger to carefully pry up the battery and slide along the side to separate the adhesive.
-
Remove the battery.
I left the phone on top of a hot-water bottle all the way through the dismantling, right from the start. That way, the phone was nice and warm and the battery came out fairly easily. There is a slightly wider gap in the housing, just where the spudger is being inserted in the first picture above, which makes the job easy.
-


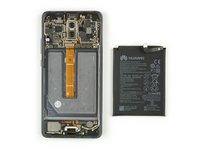
To reassemble your device, follow these instructions in reverse order.
To reassemble your device, follow these instructions in reverse order.
Отменить: Я не выполнил это руководство.
33 человек успешно провели ремонт по этому руководству.


10 Комментариев
The battery was glued in really firmly. I ended up pulling it out with a plier and had some smoke and sparks, luckily I had made sure to drain it completely prior to repair.
Hi there, I completed the battery replacement nicely with all your steps, the phone could turn on and function normally, the only issue after the battery replacement is the phone has no sound and vibration. I have ensure all connectors are back to place securely. Does anyone have any clue of the cause of no sound and no vibration?
Geschafft! Okay, ich war sehr vorsichtig und extrem überlegt. (2 Stunden) Wichtig ist ein Test vor dem verschließen. Bei mir funktionierte der Lautsprecher nicht. Stecker für selbigen war aufgesteckt hatte aber keinen Kontakt. Nochmaliges festdrücken und seit dem ist alles iO. Achtung der Akku ist extrem fest verklebt. Nur mit viel Geduld, Kraft und Wärme war es überhaupt möglich ihn zu lösen. Mit den noch vorhanden Kleberresten im Deckel wieder verschlossen. Hat alles Geklappt und Danke nochmal an diese Super Beschreibung.
Sehr gute Anleitung. Ist unter 30 Mminuten gut zu machen wenn nicht wie bei mir der Akku schon gebläht gewesen ist…Dadurch war es deutlich schwieriger den Akku raus zu bekommen - Huawei hat wirklich einen irren Kleber verwendet. Muss aber sagen das Stecker usw wesentlich besser flutschen als bei Iphones. Alles in allem finde ich das Mate 10 pro wirklich reparaturfreundlich. Danke nochmals an den Autor für die gute Anleitung?
Vielen herzlichen Dank für die Anleitung!
Wie oben schon mehrfach gesagt, war der schwierigste Schritt, den sehr fest verklebten Akku zu entfernen. Da ich keinen iOpener besitze, habe ich zum erwärmen eine Bettflasche verwendet. Die habe ich auf den Tisch gelegt und das Smartphone darauf. Das war auch deshalb notwendig, weil sich bei mir die Ladebuchse mit Flachbandkabel (Schritt 7) nicht entfernen ließ. Hier war ich einfach vorsichtig, beim Entfernen des Akkus das Kabel nicht zu beschädigen. Ist eigentlich kein Problem.
Um den Akku zu lösen habe ich zwei alte Check-Karten genutzt, die ich wie ein "Messer" benutzt haben, um von beiden Seiten des Akkus immer wieder von oben nach unten "schneidend" den Kleber zu lösen. Nach dem Lösen auf einer Seite habe ich eine Karte einfach stecken lassen, damit sich der Akku nicht wieder mit dem Kleber verbindet. Für den Vorgang war einige Kraft in den Fingern notwendig und viel Geduld.
Very good instructions. The job was quite easy and I did it in about an hour and a quarter. I used a new battery from ifixit, an Ifixit Essential Electronics Toolkit, and a hot-water bottle. The hot-water bottle was one with a flat side (no ridges) to maximise contact with the phone. I kept the phone on the hot-water bottle all the time, so that when I came to remove the battery the glue was already nice and warm, and the battery came out easily.
To remove the back of the phone I inserted the first pick about half way down the side, not in the top of the phone. The back of the phone is a bit more flexible along the side.
After I put the new battery in, I tested it before I fitted the cover. The speaker does not work until you fit the top inside cover.
If you test the phone before you connect the fingerprint reader, THEN connect the fingerprint reader, the fingerprint reader will not work until you restart the phone.
There are some useful comments under each stage of the instructions above.
This is the second time I have done this job (see above) and this time it took only about 40 minutes. Really good instructions. The only slight disappointment is that the replacement battery I bought from iFixit, and installed in July 2023, lasted less than a year, so I have replaced it this time with one from another supplier. We'll see how it goes. The Huawei Mate 10 Pro is still going strong, and I see no reason to change it.
Erm… Simply impossible to open the phone this way…
I used the iOpener for 2 mins as instructed, I’ve used even an hair drier for 30 secs on max power (could barely touch the phone after) and still with the suction tool I was not able to open the phone.
It simply doesn’t budge!!!
Miguel Oliveira - Ответить
This was much easier than I expected! ;-)
I put the phone on a hot-water bottle for about 5 minutes. I put the first pick in the side of the phone, not the top as shown in the next section. Then I kept the phone on the hot water bottle through all the following steps so that the battery glue was nice and warm when it came to that section.
Oliver Moffatt - Ответить