Перейти к основному содержанию
Присоединяйся к сообществу ремонтников - Создай аккаунт

IBM ThinkPad T41 Motherboard Replacement

Выберете то, что вам нужно

  1. IBM ThinkPad T41 Motherboard Replacement, Keyboard: шаг 1, изображение 1 из 1
    • Close the screen and turn the closed laptop over.

    • Remove all 17 screws on the bottom of the computer.

    • The multiple colors (turquoise, red, blue, orange, yellow, and purple) are for organizational purposes, indicating different screws.

    • The yellow marker at the rear denotes the UltraBay device retaining screw. This screw is optional as the UltraBay mechanism will hold the drive or battery in place anyway. The yellow marker at the front denotes the hard disk caddy retaining screw.

    Спросите у FixBot
  2. IBM ThinkPad T41 Motherboard Replacement: шаг 2, изображение 1 из 1
    • Remove the extra RAM cover, by lifting where the screw was and pulling out.

    Спросите у FixBot
  3. IBM ThinkPad T41 Motherboard Replacement: шаг 3, изображение 1 из 1
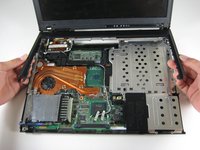
    • Turn the laptop right side up and open the screen.

    • Lift the keyboard, using a spudger at the seam between the keyboard and trackpad.

    • Careful of the ribbon cable underneath, which may tear if the keyboard is lifted too vigorously.

    Спросите у FixBot
  4. IBM ThinkPad T41 Motherboard Replacement: шаг 4, изображение 1 из 1
    • Unplug the keyboard’s ribbon cable, by lifting up the edges of the plug.

    • Remove the keyboard.

    Спросите у FixBot
  5. IBM ThinkPad T41 Motherboard Replacement, Trackpad: шаг 5, изображение 1 из 1
    • Close the laptop and turn it over.

    • Remove the five plastic stickers covering the screws on the front edge of the case.

    • In order to reuse the stickers, remove them carefully.

    Спросите у FixBot
  6. IBM ThinkPad T41 Motherboard Replacement: шаг 6, изображение 1 из 1
    • Unscrew the five screws that were hidden by the stickers.

    Спросите у FixBot
  7. IBM ThinkPad T41 Motherboard Replacement: шаг 7, изображение 1 из 1
    • Turn the computer right side up and open the screen.

    • Lift the trackpad assembly by placing hands on both edges and then pull towards you till it is free of the case.

    • Be careful of the ribbon cable underneath. It may tear if the trackpad is pulled too vigorously.

    Спросите у FixBot
  8. IBM ThinkPad T41 Motherboard Replacement: шаг 8, изображение 1 из 1
    • Unplug the trackpad’s ribbon cable by pulling on the white plastic tab.

    Спросите у FixBot
  9. IBM ThinkPad T41 Motherboard Replacement, RAM: шаг 9, изображение 1 из 1
    • Push apart the retaining clips on the RAM.

    • Note: The RAM should pop up a little bit.

    Спросите у FixBot
  10. IBM ThinkPad T41 Motherboard Replacement: шаг 10, изображение 1 из 1
    • Lift out the RAM chip.

    Спросите у FixBot
  11. IBM ThinkPad T41 Motherboard Replacement, Wireless Network Card: шаг 11, изображение 1 из 1
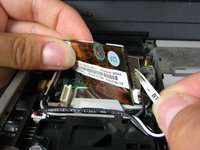
    • Pull off the one black and one white coaxial cables by lifting the tabs labeled main and aux (for auxiliary).

    Спросите у FixBot
  12. IBM ThinkPad T41 Motherboard Replacement: шаг 12, изображение 1 из 1
    • Push apart the retaining clips.

    • Note: The card should pop up a little bit.

    Спросите у FixBot
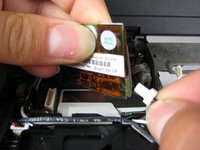
  13. IBM ThinkPad T41 Motherboard Replacement: шаг 13, изображение 1 из 1
    • Pull the wireless network card out.

    Спросите у FixBot
  14. IBM ThinkPad T41 Motherboard Replacement, CMOS Battery: шаг 14, изображение 1 из 1
    • Lift the yellow plastic-covered battery up.

    Спросите у FixBot
  15. IBM ThinkPad T41 Motherboard Replacement: шаг 15, изображение 1 из 1
    • Unplug the battery connector.

    Спросите у FixBot
  16. IBM ThinkPad T41 Motherboard Replacement, Speakers: шаг 16, изображение 1 из 1
    • Lift the speakers out by starting with the left end and then unsnake the wires.

    Спросите у FixBot
  17. IBM ThinkPad T41 Motherboard Replacement: шаг 17, изображение 1 из 1
    • Unplug the wires from the motherboard.

    Спросите у FixBot
  18. IBM ThinkPad T41 Motherboard Replacement, Expansion Slot: шаг 18, изображение 1 из 1
    • Remove the screw on the left hand side of the case, above the expansion slot.

    Спросите у FixBot
  19. IBM ThinkPad T41 Motherboard Replacement: шаг 19, изображение 1 из 2 IBM ThinkPad T41 Motherboard Replacement: шаг 19, изображение 2 из 2
    • Lift the black plastic border by lifting on either side.

    • Once the sides are up, pull the border towards you and away from the screen.

    • When lifting up, there are two pairs of plastic clips hooking into the fan grill. If you pull hard enough the border will come away, but it's better to push the clips with the spudger.

    Спросите у FixBot
  20. IBM ThinkPad T41 Motherboard Replacement: шаг 20, изображение 1 из 1
    • Pull the sheet metal cover away from slot.

    Спросите у FixBot
  21. IBM ThinkPad T41 Motherboard Replacement: шаг 21, изображение 1 из 1
    • Lift out the expansion slot by starting at the entrance hole and pulling upward.

    • Note: Try wiggling the slot from side to side until it comes out all the way.

    Спросите у FixBot
  22. IBM ThinkPad T41 Motherboard Replacement, Modem: шаг 22, изображение 1 из 1
    • Remove the three screws holding down the modem in the upper left corner of the laptop.

    Спросите у FixBot
  23. IBM ThinkPad T41 Motherboard Replacement: шаг 23, изображение 1 из 1
    • Lift the modem up, unplugging it from the motherboard as you lift.

    Спросите у FixBot
  24. IBM ThinkPad T41 Motherboard Replacement: шаг 24, изображение 1 из 2 IBM ThinkPad T41 Motherboard Replacement: шаг 24, изображение 2 из 2
    • Pull out the wire that connects the modem to the screen.

    • Unplug the other cable that attaches the modem to the motherboard

    Спросите у FixBot
  25. IBM ThinkPad T41 Motherboard Replacement, Screen: шаг 25, изображение 1 из 1
    • Close the computer screen.

    • Remove the four screws on the back of the laptop, near the right and left hinges.

    Спросите у FixBot
  26. IBM ThinkPad T41 Motherboard Replacement: шаг 26, изображение 1 из 1
    • Open the laptop screen.

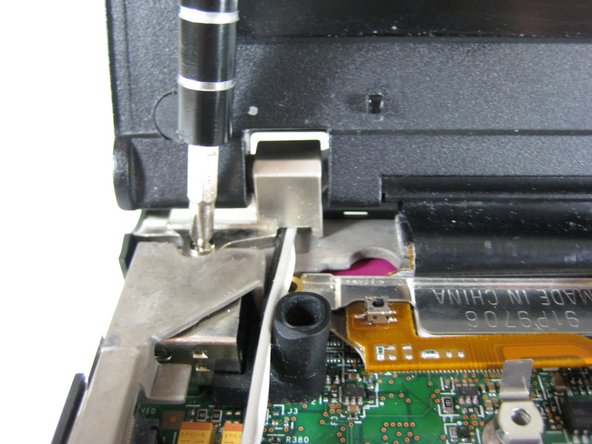
    • Remove the single screw that secures the left hinge to top of the computer.

    Спросите у FixBot
  27. IBM ThinkPad T41 Motherboard Replacement: шаг 27, изображение 1 из 1
    • Remove a single screw from the metal plate that secures the display cable.

    Спросите у FixBot
  28. IBM ThinkPad T41 Motherboard Replacement: шаг 28, изображение 1 из 1
    • Pull the metal plate away from the display cable.

    Спросите у FixBot
  29. IBM ThinkPad T41 Motherboard Replacement: шаг 29, изображение 1 из 1
    • Disconnect the display cable.

    Спросите у FixBot
  30. IBM ThinkPad T41 Motherboard Replacement: шаг 30, изображение 1 из 1
    • Carefully pull up the long antenna cables that were attached to the wireless network card.

    Спросите у FixBot
  31. IBM ThinkPad T41 Motherboard Replacement: шаг 31, изображение 1 из 1
    • Lift out the screen.

    Спросите у FixBot
  32. IBM ThinkPad T41 Motherboard Replacement, Fan: шаг 32, изображение 1 из 1
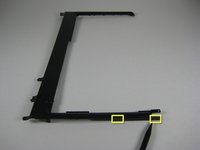
    • Unsnake the black cable from the black plastic frame.

    Спросите у FixBot
  33. IBM ThinkPad T41 Motherboard Replacement: шаг 33, изображение 1 из 1
    • Remove the sheet metal piece, which was underneath the modem.

    Спросите у FixBot
  34. IBM ThinkPad T41 Motherboard Replacement: шаг 34, изображение 1 из 1
    • Remove the rubber microphone cover in the upper left hand corner by lifting up the gray metal frame.

    Спросите у FixBot
  35. IBM ThinkPad T41 Motherboard Replacement: шаг 35, изображение 1 из 1
    • Lift away the gray metal frame.

    Спросите у FixBot
  36. IBM ThinkPad T41 Motherboard Replacement: шаг 36, изображение 1 из 1
    • Remove three screws near the edge of the computer, holding the optical bay and HDD covers.

    • Remove three other screws on the other side of the covers.

    • You should have six screws in total, three of one size and three of another size.

    Спросите у FixBot
  37. IBM ThinkPad T41 Motherboard Replacement: шаг 37, изображение 1 из 1
    • Lift out the optical bay and HDD covers.

    Спросите у FixBot
  38. IBM ThinkPad T41 Motherboard Replacement: шаг 38, изображение 1 из 1
    • Lift out the black plastic frame.

    Спросите у FixBot
  39. IBM ThinkPad T41 Motherboard Replacement: шаг 39, изображение 1 из 1
    • Unplug the fan from the motherboard.

    Спросите у FixBot
  40. IBM ThinkPad T41 Motherboard Replacement: шаг 40, изображение 1 из 1
    • Remove the three screws on the fan.

    Спросите у FixBot
  41. IBM ThinkPad T41 Motherboard Replacement: шаг 41, изображение 1 из 1
    • Lift the fan out.

    Спросите у FixBot
  42. IBM ThinkPad T41 Motherboard Replacement, CPU: шаг 42, изображение 1 из 1
    • Turn the CPU retaining screw 90 degrees counterclockwise.

    • Carefully pull the CPU out of its socket.

    Спросите у FixBot
  43. IBM ThinkPad T41 Motherboard Replacement, Motherboard: шаг 43, изображение 1 из 1
    • Remove the two screws in the upper right corner that secure the gray metal frame.

    Спросите у FixBot
  44. IBM ThinkPad T41 Motherboard Replacement: шаг 44, изображение 1 из 1
    • Unplug the small ribbon cable attached to the motherboard.

    Спросите у FixBot
  45. IBM ThinkPad T41 Motherboard Replacement: шаг 45, изображение 1 из 1
    • Remove the single screw located next to the USB slots.

    Спросите у FixBot
  46. IBM ThinkPad T41 Motherboard Replacement: шаг 46, изображение 1 из 1
    • Rotate the device so that the front faces you.

    • Lift the entire motherboard assembly out of the case.

    Спросите у FixBot
  47. IBM ThinkPad T41 Motherboard Replacement: шаг 47, изображение 1 из 1
    • Disconnect the power connector from the motherboard.

    Спросите у FixBot
  48. IBM ThinkPad T41 Motherboard Replacement: шаг 48, изображение 1 из 1
    • Using a nut driver or a pair of thin nose pliers, remove the two stand off screws next to the pink parallel port on the back of the computer.

    Спросите у FixBot
  49. IBM ThinkPad T41 Motherboard Replacement: шаг 49, изображение 1 из 1
    • Lift up the outer end of the grey metal frame.

    • Carefully rotate the frame clockwise to release it from the motherboard.

    Спросите у FixBot
Заключение

To reassemble your device, follow these instructions in reverse order.

20 человек успешно провели ремонт по этому руководству.

Marissa Blustein

Участник с: 04/16/10

543 Репутация

Автор 12 руководств

Команда

Cal Poly, Team 7-8, Maness Spring 2010 Участник Cal Poly, Team 7-8, Maness Spring 2010

CPSU-MANESS-S10S7G8

4 членов

Автор 29 руководств

6 Комментарии к руководству

Hello,

Thanks for this !

When assembling again, I noticed that at the contact between the micro-processor and the cooler the thermal paste there was a very small amount of thermal paste.

I had none to add, therefore I reassembled as is.

After starting the machine again I note that the cooling fan never stops.

I suggest that at reassembling should thermal paste added.

Philippe - Ответить Поделиться

ibm thinkpad t42 laptop driver are not download please sir my laptop motherboard information send in my email id . how can download driver download for ibm laptop

Himanshu Kumar - Ответить Поделиться

Excellent tutorial. Thank you.

genese_cranford - Ответить Поделиться

thanks alot!

Geburtswehe - Ответить Поделиться

It’s tempting to try, but I’d feel much braver with a reassembly tutorial!

Christine Segatti - Ответить Поделиться

Добавить комментарий

Статистика просмотров:

За последние 24 часов: 4

За последние 7 дней: 16

За последние 30 дней: 115

За всё время: 51,101