Введение
Removal/repair of the display
Выберете то, что вам нужно
-
-
Use a Phillips #0 screwdriver to remove the twenty screws on the underside of the T42.
 Спросите у FixBot
-
-
-
Remove the four Phillips screws located on either side of the rear of the T42 (there are two on each end.)
-
-
-
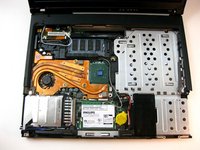
Flip the laptop over and open the screen to access the keyboard and trackpad.
-
-
-
-
Carefully maneuver the palm rest away from the keyboard, as both the keyboard and palm rest/trackpad will come off together.
-
-
-
Remove the plastic bezel along the edges, you may need to pry the areas circled with a spudger to remove the bezel.
-
-
-
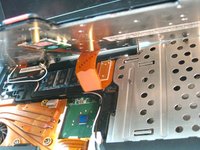
Carefully unplug the display ribbon on the motherboard, then carefully lift the display free from the device.
-


To reassemble your device, follow these instructions in reverse order.
Отменить: Я не выполнил это руководство.
6 человек успешно провели ремонт по этому руководству.

Команда

Cal Poly, Team 29-76, Johann Spring 2010 Участник Cal Poly, Team 29-76, Johann Spring 2010
CPSU-JOHANN-S10S29G76
4 членов
Автор 37 руководств
2 Комментарии к руководству
@Seth
Just use the pic numbering left to right each of the 4 rows.
Start at the top and remove in sequence, placing each on a strip of heavy tape to keep the screws in sequence.
Place a second strip on top when finished to secure the sequence until it's time to re-assemble.
Very poor & sketchy guide! NO mention at all of how to handle the other wires involved in disconnecting the screen (lid) from the laptop base, eg: the wireless antenna connections and instructions like: "Unscrew the screws holding it down" are far too vague! holding WHAT down ffs!!!!