Перейти к основному содержанию
Присоединяйся к сообществу ремонтников - Создай аккаунт

Jazz HDV178 Camcorder Operating Buttons Replacement

Выберете то, что вам нужно

  1. Jazz HDV178 Camcorder Operating Buttons Replacement, Back Cover: шаг 1, изображение 1 из 1
    • On the back of the camcorder, the side opposite of the flip-out screen, there is a section of grooved plastic with a small arrow.

    • Press down on the grooved plastic with your thumbs.

    • Push the back cover in the direction indicated by the small arrow on the grooved plastic. The back cover should slide right off.

    Спросите у FixBot
  2. Jazz HDV178 Camcorder Operating Buttons Replacement, Battery: шаг 2, изображение 1 из 1
    • Once you have the back cover off, the camcorder should look like this.

    • Look on the battery for a model number to assure that you acquire the correct replacement part.

    • The camcorder model number is located in the red box. Verify that you have a Jazz HDV178.

    Спросите у FixBot
  3. Jazz HDV178 Camcorder Operating Buttons Replacement: шаг 3, изображение 1 из 1
    • Take the battery out by pulling up on the bottom of the battery. You should be pulling from the side of the camera where the wrist strap is attached.

    Спросите у FixBot
  4. Jazz HDV178 Camcorder Operating Buttons Replacement, Housing: шаг 4, изображение 1 из 1
    • Remove the camera mount by unscrewing the 4.5 mm screw in the hole.

    • This is the bottom of the camcorder near where the wrist strap connects.

    Спросите у FixBot
  5. Jazz HDV178 Camcorder Operating Buttons Replacement: шаг 5, изображение 1 из 1
    • Remove the 4.5 mm screw located near the battery slot.

    Спросите у FixBot
  6. Jazz HDV178 Camcorder Operating Buttons Replacement: шаг 6, изображение 1 из 1
    • Break the glue that attaches the lens cover to the camcorder by sliding the plastic prying tool beneath the circumference of the part.

    • After the glue is broken, remove the lens cover.

    Спросите у FixBot
  7. Jazz HDV178 Camcorder Operating Buttons Replacement: шаг 7, изображение 1 из 1
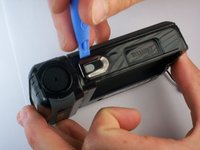
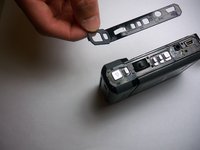
    • Use a small plastic pry tool to gently pry off the silver strip on the top of the camera.

    • Make sure to run the tool under the outline of the strip as you pry it off so the plastic does not snap.

    Спросите у FixBot
  8. Jazz HDV178 Camcorder Operating Buttons Replacement: шаг 8, изображение 1 из 3 Jazz HDV178 Camcorder Operating Buttons Replacement: шаг 8, изображение 2 из 3 Jazz HDV178 Camcorder Operating Buttons Replacement: шаг 8, изображение 3 из 3
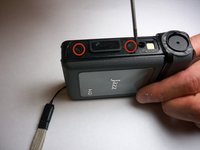
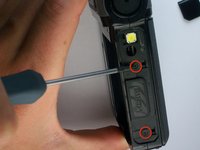
    • Locate the side of the camcorder beneath the lens and on the opposite side of the wrist strap.

    • Remove the silver strip using the same process as the previous step.

    • Remove the two 4 mm screws that were hidden under the cover.

    Спросите у FixBot
  9. Jazz HDV178 Camcorder Operating Buttons Replacement: шаг 9, изображение 1 из 3 Jazz HDV178 Camcorder Operating Buttons Replacement: шаг 9, изображение 2 из 3 Jazz HDV178 Camcorder Operating Buttons Replacement: шаг 9, изображение 3 из 3
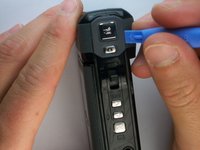
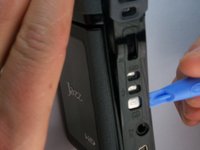
    • Pry off the rubbery cap, which covers the buttons. Use the same process as the previous two steps.

    • Slide your prying tool underneath the entire cover to ensure that the glue breaks cleanly and the cover does not snap.

    Спросите у FixBot
  10. Jazz HDV178 Camcorder Operating Buttons Replacement: шаг 10, изображение 1 из 1
    • Remove the three combined buttons so they are not misplaced.

    Спросите у FixBot
  11. Jazz HDV178 Camcorder Operating Buttons Replacement: шаг 11, изображение 1 из 2 Jazz HDV178 Camcorder Operating Buttons Replacement: шаг 11, изображение 2 из 2
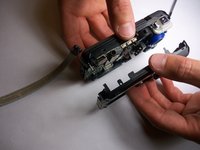
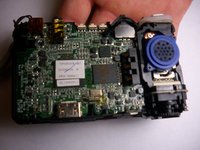
    • Using a firm hold on both sides of the camcorder, gently pull apart the two halves. Pressure should be evenly distributed across the entire device.

    • If the camcorder does not come apart easily, double check that all of the screws are removed. Return to the previous steps for screw removal if you find a screw that is still attached.

    Спросите у FixBot
  12. Jazz HDV178 Camcorder Operating Buttons Replacement, Operating Buttons: шаг 12, изображение 1 из 1
    Инструмент, используемый на этом этапе:
    Tweezers
    $4.99
    • Use tweezers to remove the rubber button assembly.

    • Blow on the sensors underneath to remove any dust on the sensors.

    • You can also dab a little rubbing alcohol on the sensor pad with a Q-tip and let it dry.

    Спросите у FixBot
Заключение

To reassemble your device, follow these instructions in reverse order.

2 человек успешно провели ремонт по этому руководству.

Jake Devincenzi

Участник с: 01/28/11

170 Репутация

1 руководство автора

Команда

James Madison University, Team 1-1, Allen Fall 2012 Участник James Madison University, Team 1-1, Allen Fall 2012

JMU-ALLEN-F12S1G1

3 членов

Автор 1 руководств

0 Комментарии к руководству

Добавить комментарий

Статистика просмотров:

За последние 24 часов: 0

За последние 7 дней: 12

За последние 30 дней: 56

За всё время: 2,945