Введение
Use this guide for replacing the keyboard on a Kindle 3. The guide shows how to disassemble the device to replace the damaged keyboard.
Выберете то, что вам нужно
-
-
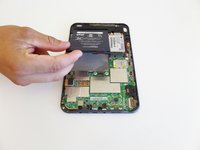
Turn the device upside-down and insert a pry tool between the two case pieces.
-
Work the pry tool around the edge of the case, releasing the 18 clips. Don't insert your tool too far, or you may damage components near the edges of the device. The clips are all in the outer edge of the backplate anyway. Note that the clip above the power switch is bigger and stronger than the rest.
-
Pull the rear cover off. The remaining two clips near the center of the back are surprisingly strong, but they face in the same direction so don't just pull up. Instead slide the cover slightly towards the top of device to release them.
-
-
-
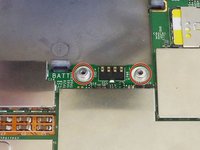
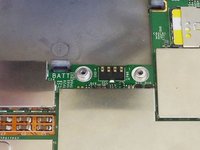
Unscrew the two silver 4 mm Phillips screws securing the battery connector.
-
Set the screws aside in a safe place -- there are exposed components and it's easy for them to short-circuit something.
-
-
-
Lift battery out of housing starting at the end that was secured by the screws.
-
Watch out for the odd-shaped silver washers beneath the battery connector (see second photo); they are necessary for proper mating of the electrical contacts when the screws are re-tightened.
-
-
-
-
Remove six silver Phillips screws from the locations shown.
-
-
-
Pry the display connector straight up from its socket on the motherboard to disconnect it.
-
-
-
Lifting from the top edge, slide the entire motherboard and midframe assembly together away from the bottom edge of the Kindle, and remove it carefully.
-


To reassemble your device, follow these instructions in reverse order.
Отменить: Я не выполнил это руководство.
9 человек успешно провели ремонт по этому руководству.
Команда

CSU Fullerton, Team 1-5, Bruce Fall 2014 Участник CSU Fullerton, Team 1-5, Bruce Fall 2014
CSUF-BRUCE-F14S1G5
4 членов
Автор 16 руководств
4 Комментарии к руководству
It works, but seriously overdoes the dismantling required . I just did this on a wifi 3g version (serial number started with B00A) and it took less than 30 minutes.
Steps 2,3 and 4 .You don't need to remove the silver screws holding the battery, the 3g unit or the inner ones on the black bit at lower right. None of them hold the board to the case, but ALL the grey screws do.
Step 5 You only need to undo the ribbon cable to the screen (marked orange) - the others don't need disturbing and are hard to put back correctly.
Steps 6 & 7 - Skip these.
Step 8 - the whole board lifts out - start at the top and be gentle - in case you've missed a screw or two.
Rebuilding - best to test before putting all the screws back, and refit the back starting at the switch end rather than the top or sides.
Thanks for the guide. Used to strip down a device saturated with suntan lotion. Per Dave’s comments I skipped detaching the extra ribbon connectors, but needed to take out most of the silver screws to get the main boards apart. I also wanted to detach the battery before wading in with contact cleaner and baby buds. Now back working a treat. Daniel
This guide no longer includes any extra/unnecessary steps—the above comments refer to an old version of the guide.
Where is the firmware chip located? I want to access to load an older version of the firmware that can be jailbroken.