Введение
Amazon’s Kindle Paperwhite 3rd Generation possesses a GS957661, 3G motherboard. This guide requires that the Kindle is turned off, and that a plastic opening tool, angled precision tweezers, and a PH000 screwdriver are used.
Выберете то, что вам нужно
-
-
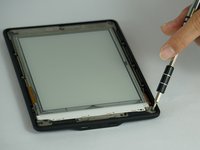
Gently pry the bezel off the screen using a plastic opening tool. Start at the corners and slide around the edges until you return to your starting point.
 Спросите у FixBot
-
-
-
Use extreme caution when prying up the bezel. Be careful not to allow your pry tool to fall underneath the display. Look under the cover as you work, separating the display from the adhesive of the bezel.
-
You want to make sure your separator goes through both sides of the bezel over top of the display.
-
The second photo is the layer you want your tool to pass through safely.
-
The third photo is an example of what can go wrong. If this happens your digitizer layer will misread touches and the display is permanently damaged.
-
-
-
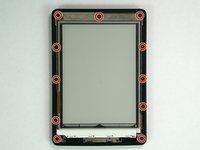
Unscrew the eleven 3.2 mm Phillips #000 screws surrounding the frame.
-
-
-
-
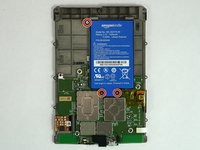
Unscrew the three 3.0 mm Phillips #000 screws that are securing the battery.
-
-
-
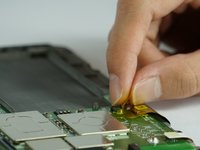
Flip the black latch with a plastic opening tool, and then gently pull back the orange ribbon cable.
-
-
Инструмент, используемый на этом этапе:Tweezers$4.99
-
Flip the tiny off-white latch with angled precision tweezers toward the direction of the battery.
-
Gently peel back the orange ribbon cable.
-
-
-
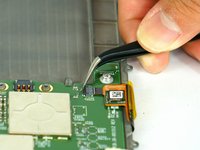
Peel back the orange ribbon cable near the battery.
-
Flip the tiny black latch with angled precision tweezers toward the closest edge of the device.
-
-
-
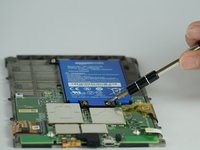
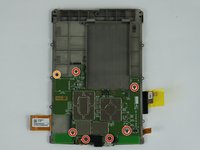
Unscrew the six 3.0 mm Phillips #000 screws surrounding the motherboard.
-
Unscrew the one 2.5 mm Phillips #000 screw.
-
-
-
Use a plastic opening tool to lift the motherboard upwards from the frame.
-


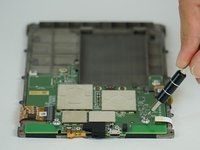

To reassemble your device, follow these instructions in reverse order.
Отменить: Я не выполнил это руководство.
13 человек успешно провели ремонт по этому руководству.

Команда

USF Tampa, Team 14-3, Lacy Spring 2016 Участник USF Tampa, Team 14-3, Lacy Spring 2016
USFT-LACY-S16S14G3
4 членов
Автор 14 руководств
6 Комментарии к руководству
how do I fix my loose charging port?
how do i fix my loose charging port connection
Where can I buy a kindle paper white, new mother board?
Tip, heat the front bezel to soften the glue.
I totally know how to fix my kindle but I don’t know where to get the part. I broke the tip to the ribbon cable for the only %#*@ button on the device. do they sell those here?