Перейти к основному содержанию
Присоединяйся к сообществу ремонтников - Создай аккаунт

Kurio 7 Motherboard Removal Guide

Выберете то, что вам нужно

  1. Kurio 7 Motherboard Removal Guide, Back Panel: шаг 1, изображение 1 из 3 Kurio 7 Motherboard Removal Guide, Back Panel: шаг 1, изображение 2 из 3 Kurio 7 Motherboard Removal Guide, Back Panel: шаг 1, изображение 3 из 3
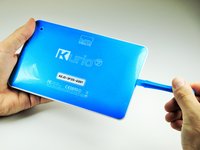
    • Begin by removing the rubber cover from the Kurio 7.

    Спросите у FixBot

    Добавить комментарий

  2. Kurio 7 Motherboard Removal Guide: шаг 2, изображение 1 из 2 Kurio 7 Motherboard Removal Guide: шаг 2, изображение 2 из 2
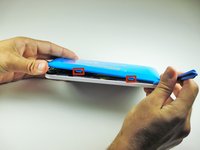
    • Remove the four 30 mm Phillips #00 screws from the outer case.

    Спросите у FixBot

    Добавить комментарий

  3. Kurio 7 Motherboard Removal Guide: шаг 3, изображение 1 из 2 Kurio 7 Motherboard Removal Guide: шаг 3, изображение 2 из 2
    • Insert the plastic opening tool in the gap between the front cover and the back cover of the device.

    • Slide the plastic opening tool around the edge of the device. Gently pry apart the tabs that hold the front cover and the back cover together.

    • Be careful not to break off the tabs that hold the front cover and the back cover together.

    Спросите у FixBot

    Добавить комментарий

  4. Kurio 7 Motherboard Removal Guide: шаг 4, изображение 1 из 2 Kurio 7 Motherboard Removal Guide: шаг 4, изображение 2 из 2
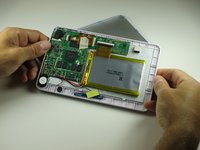
    • Once all of the tabs are removed, the back cover should come off easily.

    • Gently remove the back cover. There are wires inside that may get caught on the cover while removing it. These wires are soldered to their components and are difficult to reattach.

    Спросите у FixBot

    Добавить комментарий

  5. Kurio 7 Motherboard Removal Guide, Kurio 7 Motherboard Removal Guide: шаг 5, изображение 1 из 2 Kurio 7 Motherboard Removal Guide, Kurio 7 Motherboard Removal Guide: шаг 5, изображение 2 из 2
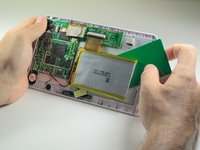
    • Use a plastic credit card, or other thin object, to separate the battery from the screen.

    • Be sure to work the card carefully and slowly around in order to not damage, break, or deform the battery.

    • Carefully set the battery aside.

    Спросите у FixBot

    Добавить комментарий

  6. Kurio 7 Motherboard Removal Guide: шаг 6, изображение 1 из 2 Kurio 7 Motherboard Removal Guide: шаг 6, изображение 2 из 2
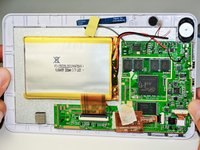
    • Use a Phillips #00 screwdriver to remove the eight 40mm screws holding the motherboard in place.

    Спросите у FixBot

    Добавить комментарий

  7. Kurio 7 Motherboard Removal Guide: шаг 7, изображение 1 из 3 Kurio 7 Motherboard Removal Guide: шаг 7, изображение 2 из 3 Kurio 7 Motherboard Removal Guide: шаг 7, изображение 3 из 3
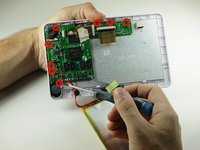
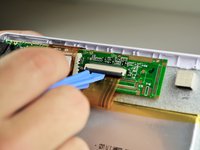
    • Place the plastic opening tool on the base of the black ribbon clip and pull up, like a lever, to release the mount. This should release the clip holding the ribbon to the mount.

    • Pull the ribbon out of the mount.

    Спросите у FixBot

    Добавить комментарий

  8. Kurio 7 Motherboard Removal Guide: шаг 8, изображение 1 из 1
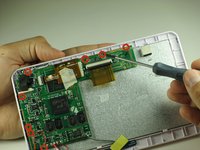
    • There should be masking tape on the yellow ribbon. Pull the tape off of the motherboard and wrap it around the yellow ribbon.

    • Do not pull the tape completely off the motherboard, as it is used to protect components on the ribbon.

    • To remove the ribbon from the mount, follow the same steps in Step 3.

    Спросите у FixBot

    Добавить комментарий

  9. Kurio 7 Motherboard Removal Guide: шаг 9, изображение 1 из 1
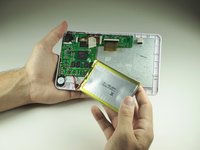
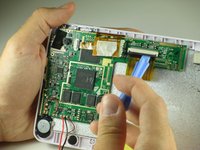
    • Pull back the ribbons and put the battery near the bottom of the Kurio.

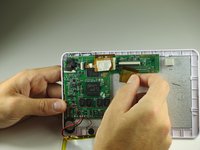
    • The motherboard is now removed so that other components can be worked on.

    Спросите у FixBot

    Добавить комментарий

Заключение

To reassemble your device, follow these instructions in reverse order.

Отменить: Я не выполнил это руководство.

5 человек успешно провели ремонт по этому руководству.

Eric Rice

Участник с: 04/14/14

913 Репутация

Автор 3 руководств

Команда

Cal Poly, Team 12-36, Maness Spring 2014 Участник Cal Poly, Team 12-36, Maness Spring 2014

CPSU-MANESS-S14S12G36

4 членов

Автор 14 руководств

0 Комментарии к руководству

Добавить комментарий

Статистика просмотров:

За последние 24 часов: 2

За последние 7 дней: 8

За последние 30 дней: 36

За всё время: 3,815